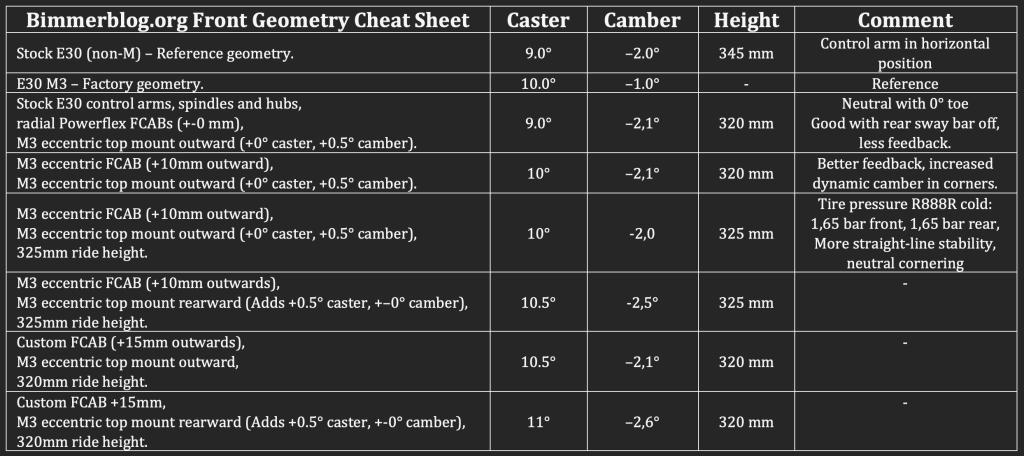
Here’s quick Cheat Sheet to E30 front geometry. The table below presents a comparison of various E30 front suspension setups, normalized to a baseline where the control arm is horizontally aligned. This allows for accurate comparison of caster, camber, and wheel position. The baseline setup uses E30 control arms, stock spindles, and hubs.
Caveat 1:
Lowering your E30 too much affects negatively on roll center (more body roll), dynamic camber development (less grip on corners) and bump steering (toe changes on bumps).
Caveat 2:
Any lower control arm and/or spindle change that moves the front tire rearward, negatively affects on the suspension geometry parameters.
The height is measured from the wheel hub to the fender. 345mm is the height when control arm is horizontally aligned. Go lower, and geometry corrections are needed. Due to huge amount of build variations, take these numbers with a grain of salt
Base Setup in the table:
– Control Arms: Stock E30 non-M, – Steering Rack: E36 with modified subframe brackets, – Front Control Arm Bushings (FCAB): E30 M3 Evo-style eccentric, – Top Mounts: E30 M3 eccentric, – Stock E30 spindles and wheel hubs.
The easiest way to maintain good handling..
A) Don’t lower your E30 too much — avoid letting the control arm point upwards,
B) stick with the stock E30 lower control arms (LCAs), spindles and hubs,
C) Maybe it’s not the front end? Try disconnecting the rear sway bar (!).
Changing the Front Control Arm Bushings (FCAB)
I changed Powerflex centric bushings to M3 Evo eccentric ones. There’s notable difference when increasing caster from 9 deg to 10: more straight-line stability, better feedback, and increased dynamic camber in corners. The change from Powerflex bushings to M3 evo eccentrics is highly recommended. Powerflex are hand tight to lower contol arms (LCA), whereas Evo bushings needed a custom tool.
Bushings 101
BMW engineers knew what they did when designing M3 evo FCABs,
Think twice before installing billet FCABs and top mounts on the street – both cause excessive NVA (Noise, Vibration, and Harshness) and stress to the chassis,
Stick with Powerflex and/or M3 evo FCABs on the street.
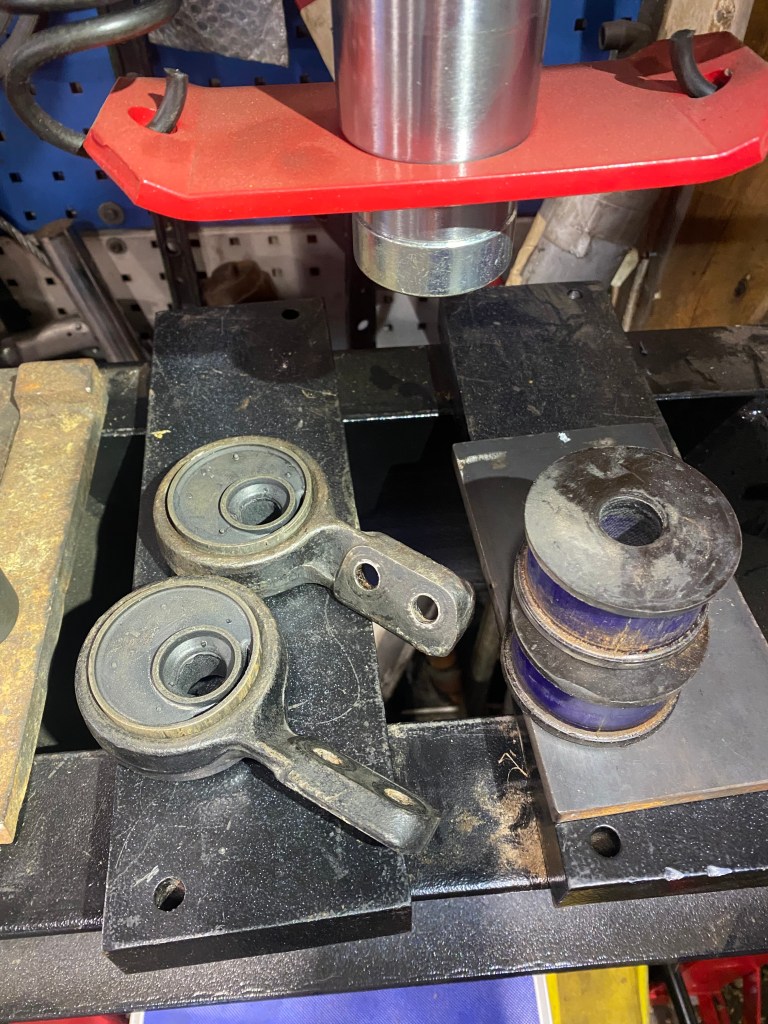
Hydraulic press is needed to swap bushingsToe angle must be set to zero after changing eccentric Front Control Arm Bushings (FCAB). Zeroing the toe can be done with a string line. The Precise adjustment is more to do with carefulness while tightening the locking nut than having expensive equipments. Custom fabricated tool was needed to insert M3 Evo eccentric FCABs.
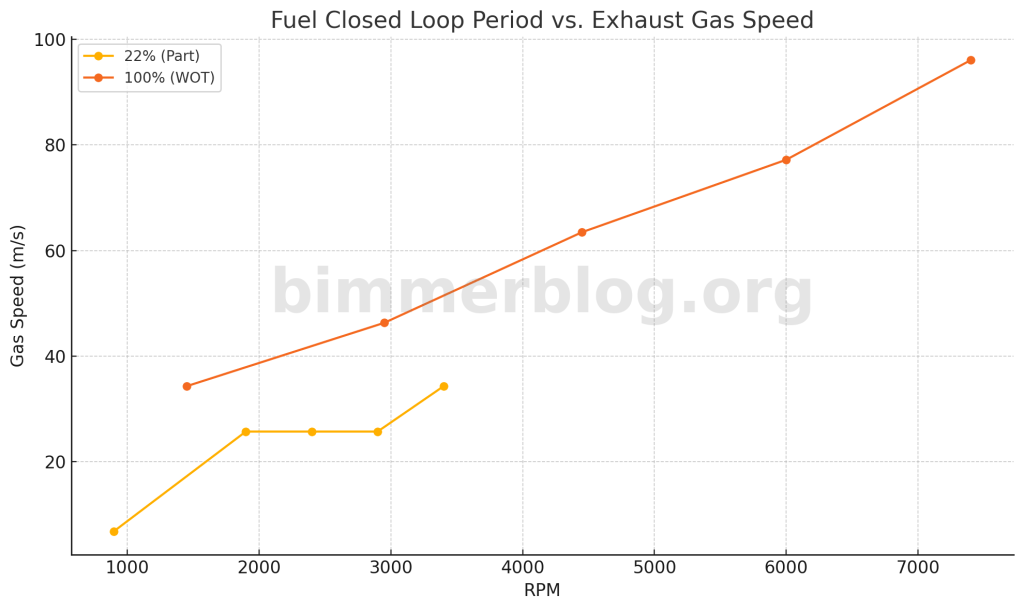
Approximated, average exhaust gas speed on M60B44 engine
Setting up closed loop for the first time? Or Changing lambda sensor to a new location? Proper delay must be introduced for correct closed loop operation.
The dual lambda setup:
4.9 LSU Lambda sensor per bank located after cylinder bank collector,
Sensors are free air calibrated,
Connected to LTCD controller,
Lambda heating turns on at 240 seconds in order to prevent sensor breaking from moisture.
The single lambda setup:
NTK Lambda sensor located at X-pipe collector,
1600mm distance from cylinder heads,
Sensor free air calibrated,
Connected to LTCD NTK controller.
The methodology:
The baseline for exhaust gas speed was simulated both WOT and 22% of throttle opening,
Approximated average gas speeds,
Delay was was calculated based on the sensor location (1600mm),
Less aggressive Trim Gain (80% -> 37%) was introduced on idle region to prevent oversampling and oscillation,
More frequent sampling rate was applied to compensate for less aggressive Trim Gain,
Decreased max. negative trim value (-5%) to protect engine from faulty sensor(s),
Test drive and post analysis with 200hz sampling rate for Lambda sensor was applied.
The chart below is further optimized Fuel Closed Loop Period for full rev range. Since gas velocity is very low at idle due to aggressive cam setup, Closed Loop can be turned on e.g. at 1300rpm. This eliminates the need for increased delay on idle, and can smoothen transition from idle to cruising, and vice versa. Since 4.9 lambda sensors are prone to break in non-cat engines, delayed heater activation is used. No oscillation observed with the following delays.
Note: The new setup will be utilizing three lambda sensors: one per bank, and third one in the x-pipe collector to measure sum. This is to prevent accidental 4.9 lambda sensor malfunctioning, where sensor can show too rich mixture before breaking for good.
Fuel Closed Loop Period (ms) for full rev range on M60B44.
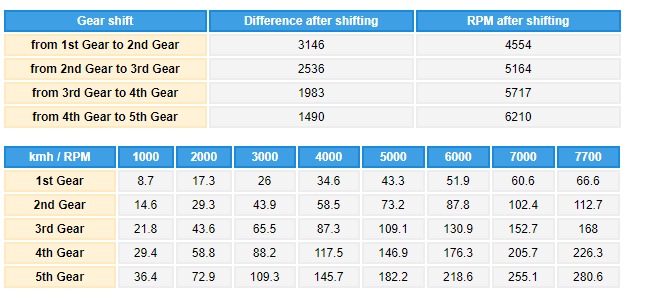
Have you ever wondered the effect of differential gear ratio to real-world performance? How about transmission gear ratios? Read on!
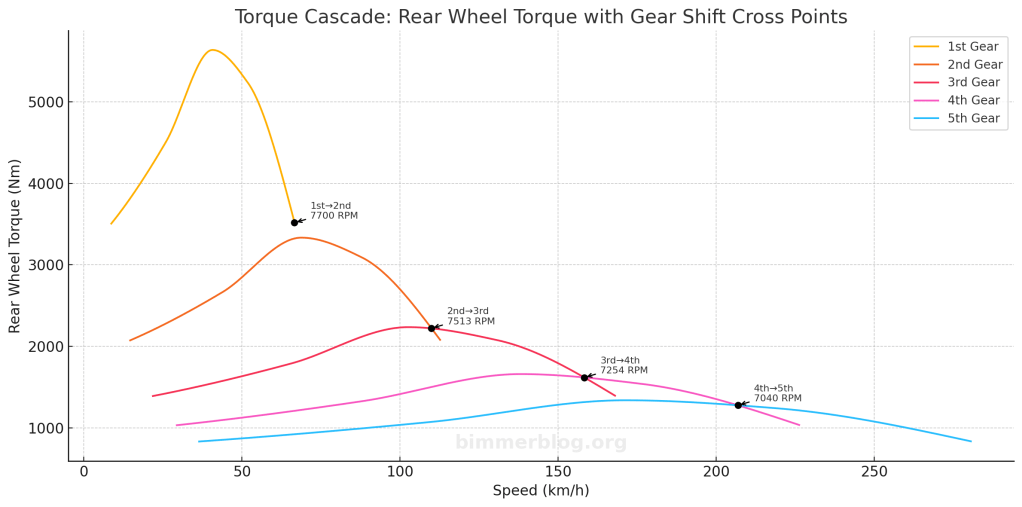
Your engine is torque generator, while transmission is torque multiplier. This chart is illustrating optimal shifting points for maximal acceleration on high performance engine with manual transmission.
The chart above is illustrating how much actual torque rear wheel is transferring to ground. When you upshift, the amount of torque decreases in relation to transmission gear ratio. The best acceleration is achieved by maximzing the area under the torque cascade.
The formula for rear wheel torque is:
Engine torque * Transmission gear ratio * Diff gear ratio * Powertrain loss = Torque on the rear wheel
As you can see from the formula, there is four options to optimize your vehicle’s rear wheel torque. Too often only max hp numbers are being taken into account. Best engines can tackle this challenge by providing wide torque and power band. This approach increases usable rev range. The next challenge is to match your engine’s power band with transmission, and diff ratio. This is where torque cascade, the chart above, becomes handy. In modern cars, most factories tackle this issue by having 7-9 speed transmissions. This is also the reason why so many car enthusiasts are interested in 8HP transmission swaps. However, putting a cheap manual transmission from a diesel car is not really an option. As you can see from the cascade chart, an engine with wide power band needs longer first gear, not shorter. Subjectivity is big factor here (manual, auto, DKG), so choose your path wisely.
A good design is sum of great engineering choices resulting a satisfactory compromise.
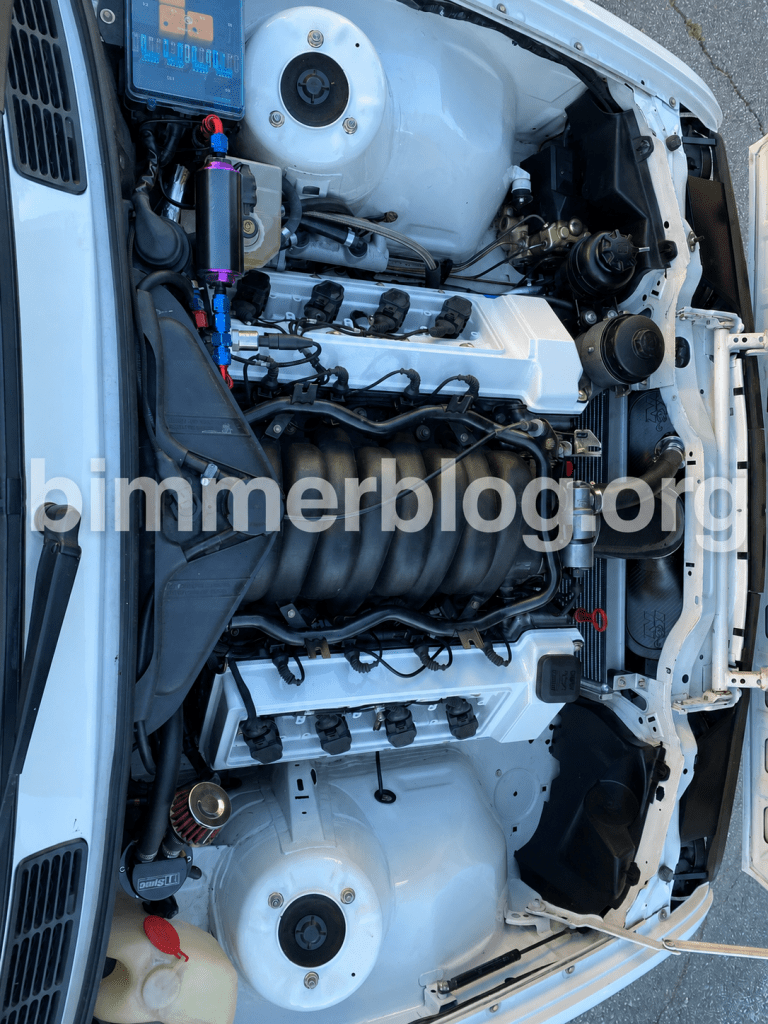
A text book like power curve on 120 hp per litre M60B44 frankenmotor.
The goal has been to design street drivable, 120hp per litre M60 engine with smooth power delivery, and reasonably good idle characteristics. Is it possible without Vanos? Please read on!
A) Bimmerblog.org designed, secret sauce camshafts,
These camshafts:
provide better idle and part throttle drivability than aftermarket cams,
are exceptionally good at reducing parasitic losses,
are suitable for up to 120hp per litre configuration,
No rollercoaster in power curve,
No risk of knocking in high compression engine.
B) Bimmerblog.org designed, individual throttle bodies (ITBs) with bellmouths:
Tapered intake runners,
55mm butterflies,
Effective runner length is 216mm,
Effective runner diameter is 53,4mm,
Relatively easy to DIY from aftermarket or OEM parts.
Delivery ratio peaks at 8000rpm with 216mm long runners and effective intake diameter of 53,4mm.
Other remarks:
The low end torque was not a design parameter: only the smoothness of power curve,
41mm header primaries can be deemed undersized by many,
Collectors are seen restrictive in layman’s terms, yet the negative supercharging is substantially high at 8000rpm,
ITBs and aggressive idle ignition control by Motec further improves idle quality,
Amount of scavenging for the engine has been found by trial and error, and;
This works across different cams,
Engine lifespan will be severely reduced with mean piston speed of 26,2 m/s @9500rpm,
Short stroke crankshaft is highly recommended for the application.
Bottom line:
Yes, 120hp per litre, naturally aspirated M6x engine is doable on the street. Cams, cylinder heads, headers and intake manifold have to be carefully matched together.
More information about performance upgrades can be found on my other articles:
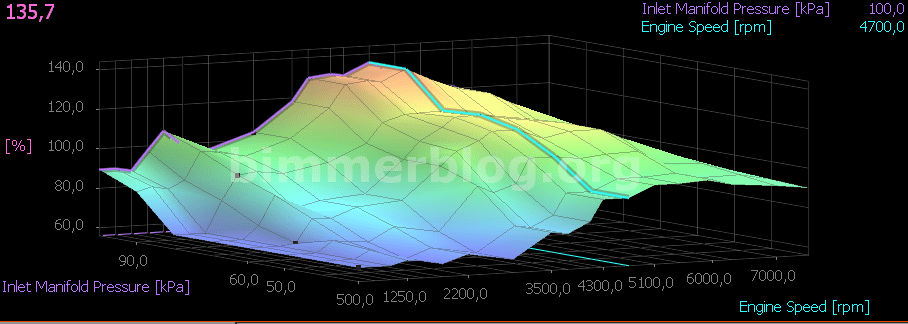
The jaw-dropping Volumetric Efficiency (VE) of 135,7% in naturally aspirated M60B44 engine.
For starters – Internal Combustion (IC) engine is an air pump
Naturally aspirated engine tuning is plain simple: (yet so ever challenging!)
A) Think your engine as an air pump,
B) Air is always moving from higher pressure to lower.
In order to increase the amount of air your naturally aspirated engine can transfer, you can:
1) Increase the size of an air pump (cc, cid),
2) Increase the effective speed of an air pump (rpm),
3) Optimize the gasdynamics for desired rpm band, such as matching cams and pressure waves with both intake and exhaust systems for optimal volumetric efficiency and scavenging effect,
4) Increase the intake air density with cooler air temperature,
5) Reduce pressure losses in the intake air path to minimum.
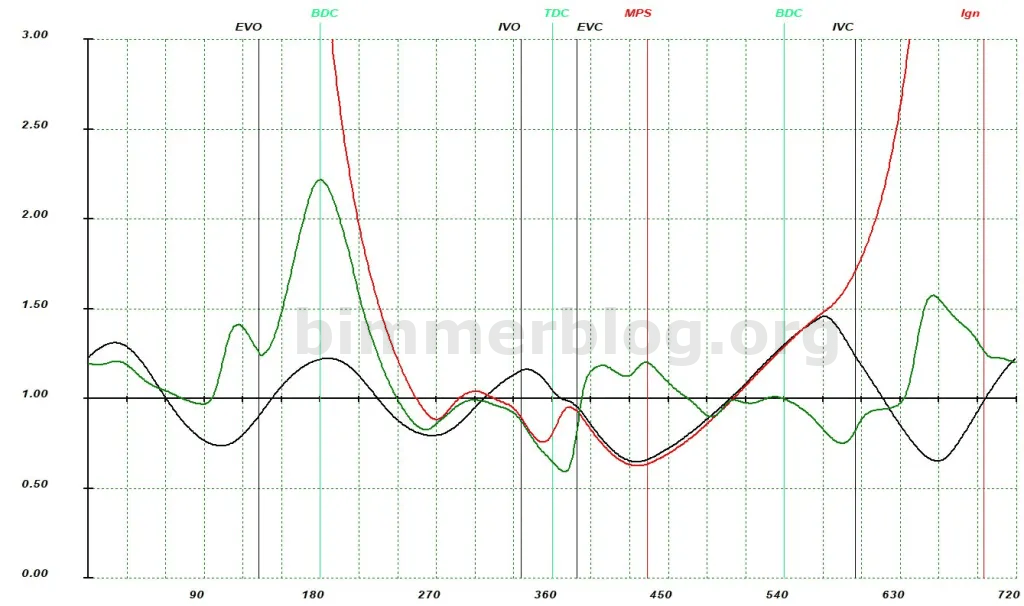
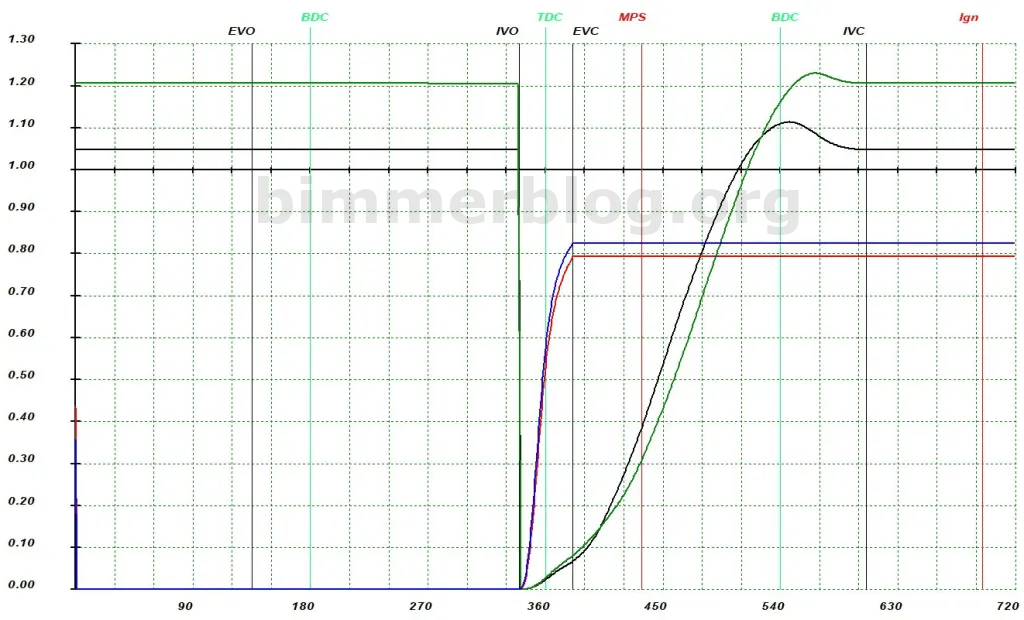
Hot street M60B44 at 4700rpm. Black line is intake pressure ratio at the intake valve. Green is pressure trace at the exhaust valve. Note the pressure differential during overlap. Red is cylinder pressure.
The Foundation of Naturally Aspirated engine: Displacement
Actually this applies for forced induction engines too. The very base foundation for HP/Torque capability is the engine displacement. Even in turbocharged applications, there is no replacement for displacement. More is better, until you hit the maximum tolerated piston speed.
Bore and stroke:
S65B40 engine with 4,0 litres has 92 mm x 75.2 mm (Bore x Stroke),
M60B40 engine with 4,0 litres has 89 mm x 80 mm (Bore x Stroke),
M62B44 engine with 4,4 litres has 92mm x 82,7mm (Bore x Stroke),
S62B50 engine with 5,0 litres has 94 mm x 89 mm (Bore x Stroke).
For comparison, Ferrari 458 engine with 4,5 litres has 94mm x 81mm (Bore x Stroke),
Rod to stroke ratios:
S65B40: 140,7mm : 75,2mm = 1,87
M60B40: 143mm : 80mm = 1,79
M62B44: 143mm : 82,7mm = 1,73
S62B50: 141,5mm : 89mm = 1,59
Mean piston speeds:
S65B40: 21 m/s @8400rpm
M60B40: 21 m/s @7850rpm
M62B44: 21 m/s @7600rpm
S62B50: 21 m/s @7000rpm
RULE 1: In naturally aspirated engine, an engine displacement will give you torque characteristics for low-to-mid rpm range. The maximum torque you can achieve is approx. 120nm per litre on NA-engine.
RULE 2: Stroke will dictate maximum tolerated piston speed, and bore how big valves you can use. Shorter stroke means less piston speed and higher revving engine – but less torque on low end.
Read on, and learn the RULE 3 below.
Maximum torque per litre, naturally aspirated engines
80 nm/l: stock 2-valve NA-engines
100nm/l: Best 2-valve NA-engines
100-110 nm/l: Modern, stock 4-valve NA-engines
110-120 nm/l The best stock, and modified 4-valve NA-engines
The character of naturally aspirated engine: Cams
“Why hotter cams 101”: If you seek for more power, you have to increase volumetric efficiency of an engine, and/or stretch the power band towards higher rpm range.
When you rev higher, the following will happen:
A) Less and less time your engine valves stays open (in milliseconds) in relation to rpm.
And;
B) Flowing gasses create more and more inertia, and fluid friction.
Take home points:
Problem A) can be tackled by assembling higher degree cams. This enable valves to stay open longer (in milliseconds) on higher rpm range.
Problem B) Increased overlap paired with good exhaust headers can take advantage of increased gas inertia. Exiting exhaust gasses in the header are creating both positive and negative pressure pulses, which can create low pressure areas, thus creating ‘scavenging effect’. OK, let’s explain this in the other words: While gasses are always looking for a route from higher pressure area to lower, during scavenging effect exhaust gasses have enough kinetic energy to keep moving forward – which in ideal situations – can create low pressure area around exhaust valve and combustion chamber during intake opening. This pressure differential can assist combustion chamber to empty burnt gasses more efficiently, while simultaneously sucking fresh air from induction system. This is called scavenging effect, and can improve your engine’s Volumetric Efficiency (VE), and produce more torque on desired rpm range. This is why you have to choose in between primary lengths for either optimal low-to-mid range torque, or maximum top end power. A note: 42mm OD primaries are fine up to 600hp!
RULE 3: In naturally aspirated engine, cylinder head flow capability in relation to engine size (cc, cid) will dictate torque characteristics for desired (Such as upper) rpm range. Number of valves, valve sizes, head porting, cam geometry – these all have an affect on volumetric efficiency(VE) for your desired rev range.
Scavenging efficiency and delivery ratio of intake system
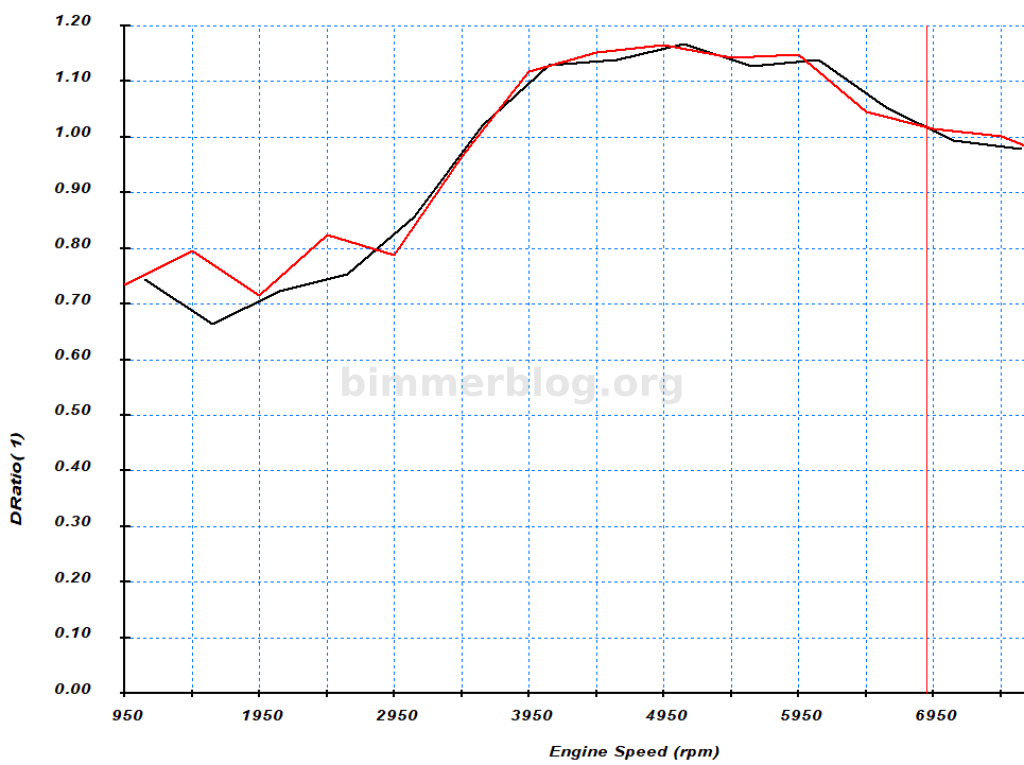
Scavenging effect – also known as reverse or negative supercharging – is typically combined with inertial, or inertia supercharging, which in short can utilize A) kinetic energy of incoming air, and B) acoustic supercharging (rebounding resonances) in between a closing intake valve and intake manifold plenum. Model year 1992 intake manifold with proper velocity stacks has potential to high delivery ratio (DRatio) on mid range. The advantage over short ITBs can be up to 65nm on 4500rpm.
Comparison of long vs short runners on hot street M60B44 at 4700rpm. Green is model year 92 intake (with proper velocity stacks) and black are short (212mm with bell mouth) ITBs. Blue line is scavenging efficiency with 92 manifold, and red with ITBs.
Improving intake air density by eliminating the causes of heat soak
NOTE TO SELF: DIN corrected, dyno verified torque on my M60B44 engine is 113 nm per litre, measured on highly respectable hub dynamometer with DIN correction, and known for its accuracy. On street, under optimal conditions with +7 C outside temperature, the log data has shown engine loads as high as 119,4nm per litre. Please note this is NOT torque by DIN standard, only peak calculated torque from maximal engine load, hardly comparable with any other engines than my own. The difference in between dyno vs street is also due to fact the engine has very high dynamic compression, so it is(or was) suffering from heat soak while being stationary. During the dyno run the stock Intake Air Temperature (IAT) was showing temperatures up to 110 Celsius. While driving on street IAT sensor is showing +8C on top of ambient temperature, meaning IAT of 28C on street means +20C ambient temperature. The delta for inlet system temperature was staggering 82C on dyno. Since DIN corrections are based on atmospheric temperature, corrections are not taking account of temporary heat soak in the engine. The delta in inlet wall temperature was later analyzed and showing 3.8% loss in engine torque. The heat soak issue was eventually solved with less aggressive idle ignition management, combined with improved intake manifold insulation and engine cooling methodologies. The difference is not only calculative, its seat-of-the-pants noticeable on a hot summer day.
M6x engine with hollow billet cams. Emphasis on cylinder head optimization is needed for 110 nm+ per litre engine.
Reducing pressure losses in the intake manifold
Higher intake manifold pressure than atmospheric pressure on naturally aspirated engine is rare sports. The pressure loss in the intake plenum can be minimized with RAM-air effect. There was 2 kPa pressure delta in intake manifold during the one mile run. This is not much, but states the RAM-air system works. When compared to filter on hot side, the benefit of RAM-air intake can more than 4 kPa. This kinda pressure loss is a no go for high performance, naturally aspirated engine, since they operate with such small pressure differential. MAP sensor is located at the end of intake manifold plenum. Although that being said, this data does not prove – nor deny – the existence of inertial supercharging, which can happen closer to an intake valve where incoming air can be compressed. As we learned earlier, the delivery ratio can be over 1.20 when both exhaust and intake systems are matched together, and optimized.
Examples of air intake optimizations:
Air intake on hot side, 100kPa Ambient
Air intake on hot side, 98kPa on WOT
RAM-air intake, 100kPa Ambient
RAM-air intake, 102kPa on high speed WOT
___________________
= The pressure loss (or save!) can be up to 4kPa
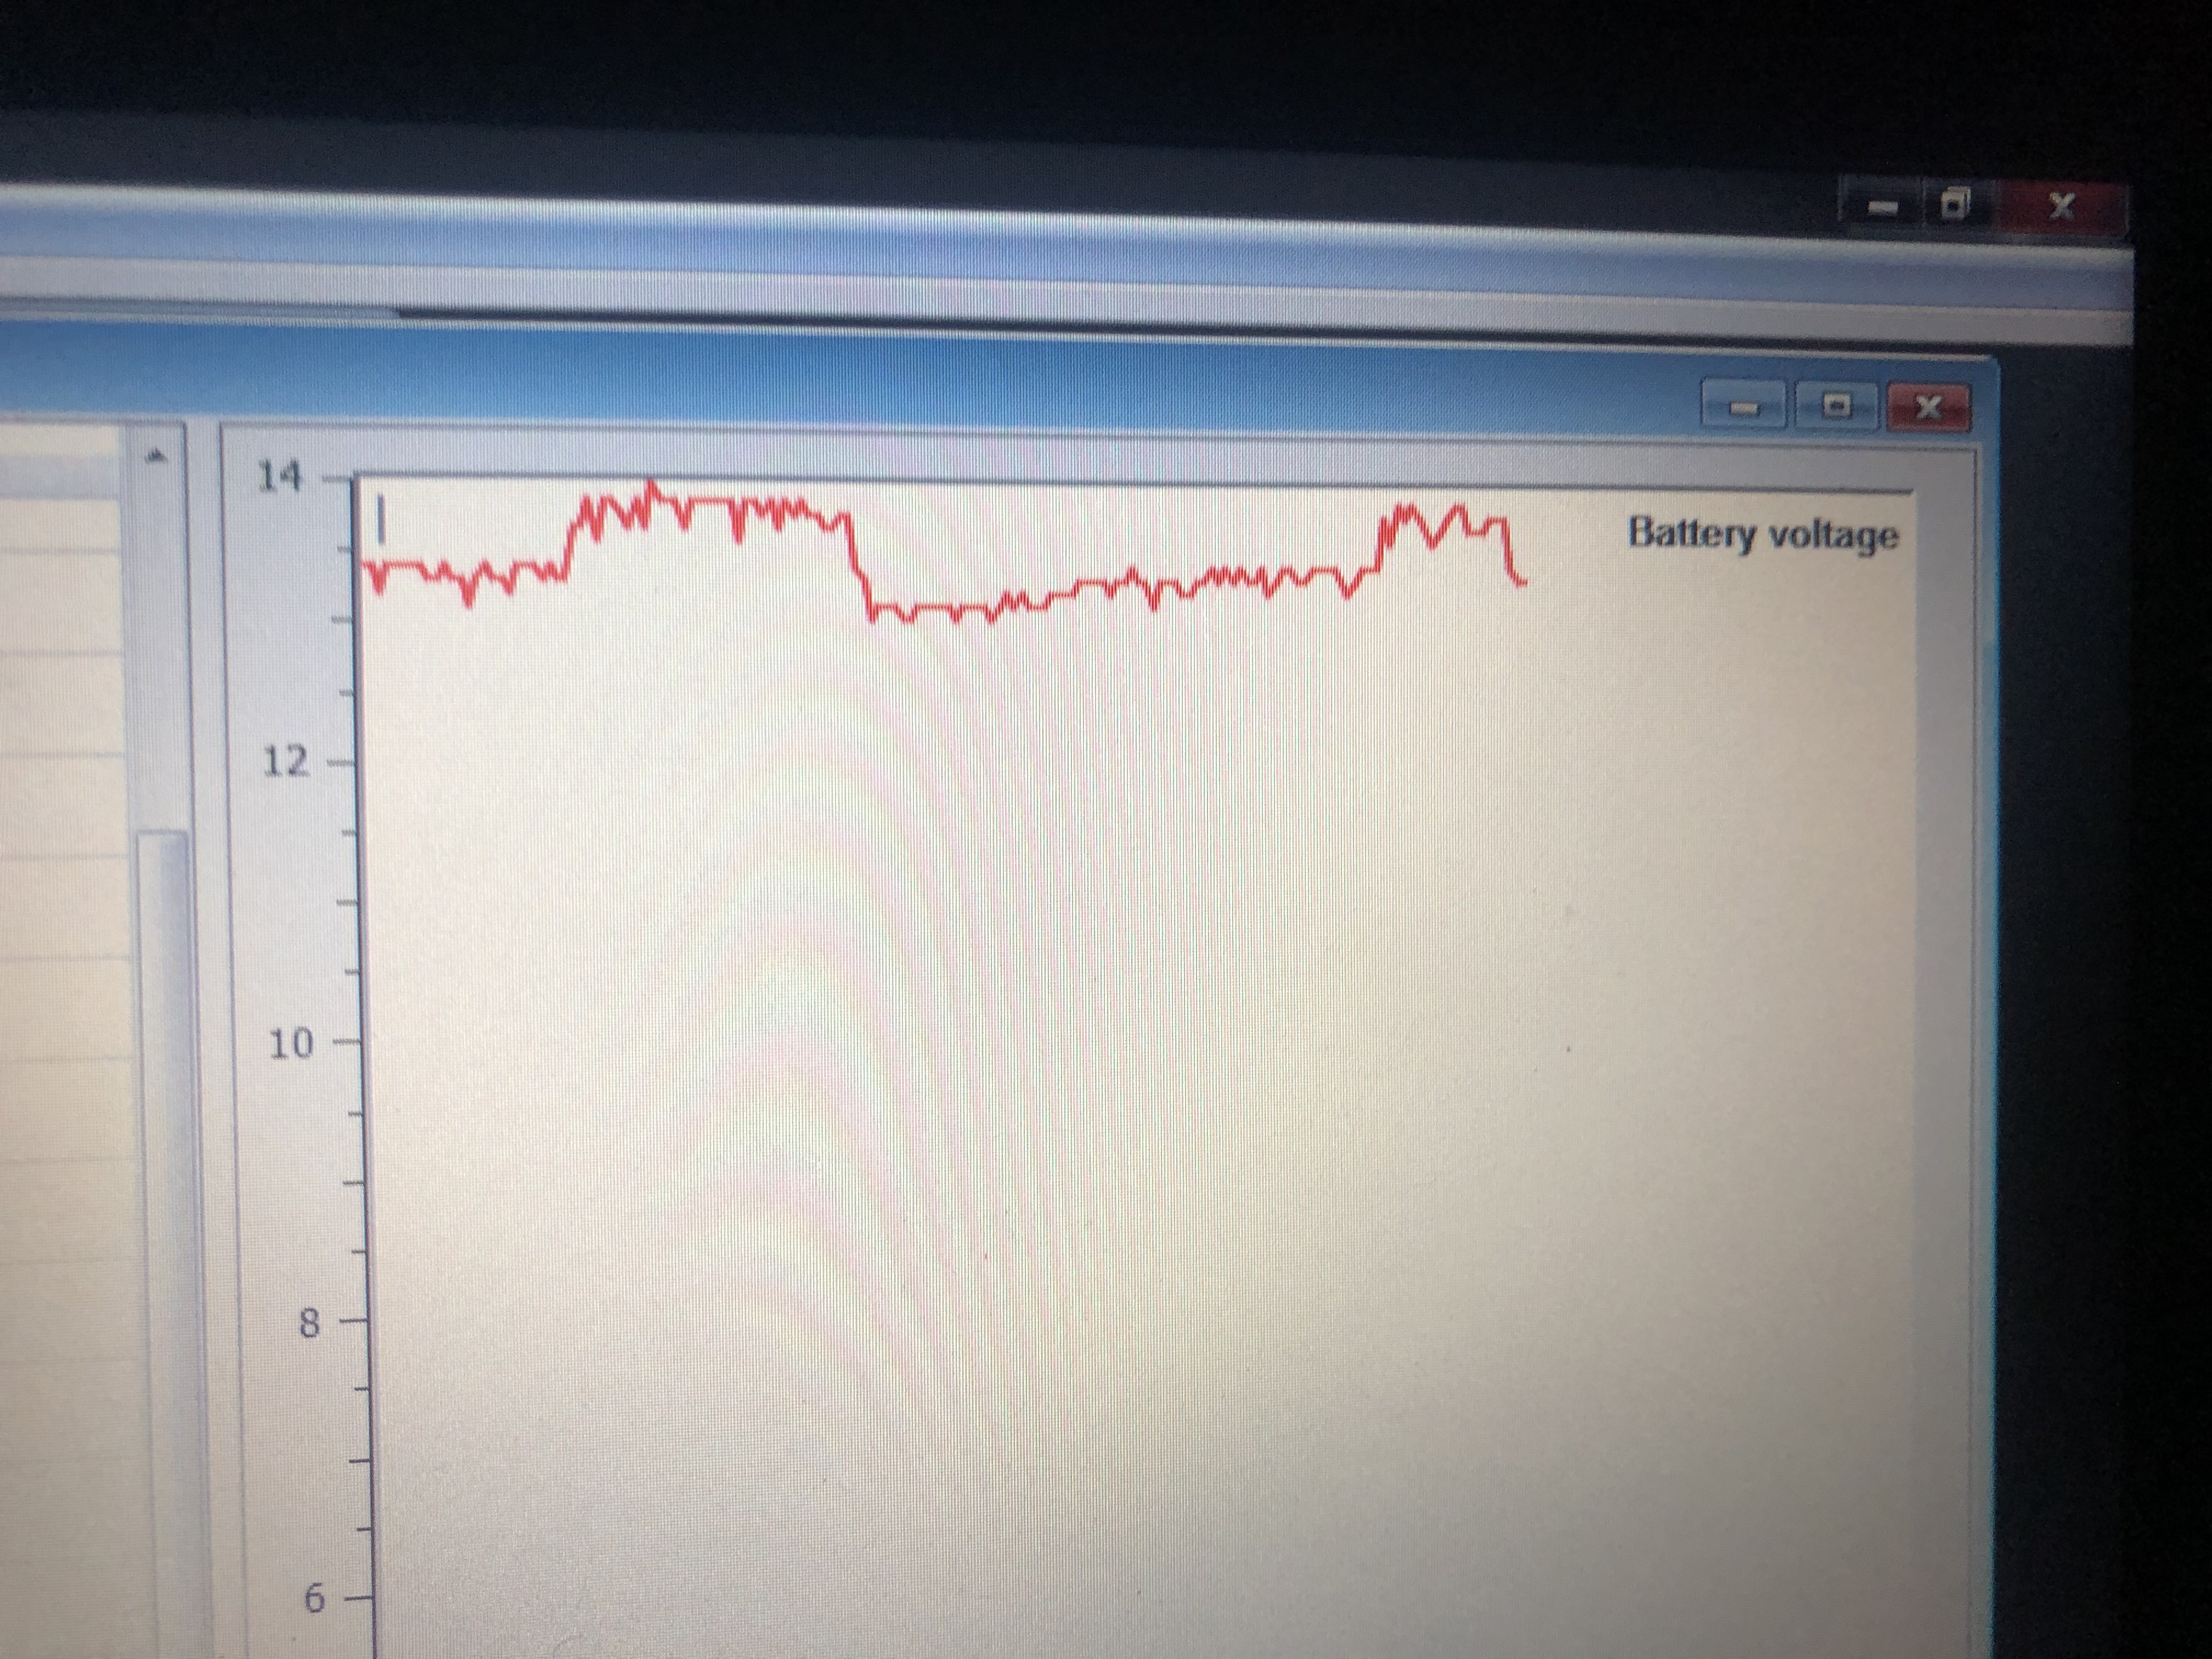
Log data showing minimal pressure loss, temporarily even above atmospheric pressure.
The Cold Air Intake (CAI) with RAM-air effect the market doesn’t sell
Let’s be clear: The majority of aftermarket Cold Air Intakes (CAI) do not work. They are just cool looking parts sucking hot and low pressure air under the bonnet. This is especially bad for naturally aspirated engines as stated in the previous paragraph. The filter you can use is K&N part nr. 63-3052. You can use other C6 Corvette filters too. The log data from one mile runs verifies the existence, and efficiency of the RAM-air system below.
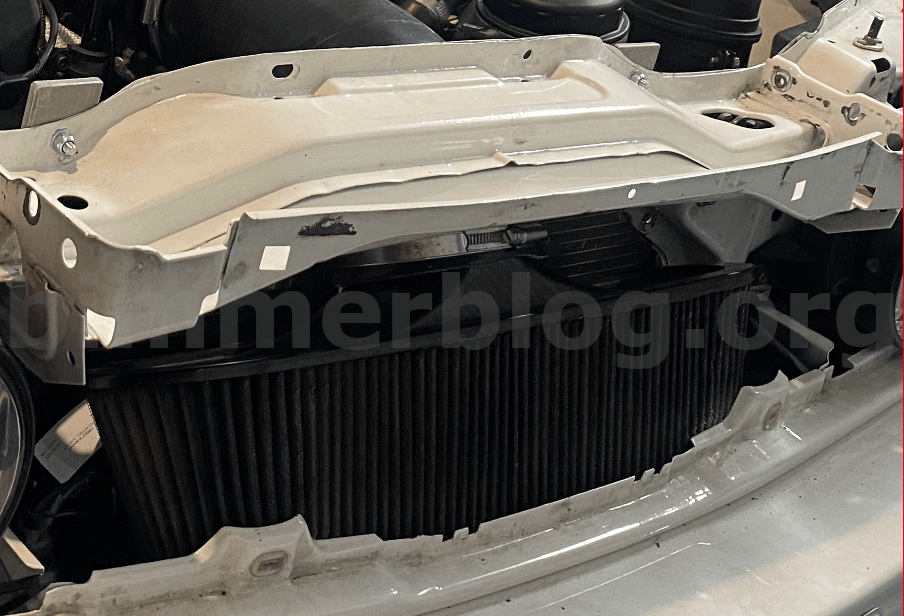
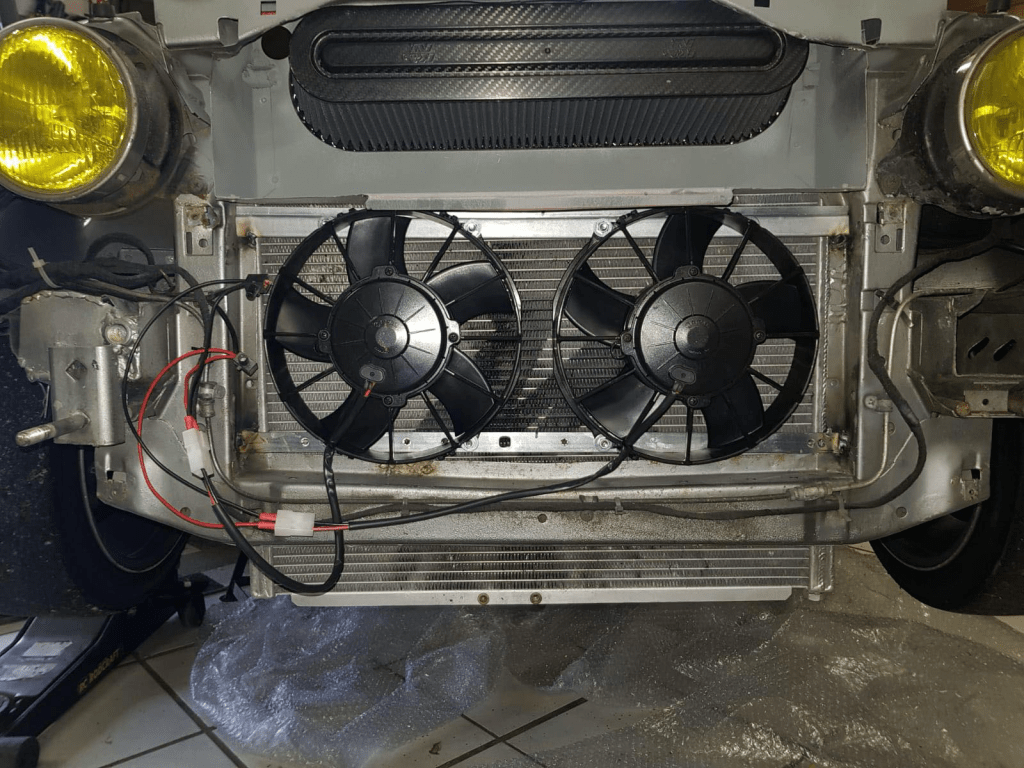
Optimized air induction system with Ram-air effect on M6x engine. This effect can increase engine load (Mg/Stroke) up to 2,5%. In Addition, there can be up to 10% reduction in engine load (torque), if your engine is sucking both hot and low pressure air from engine compartment.Race winning cold air intake system on E30 V8 by Jaschinski Motorsport. You need to lower radiator mounting points by 10 cm in order to install Corvette style CAI. Compact, and high quality cooling fans are needed to keep engine cool while idling. Note the encapsulated compartment for the filter.
About the importance of data logging and measuring
I have tested different optimization techniques based on the principles presented in this article. The baseline is initial dynorun. Mg/stroke is the engine load (Torque). The difference in engine output at 6900 rpm can be over 10% when optimizing both intake and exhaust systems. The most visible modification is Corvette style CAI with RAM-air effect. Other modifications are not visible. 7,4% difference was measured during one mile run with RAM air effect (+18C ambient temperature), and 10,4% difference with cold weather (+7C ambient temperature). Thereafter more optimizations have been implemented. The data point of 6900 rpm was selected simply by the availability of data, and due to interest in optimizing torque on upper rev range – without sacrificing low-to-mid end torque. These optimizations have made huge difference, and unlocked full potential of the engine. Fast forward to today, and possible modifications are being analyzed in advance. This can save a lot of time, money, and from disappointment.
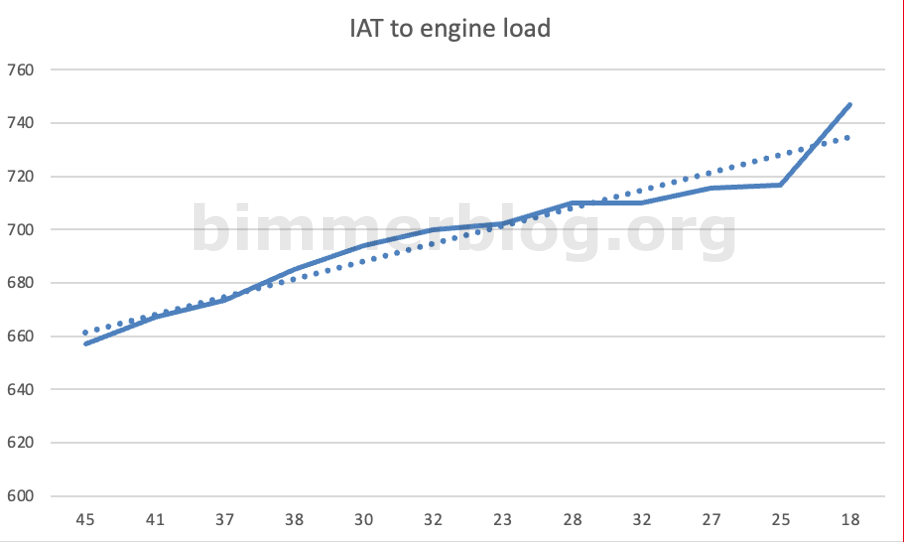
Correlation of IAT sensor (C) and engine load (Mg/stroke).
More information about performance upgrades can be found on my other articles:
One mile acceleration is the ultimate performance car test.
1609,344 meters. One mile acceleration may never get any attention on mainstream car magazines, but in reality it is the most demanding performance test on any motor vehicle, including electric cars.
Reasons why One mile acceleration is the ultimate performance car test:
One mile acceleration creates the most demanding load on your engine vs. any other performance test such as quarter mile, 0-100km/h, or 0-200kmh etc. Prolonged heat accumulation (BTU) during the one mile run can have drastic results on your car’s performance, and durability.
Since the test is very demanding – and dangerous – it is performed only on closed tracks such as airstrips. CAUTION: Never try one mile run on public roads.
Although my car is designed as cafe racer, not on drag strip, I was interested to see what is M60B44 engine’s real world performance. On one mile run you can compare your car against a vast array of other performance cars. I was lucky to be able to test performance of my E30 on airstrip. I was planning ahead two shifting point scenarios:
The secret sauce for high performance is the torque band on rear wheel, divided by your car weight.
SCENARIO 1: Shifting on maximum torque:
1st to 2nd gear on 7500 rpm @65 km/h,
2nd to 3rd gear on 7500 rpm @110km/h,
3rd to 4th gear on 7000 rpm @152km/h,
4th to 5th gear on 6500 rpm @191km/h,
RESULT: One mile acceleration top speed: 253 km/h @6950rpm
VERSUS:
SCENARIO 2: Shifting on maximum rpm:
1st to 2nd gear on 7500 rpm @65 km/h,
2nd to 3rd gear on 7500 rpm @110km/h,
3rd to 4th gear on 7500 rpm @164km/h,
4th to 5th gear on 7500 rpm @220km/h.
RESULT: One mile acceleration top speed: 254 km/h @7000rpm
ANALYSIS:
One km/h difference between the tests is pretty much negligible. The possible reason is increased tyre pressure after the first run. Subjectively I felt shifting is performed too late on scenario 2, although it yielded into better top speed. M60B44 engine has amazing torque band, so it really doesn’t matter when you change to fifth gear. On the same day, my naturally aspirated E30 was able to beat much higher performance cars due to 26 C weather – since turbocharged cars running on petrol were clogging due to heat accumulation. Cars running with ethanol (E85) were not facing this issue though. Tesla Model S was one of the biggest disappointment with top speed on 230 km/h range. It was pretty staggering to realize the difference in between advertised hp vs. real world performance.
PS. There was a notable side wind on the airstrip, and organisers did indeed gave a warning to motorbikes about the pesky wind. Nevertheless, I did not noted any side wind issues on E30 whatsoever, although the wind on the above video is substantial. A few really understand how seriously stable car E30 with M-technic 2 aerodynamic package is to drive at high speeds. There is so much reason why E30 is legendary. E30 is pretty much beating all never cars (read: heavier) in driving response, and feel. Due to its light weight, it just goes like a thought. It is much better than 335 M-Sport, which I did not felt comfortable at all to drive due to pesky side wind. 335 is just too heavy, rear axle gets slump, car lacks top speed stability, and it is nowhere as nimble on twisty roads as E30.
Evo3 version of M60B44 hot street engine with 1000-7600rpm rev range, and over 500nm of torque.
M6x engine builds have gained some popularity on Youtube lately. I’m an old school fan of E30s since 90s: first naturally aspirated, then turbos, and since ’15 with different M6x configurations. I just love the engine responsiveness, amazing torque, and the sound the engine reciprocates, which makes stock M3s feel like grocery getters. Not to mention the later generation bimmers having fake engine noise from speakers. That’s just utter blasphemy for me. Since turbos are everywhere, even grannies are having at least one in their commuters, it’s so refreshing to have naturally aspirated high performance engine on street.
I’m running my car with Toyo semi slicks, and 50% limited slip differential with KW suspension. Otherwise the car is stock looking with full M-tech2 interior, and factory bodykit. The weight of the car is 1180kg (fuel tank 3/4 full), being identical to stock E30 325i. This is achievable by selecting the lightweight parts for the build, told on this blogsite. Actually you can reduce weight over 11,5kg from engine internals only! Its all about power-to-weight-ratio, power under the curve, and torque on rear wheels. By extending your engine’s usable power curve up to 7600rpm you can gain up to 160 hp on lower gear shifting point. This makes massive improvement on 0-60mph times.
By extending engine’s rev range the median power stays up while shifting. The result can be up to 160 extra hp from 1st to 2nd gear.
Stage 1: M60B40 with ported heads, headers, CAI and stock ECU
A budget swap on E30 is based on M60B40 engine, mostly due to its simplicity with both wiring harness and ECU. M60B40 is solid engine for a budget build. Just do head porting, increase compression ratio, add headers and Corvette style Cold Air Intake (CAI), and you’ll have 320hp and 450nm. Here’s Corvette-style CAI 101:
A) CAI gets air from the front, not hot air under the bonnet, and utilizes ram-air effect,
B) they are from C6 Corvette, and/or utilising the very same principle.
The other low cost option is to go with stock M62B44 engine, but they have milder cams than M60, and timing chain assembly is with single chain. M62B46, and M62B48, and S62 are also viable, but these options are expensive, and their availability is also scarce. Please remember, M62 engine family got bad timing chain and guide design, whereas M60 timing assembly with duplex chain is super solid, on par with S-engines.
Stage 2: Low budget M60B44 build with stock internals and ECU
So how about installing M60B44 engine? Hey, wait a minute! There is no official engine type such as M60B44 from the factory line. The aforementioned code simply refers to a custom built engine, utilizing the best components from both M60 and M62 engine generations. This unique combination creates a high compression engine, a ratio typically found only in S-series of engines. In the land of “what ifs”, this engine could have been rolled out from the factory as hypothetical, high power S-variant for M60 engine family. This homebrew engine modification is also know as M60B44 hybrid motor, or M60B44 frankenmotor.
First, let’s clarify one thing: If you are after a budget build, stick with a stock internals, and ECU. If you are after some serious naturally aspirated performance, you better have a good budget. Truth to be told, its far easier to get the same amount of power from a random V8 crate engine, than start tinkering with an exotic 32 valve bimmer engine. Ok, now when we are clear with this, we can proceed on how to build a serious high performance M60B44.
Stage 3: Hot street or race build with aftermarket parts and ECU
Builders are typically too focused on maximum hp numbers, and this in turn can lead to compromised low-to-mid end performance. Just a quick reminder: it’s power under the curve that matters. Be honest on what application you are building your engine for. If it’s on street, it’s for street. It really is that simple. This means your engine stays majority of its time on 1000-3000 rpm rev range. No matter your driving style.
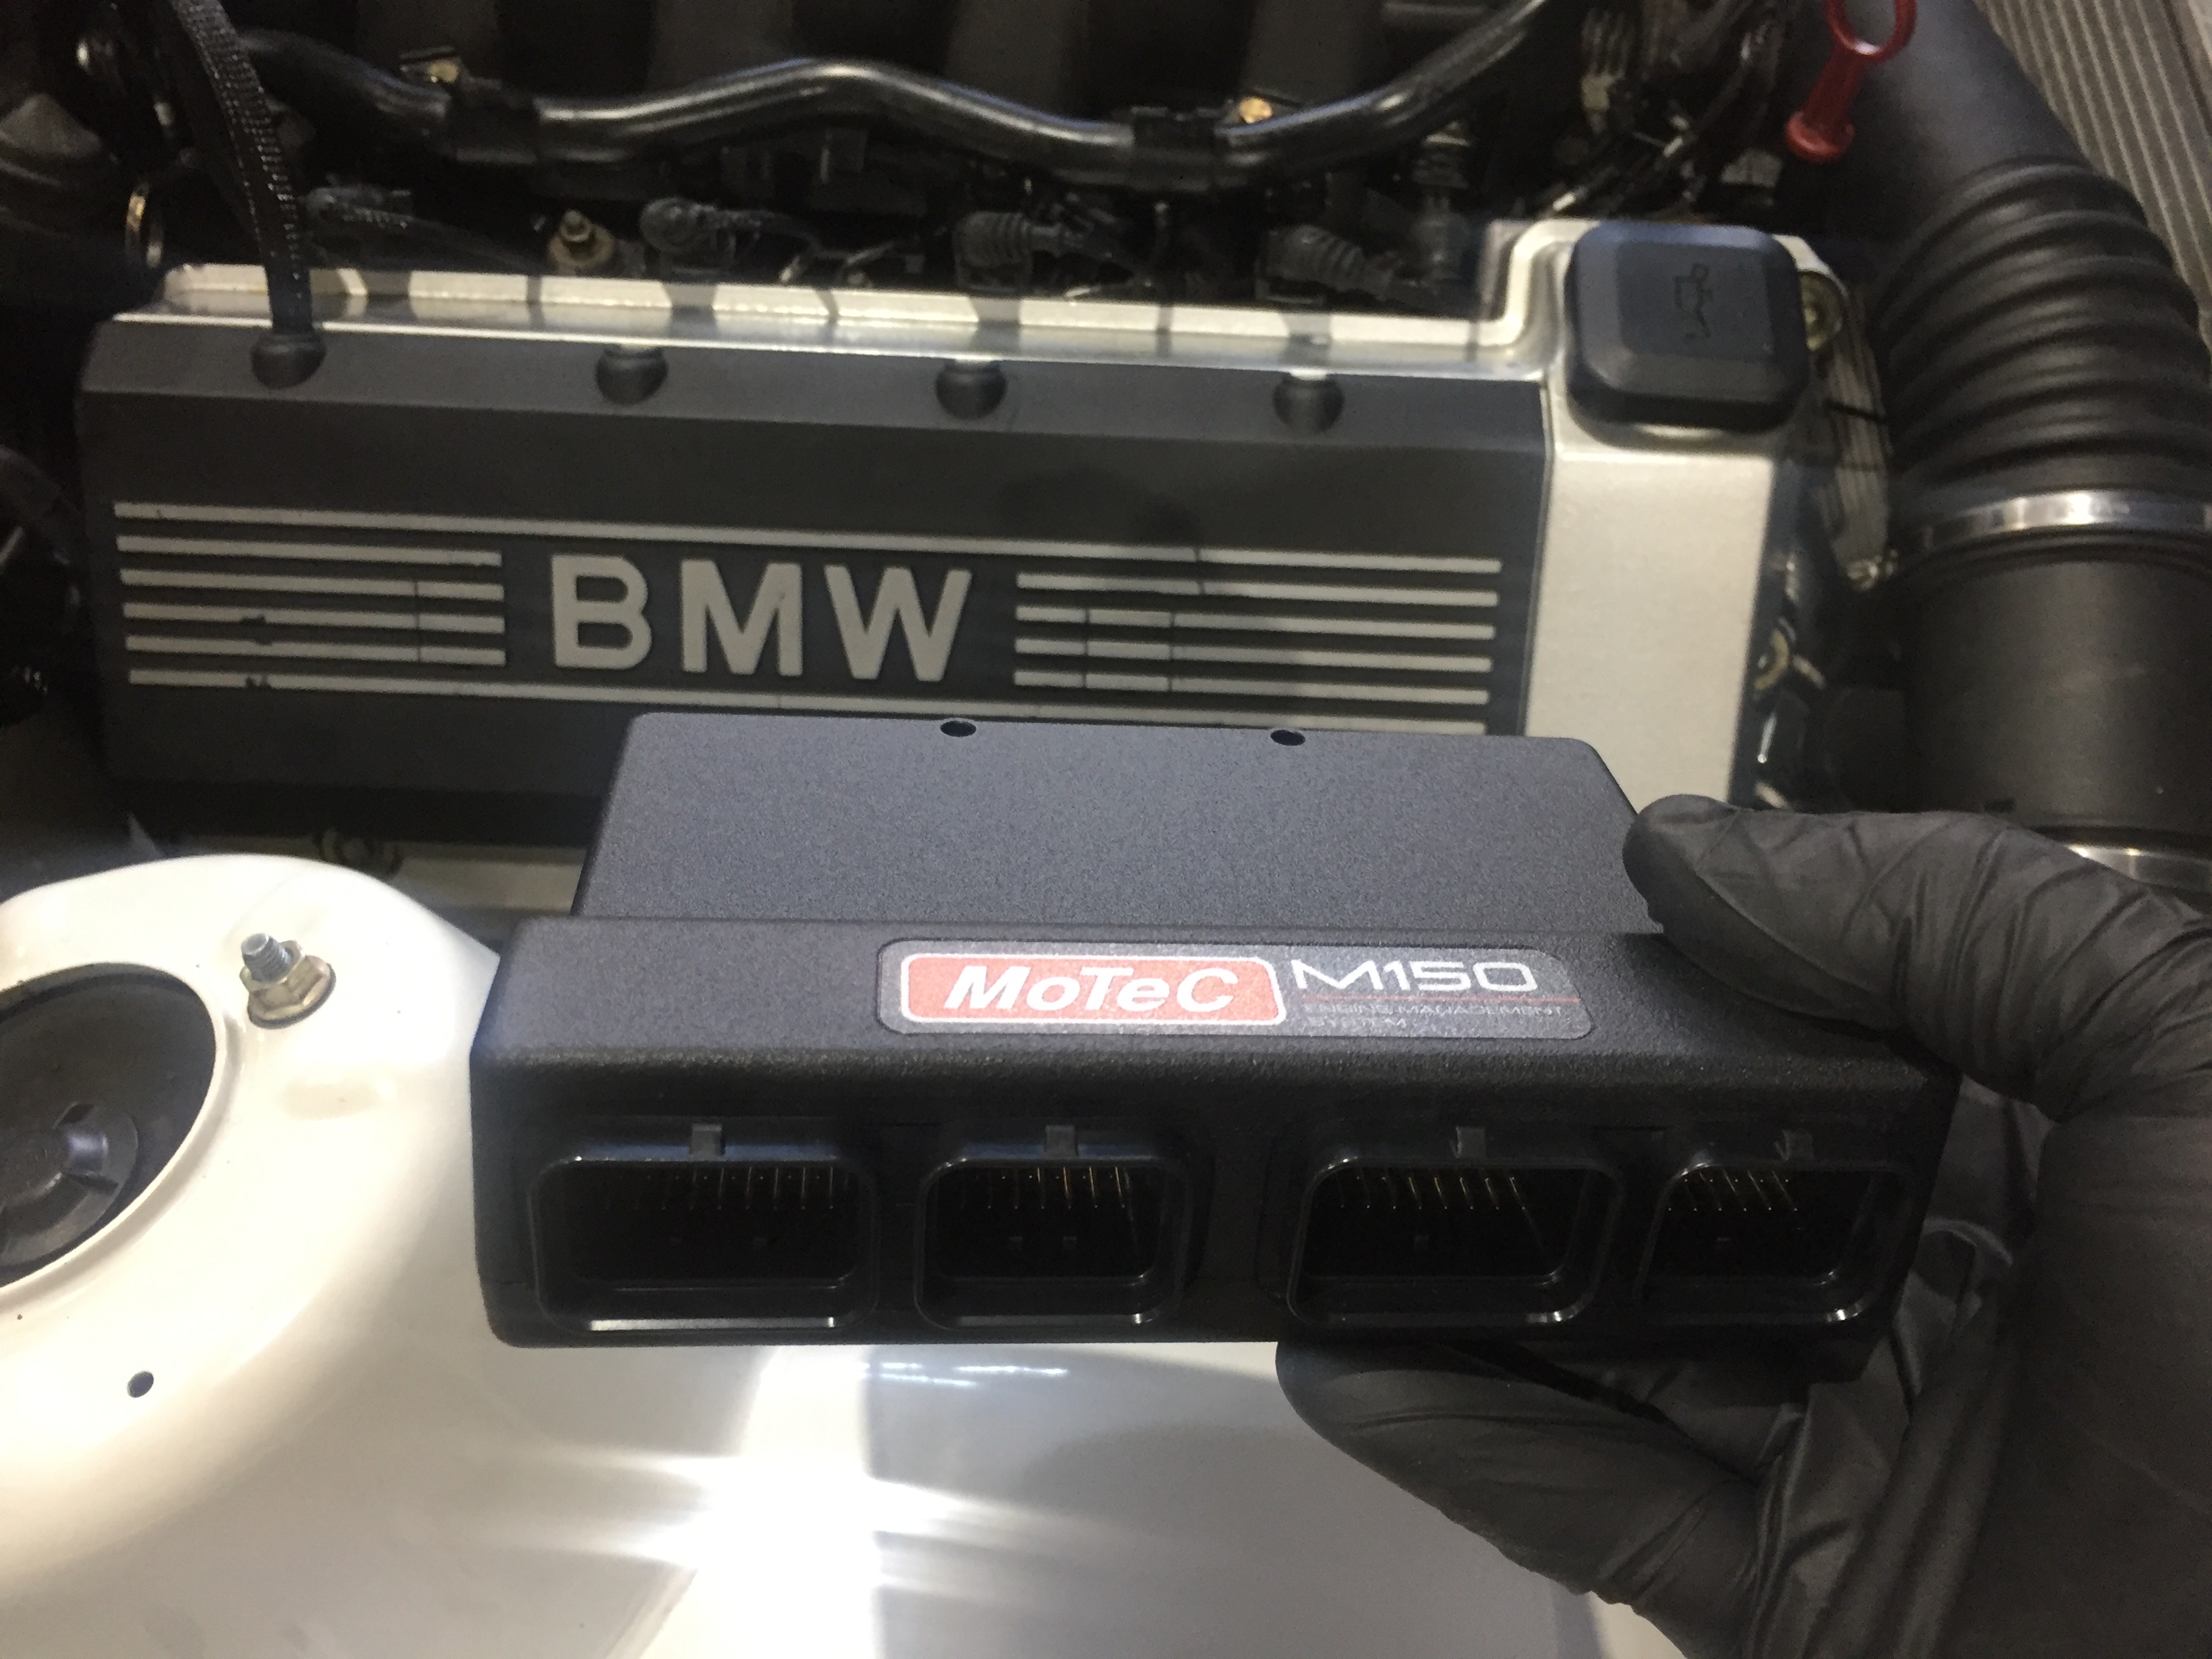
Please check my other article about mean piston speeds, and volumetric efficiency here. Keep the mean piston speed below 21m/s, and you’ll have sufficient longevity for your build. For performance oriented build, and the extended power curve you’ll need hotter cams. With stock cams you can get very nice low-to-mid range torque, but not the extended power range. With right cams your effective shifting point can be on 7500rpm+ territory, while still having massive amounts of low-to-mid range punch and engine responsiveness. The best option is to go with hollow, gundrilled Cat Cams. Cat Cams can provide several options for M60 cylinder heads, including cams with customer specifications. For starters, Cat Cams sports are viable option if you still want to use stock ECU. Hot street or race cams with more aggressive overlap will provide you with extended power range, when combined with well built exhaust headers. More aggressive cams and lightweight components do require aftermarket ECU such as Motec M150 or similar in order to keep idle, and in case you want to utilize all 4 knock sensors.
Gundrilled, hollow Catcams in M60B44 hot street engine. These are 3,6kg lighter than stock cams.
Selecting right headers for your build
There is at least two aftermarket manufacturers building headers for M6x engines. You can also built them yourself, or let a workshop to do the magic. Please note, there is no need to go with bigger than 42 mm primaries on any configuration with less than 600hp. Optimal primary lengths are based on wave harmonics for desired operating range. Changes in your engine configuration will change the optimal primary length. Hot street build optimized for 4000-6500rpm range can be used either with long 730-790m primaries, 440-500mm mids, or 310-370mm shorties. Suitable collector size can vary from 2.25″ to 2.5″ depending on an intended use, and configuration. For street use my recommendation is 2.25″ collector. Optimal exhaust for M60B44 is dual 2.5″ with X-pipe, and free flowing mufflers. Optimal placement for X-pipe is about one meter from the end of primaries. Recommended, high quality manufacturer for custom spec exhausts is Martelius.
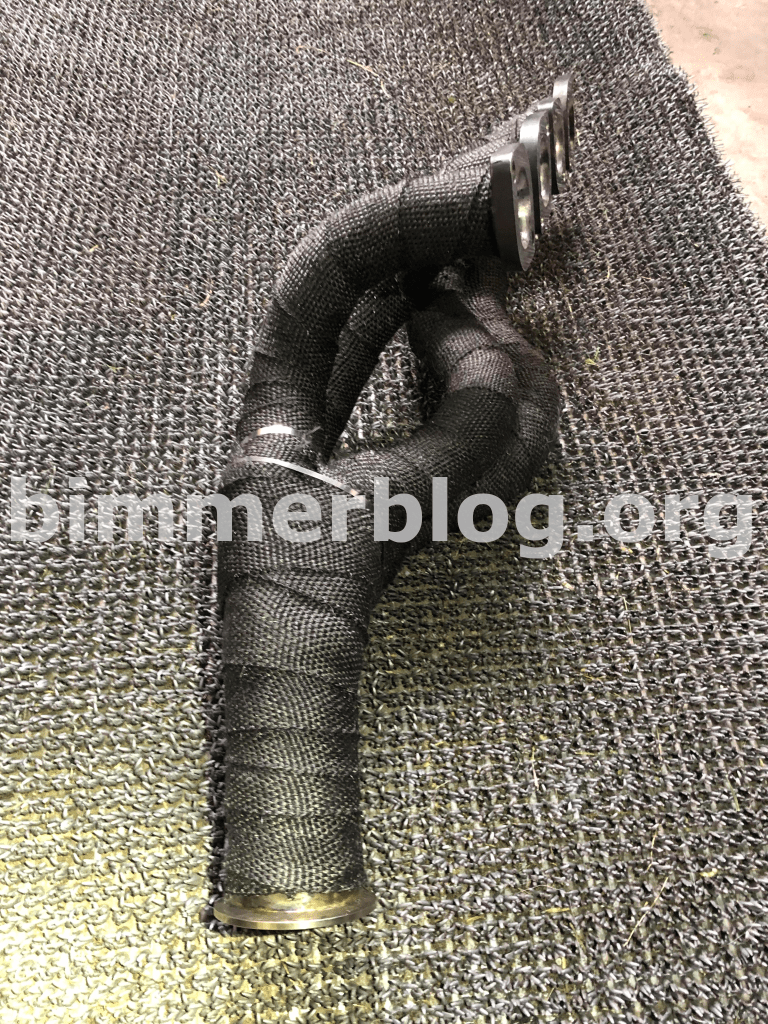
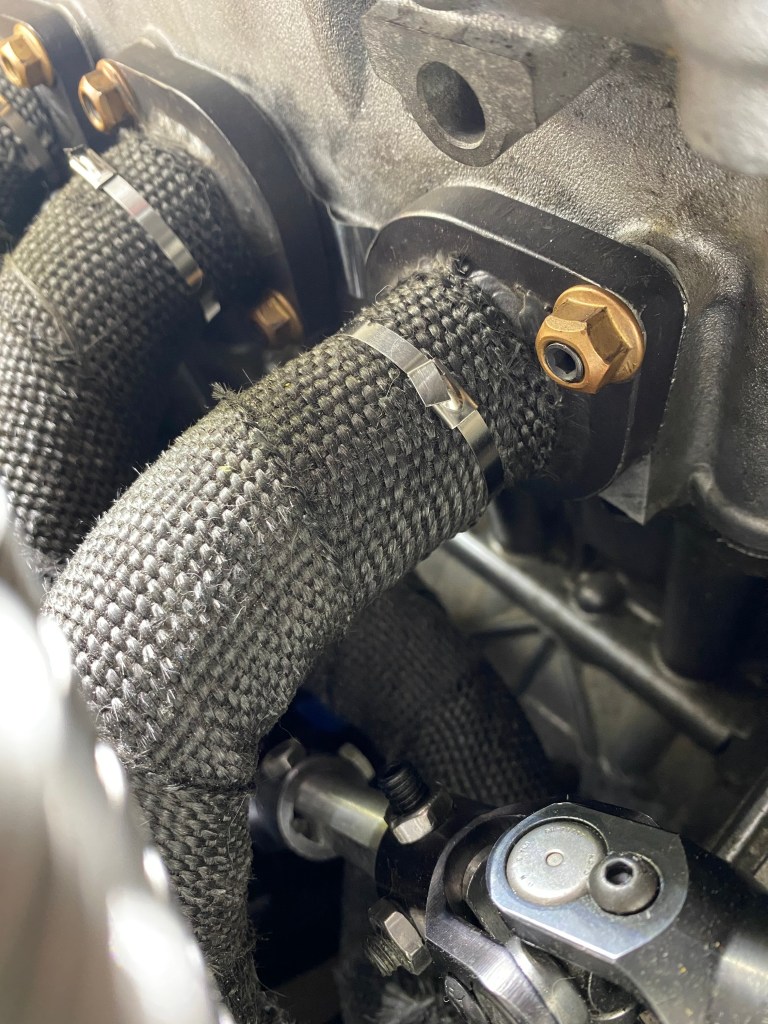
Mid length 41mm (1 5/8″) primaries with ported flanges. Note the follow-through for steering shaft.
Be advised with steering shafts
Exhaust headers for E30 V8 swap are tight fit thanks to bulky steering shaft. DO NOT weld, or shave off any material from any steering shaft configuration. Condor Speed Shop is providing bolt on steering shaft conversion kit for extra clearance. With stainless steel shaft you can get rid of the rubber coupler too (Rubber and heat = not good idea). The heat will destroy the stock rubber coupler, and likely will weaken other plastics as well – go with the full steel on this. The result is sharper steering response, and much safer build. I cannot emphasize this enough – Do not cut the corners on this.
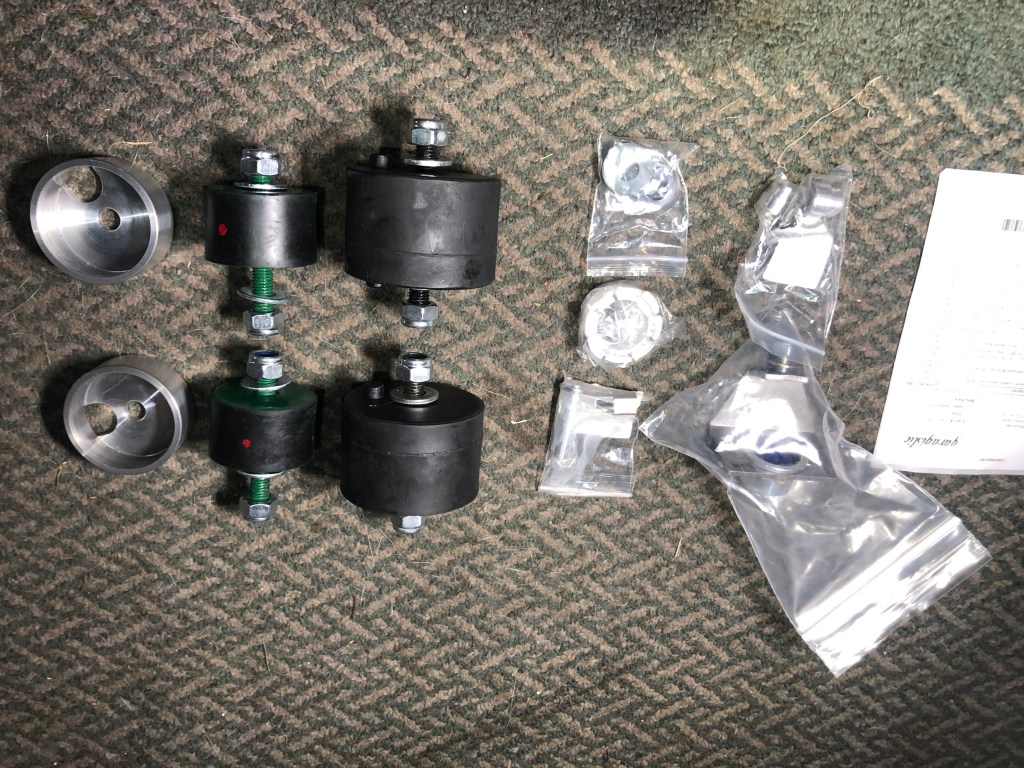
V8 engines are ruthless on first gear. 500nm of naturally aspirated torque on first gear translates to 6630nm of torque at rear wheel. (500nm x 4,21 tranny x 3,15 diff). No need to wait torque delivery on 3rd gear like turbocharged engines, instead you are full on from starting line. Combine this with 50% limited slip differential and semi slicks, and you can have some serious issues to keep engine, transmission, and rear differential at the bay. And I’m deadly serious about this. I broke universal light truck engine mounts with my first build. If you are looking for engine mounts, and what ever brackets please consult the dudes on Garagistics. The company provided me with correct bushings for transmission linkage, even I tumbled on describing the right combination. Likely one of the best customer service experiences I have ever had.
Transmission mounts with enforcer cups from Garagistics, and polyurethane shifter bushing kits for a tight feeling shifter. Please note there is both rounded and oval bushings for carriers.
About dual mount differential covers
Stock diff covers on E30 are with single mount ear. Since driveline is under elevated stress its highly recommended to install heavy duty rear differential cover with dual mounts. There is several options out there, and while non of them I have seen are optimal (Tip me if you see any decent ones), its better to have a setup that can withstand the torque on first gear. You can either go with a stock E36 rear cover, or have one of the aftermarket ones.
Most aftermarket diff covers are not hemisphered, but nevertheless can offer more rigid assembly due to billet design. in the picture: PMC diff cover with improved breathing design.
Aim for serious gains with volumetric Efficiency (VE) of over 130%
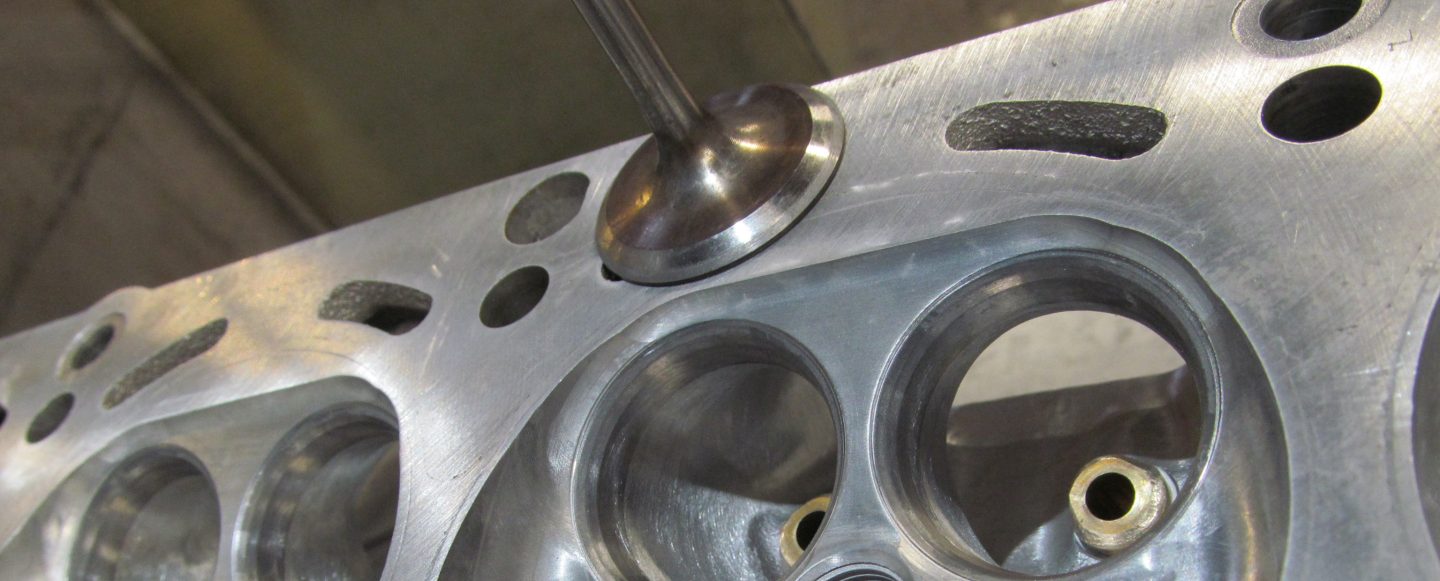
The cylinder heads are CNC milled from the factory, and provided in 4-valve configuration with 35mm intake, and 30,5mm exhaust valves. Add this with professional porting services, and the cylinder heads can flow up to 300cfm @28″. This means theoretical hp of 600hp. Tick all the boxes mentioned on this blogsite, and your 4,4 litres V8 stage 3 configuration can charge air with Volumetric Efficiency (VE) of over 130%. That is state-of-the-art for an internal combustion engine.
Ported M60B40 cylinder heads with 35mm intake, and 30,5mm exhaust valves can flow closer to 300 cfm@28″
The base recipe for M60B44 consists of:
M62B44 bottom end,
M60B40 cylinder heads,
M60B40 robust timing assembly with duplex chain,
M60B40 wiring harness, sensors and ECU.
Benefits of building M60B44 engine:
Increased ~ 10,9:1 compression ratio,
By shaving 1mm from cylinder heads you can increase compression to ~ 12,2:1
Almost ideal stroke-to-bore ratio. In comparison, Ferrari 458 engine with 4,5 litres capacity has 94mm x 81mm (Bore x Stroke) whereas M62B44 engine is 92mm x 82,7mm,
4,6 litres and bigger M6x bottom ends increase stroke, which leads into increased piston speed, and compromised high rpm performance,
Wide selection of high quality M60 engine cams from Cat Cams,
Cylinder heads are CNC machined,
32 valve cylinder heads can flow 600hp,
Ported cylinder heads can provide excellent low lift flow,
Robust duplex timing chain that can take the beating,
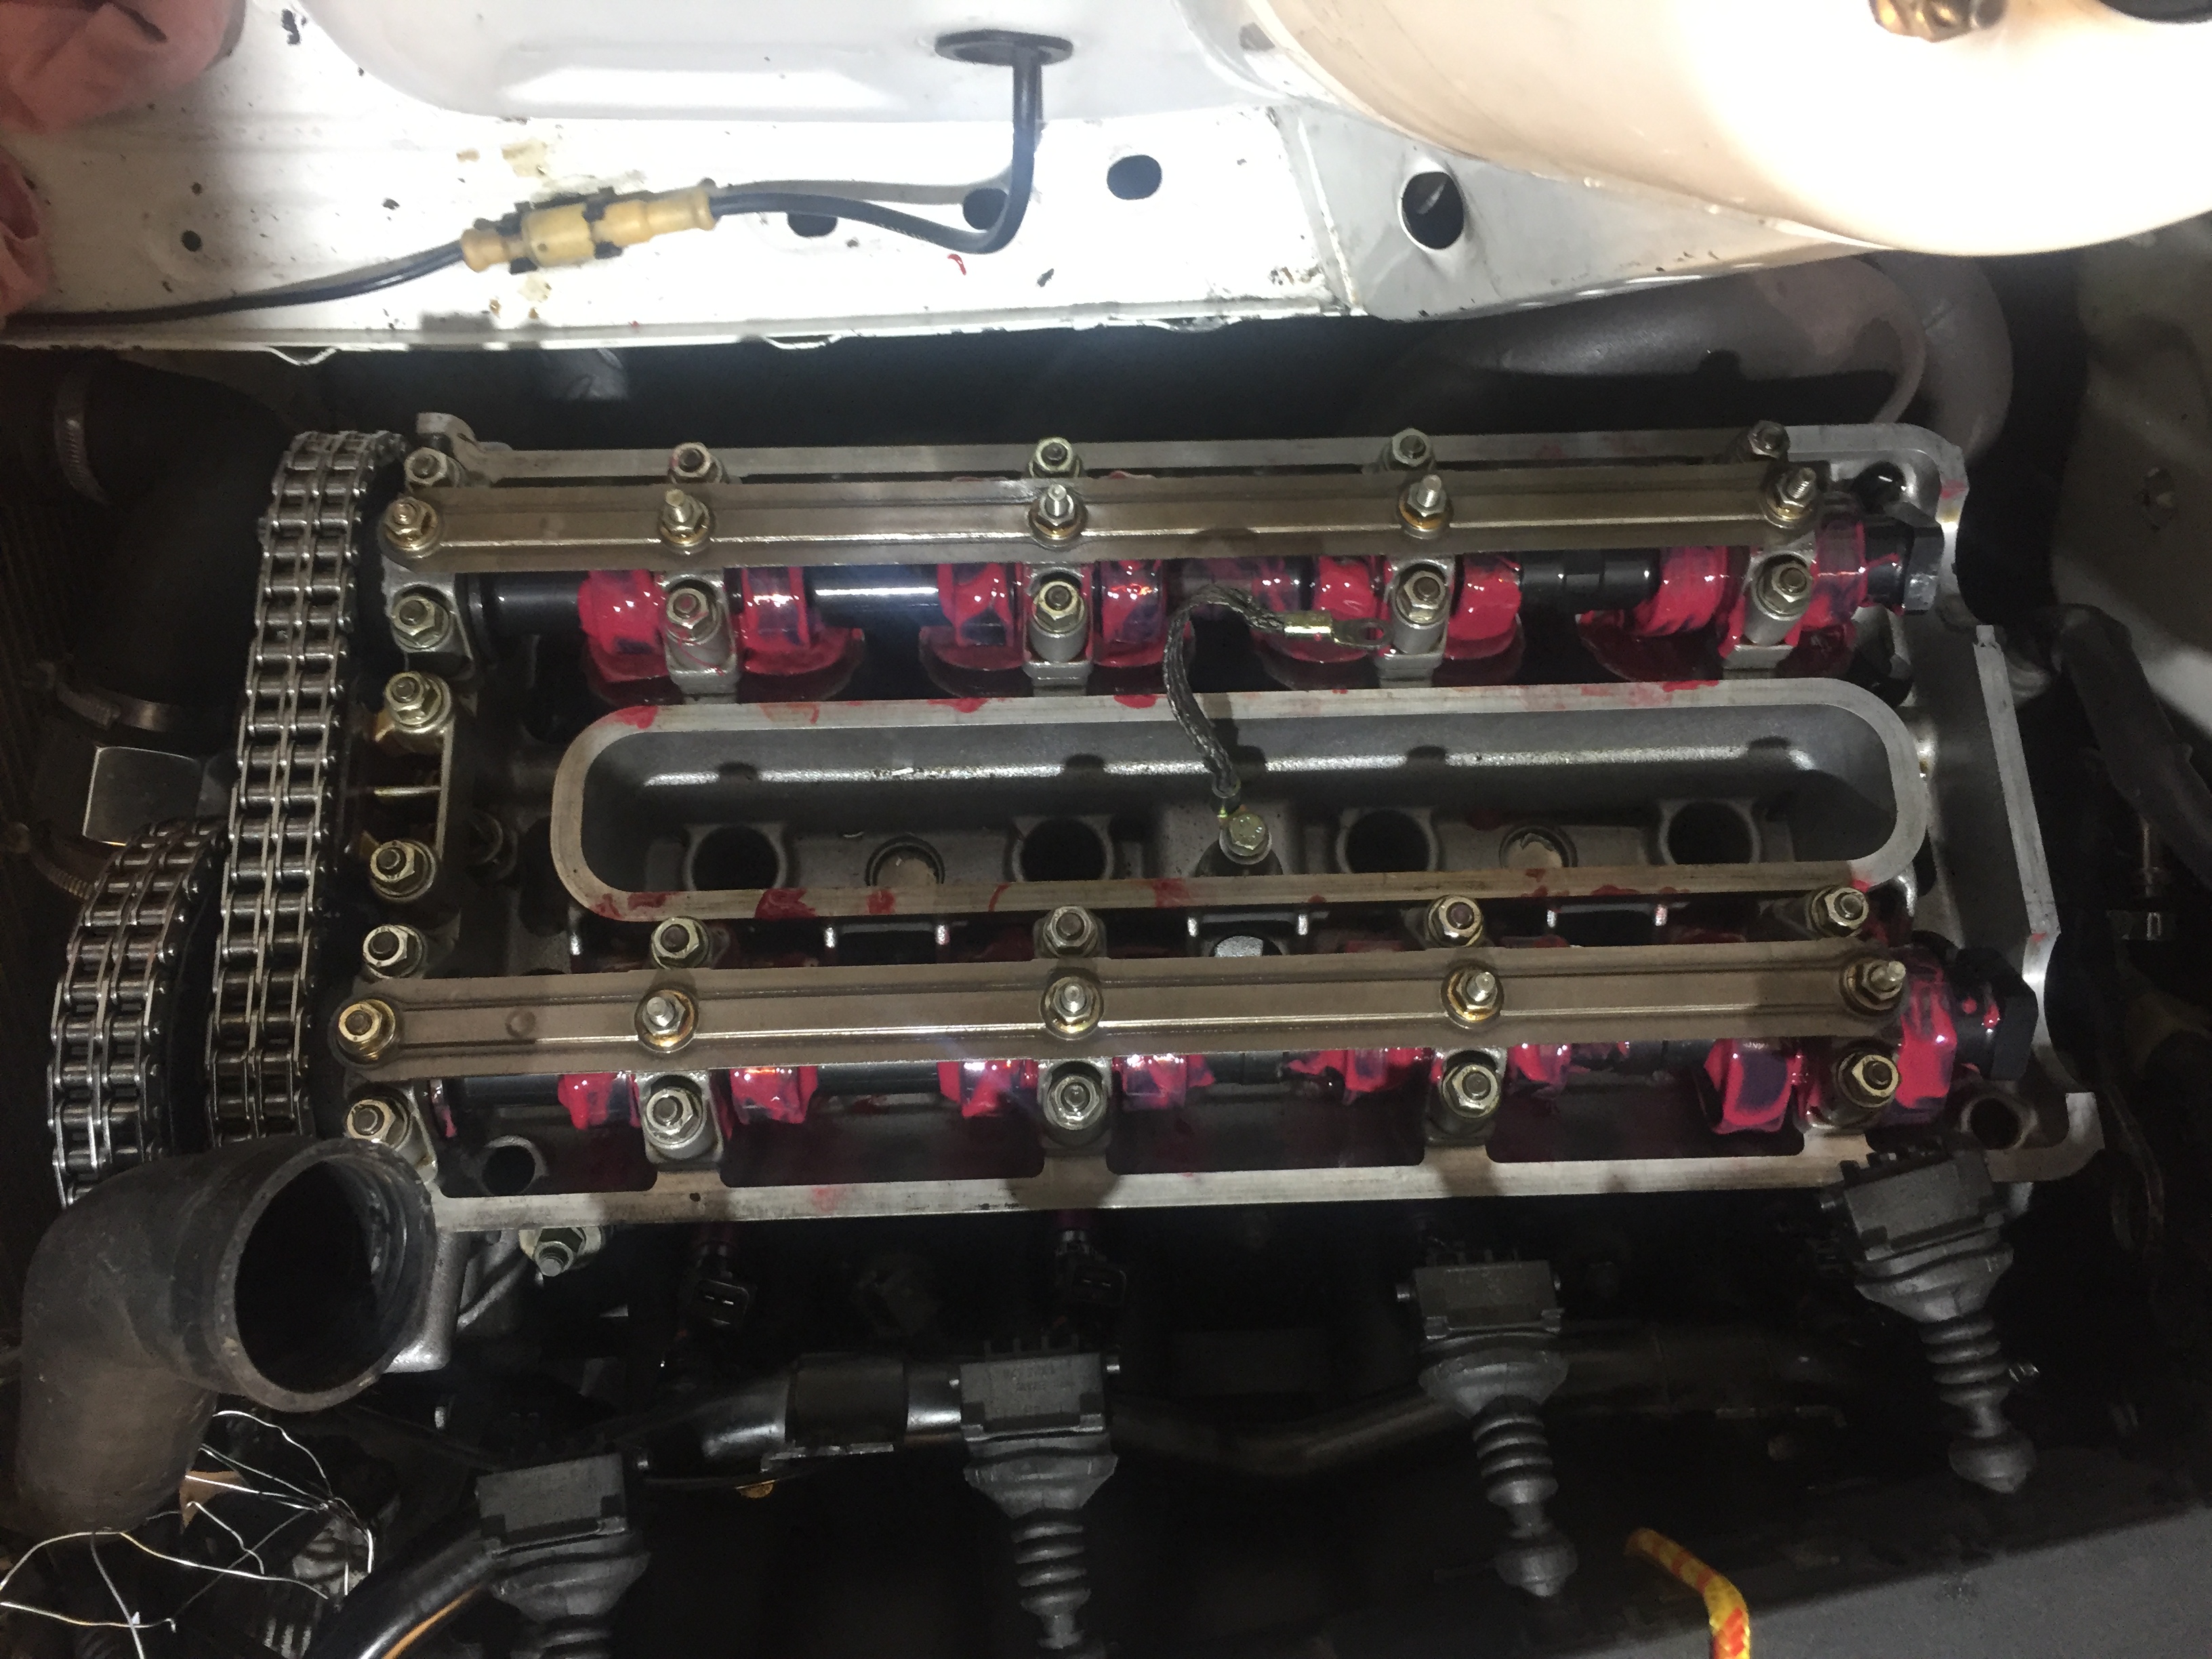
Stiffer dual spring valve train. To gain real benefits from the M60 springs, you must assemble lighter lifters, see my other article here,
660-960 grams of weight saving with aforementioned lifters, allowing the top end to sustain revs up to 8400 rpm,
Durable Alusil block,
Lighter forged crankshaft, thanks to revised design with the central hollow cavity,
Oil spray nozzles for pistons,
Gaining the benefits of using M62B44’s MLS-type cylinder head gasket.
As you can see above, M60B44 combination gives you great prerequisites for building race, or hot street engine.
Building tips for M60B44 engine:
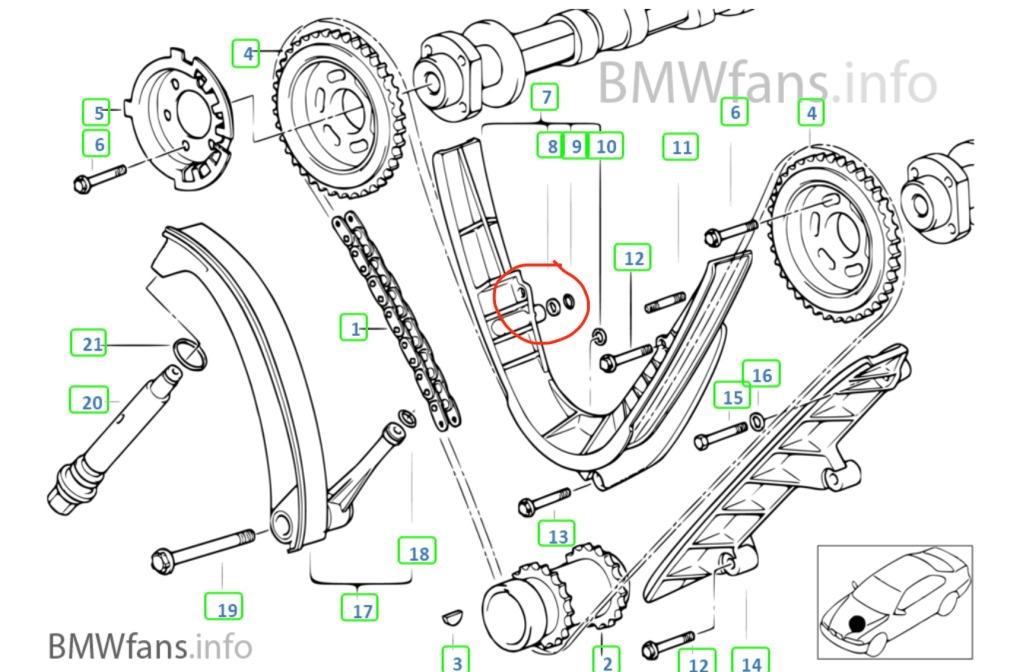
Remember to block the obsolete oil channel for M62 cam tensioner (See the pic below),
Stock ECU can handle sport cams with couple degrees of overlap (1mm-to-1mm). If you go with more aggressive cams such as 8 or more degrees of overlap (1mm-to-1mm) you’ll need an aftermarket ECU,
Reduced inertia can also cause your engine to stall on traffic lights, even with mid priced aftermarket ECUs,
With all above tips utilized, your engine is capable of producing amazing torque numbers, all the way up to 113-115 nm per litre.
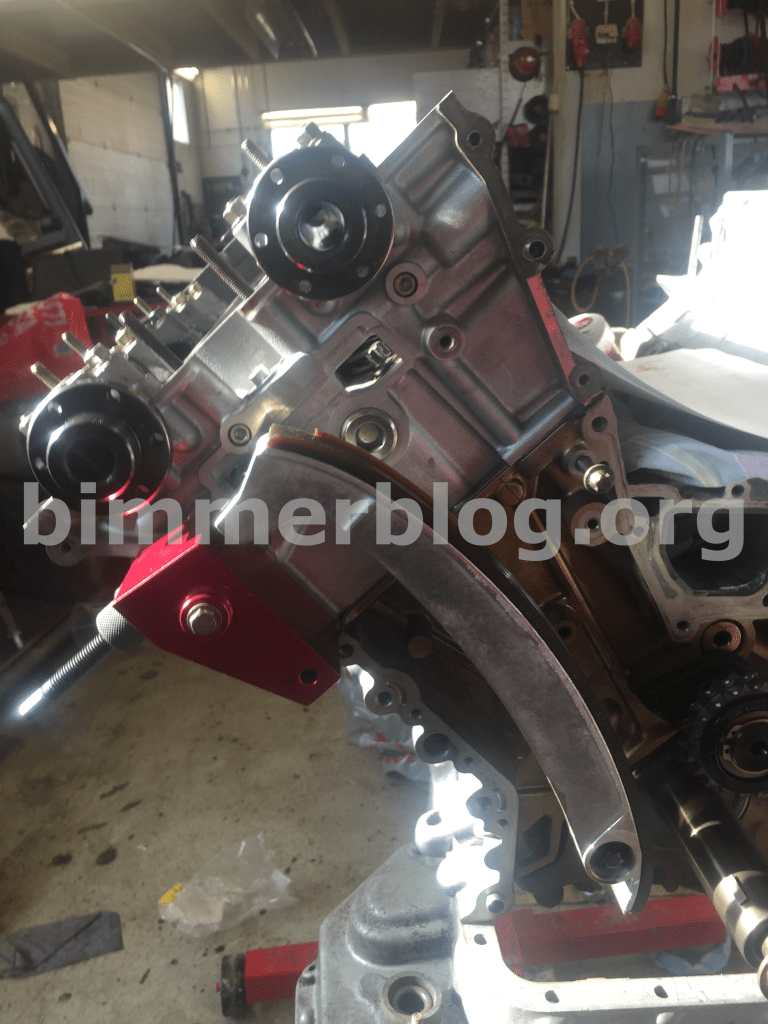
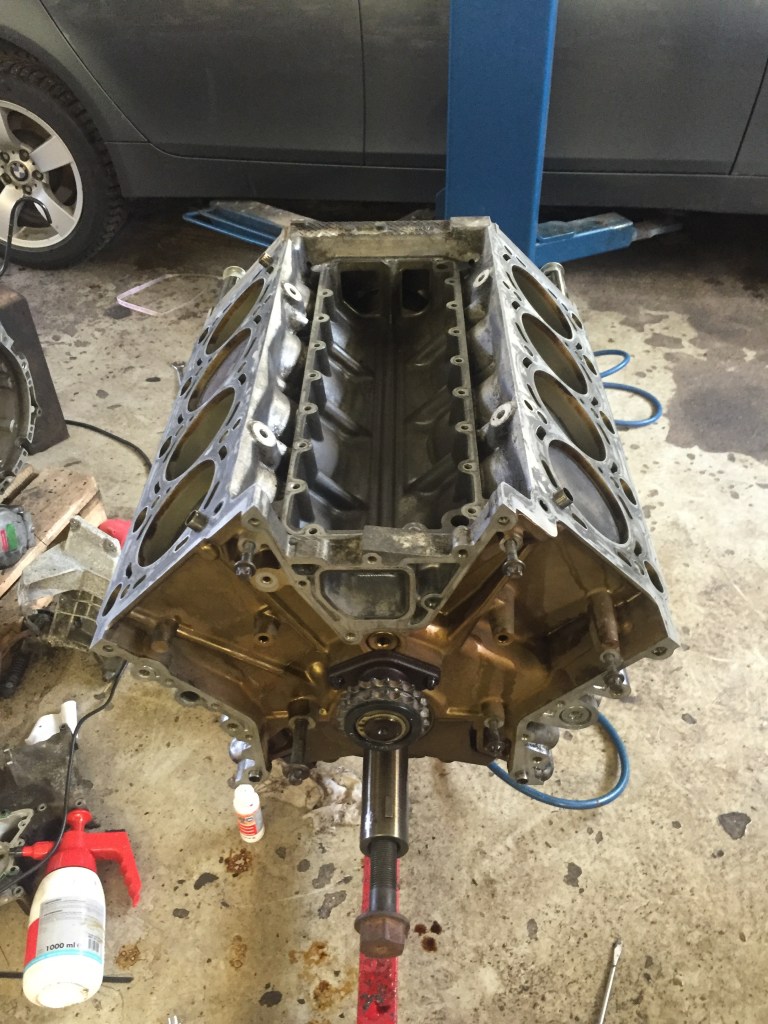
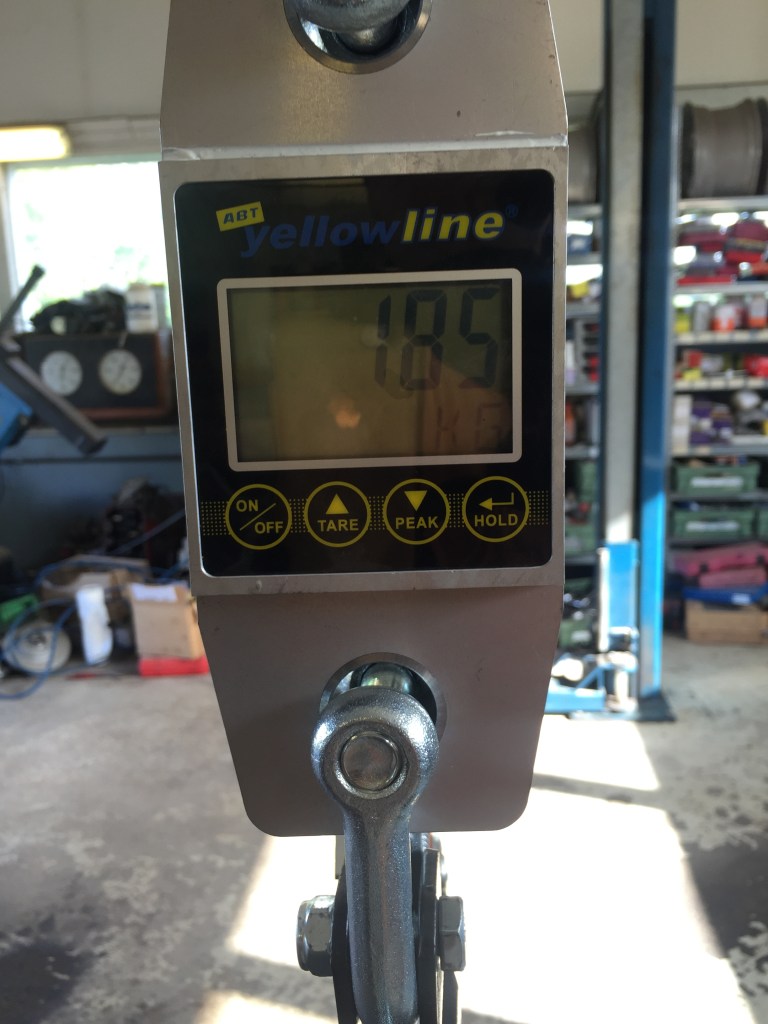
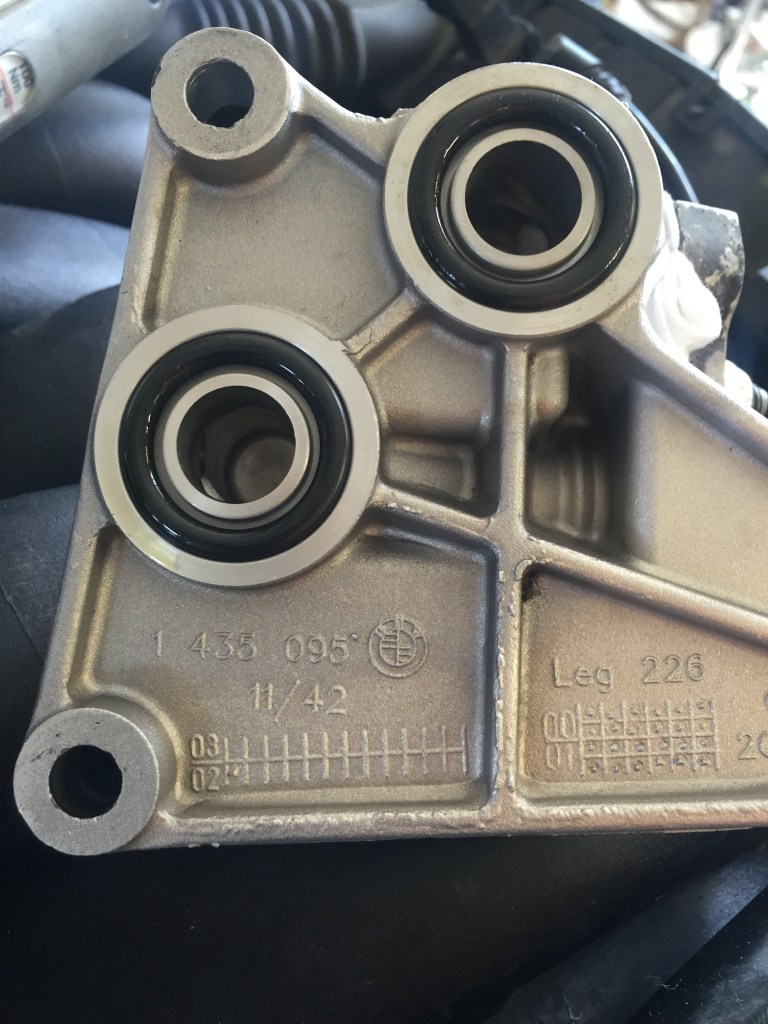
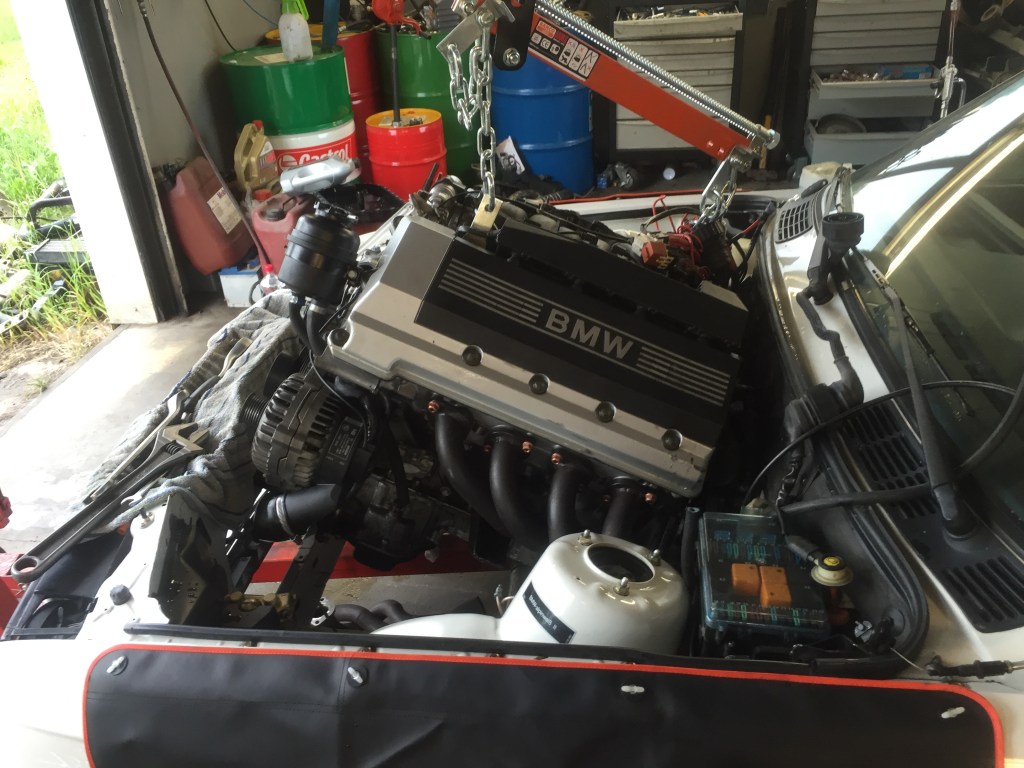
This is where it all begins, the building of custom M60B44 engine.M60B44 dry engine weight without starter motor and generator. Not that heavy!X5 oil assembly leg Nr. 1142 1 435 096 to use with E30 M6x swaps.
The obsolete M62 assembly with deflection rail (Nr. 7), and the location of the oil channel (Nr. 8 and 9).
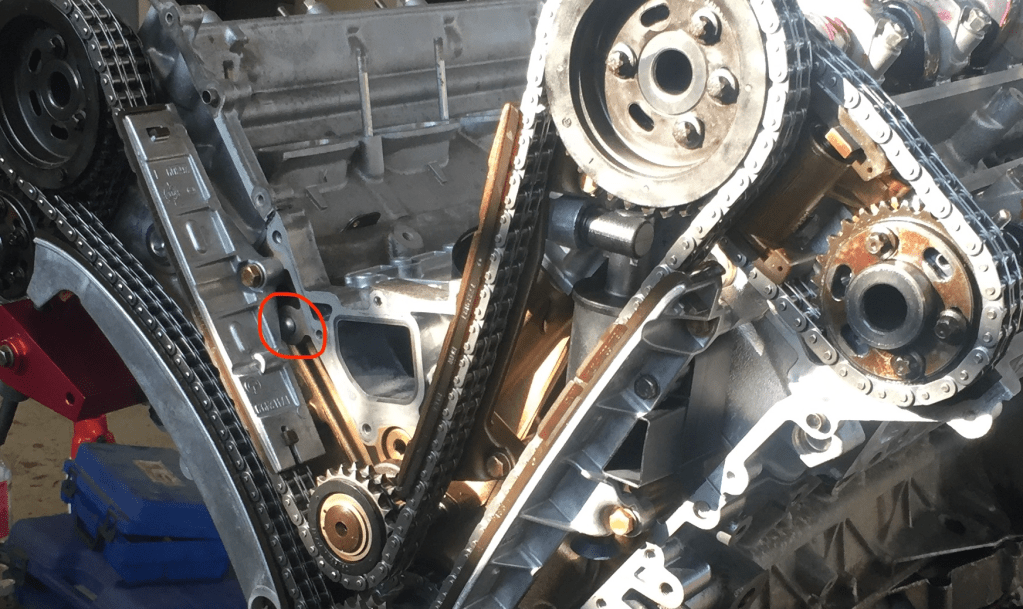
M60B44 hybrid engine with robust duplex timing chain, and blocked oil channel.
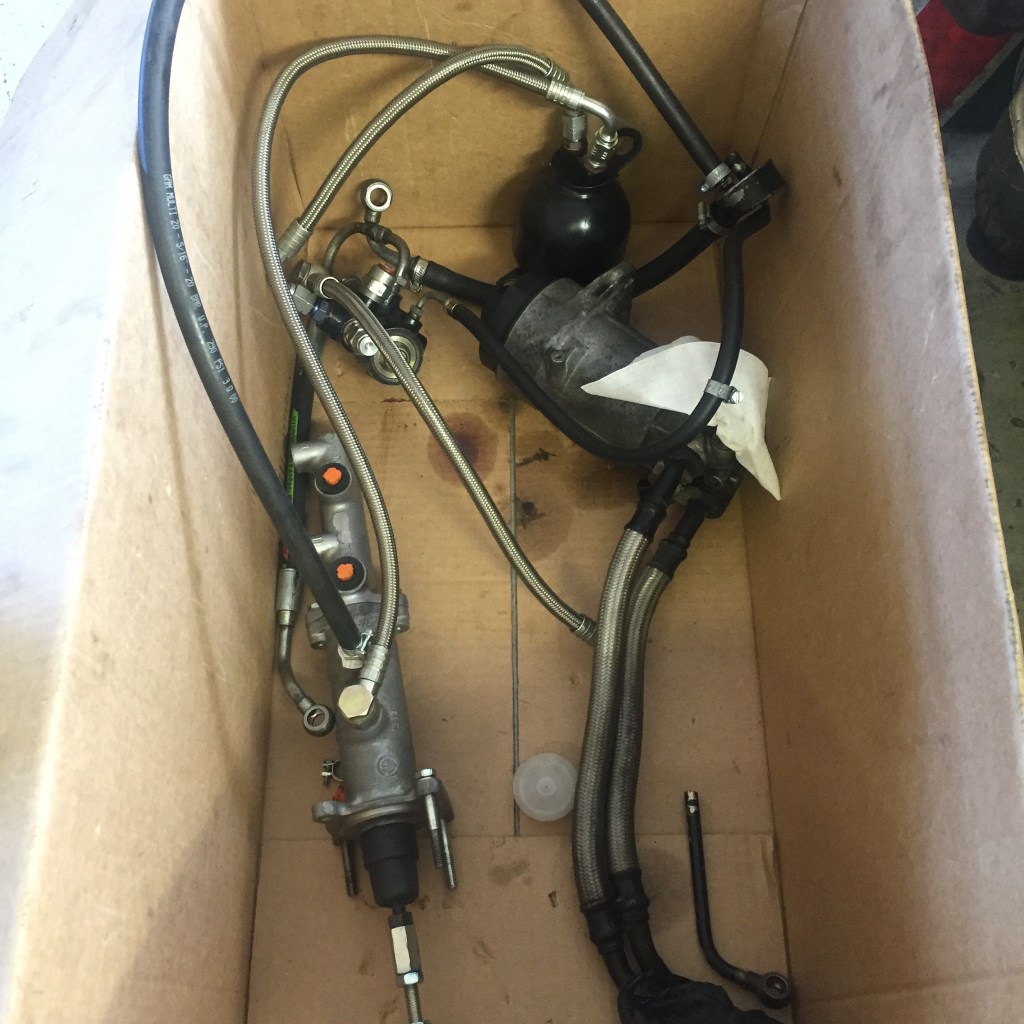
Hydraulic brake booster and brake master cylinder from BMW 850i (E31) for high quality brake assembly.M60B44 stage 3 engine is built to take some serious beating up to 8400 rpm!
More information about performance upgrades can be found on my other articles:
Search no more. You found the information in regard to performance upgrade for BMW M60 hydraulic lifters. They are also known as flat tappets, hydraulic tappets or just simply – lifters – they are all meaning the same – a hydraulic element which is in between your engine’s camshaft and valve, adjusting the valve clearance by utilizing hydraulic pressure. They are called flat tappets for a reason: the top of the lifter is flat, and while its moving up and down in relation to an engine speed, it is also rotating around its axis. Inadequate manufacturing quality (When using cheap Chinese parts) and the requirement for flat tappet rotation can create major challenges during a first startup, if lifter(s) will fail to rotate. This can lead to permanent cylinder head and camshaft damage.
Use appropriate cam lube during the assembly. Immediately after the startup, keep the revs continuously above the 3000 pm territory. This will ensure that new flat tappets can start to rotate along its axis. Do not let your engine to idle for the first 20 minutes! Higher rpm during a break-in period will provide both A) higher oil pressure for lifters and B) higher rotating force through camshafts
Engine comparison: M60 vs. M62 engine
M60 engine design is from early 1990’s. This means the engine was utilizing 35mm valve lifters used in both M50 and M42 engines. On M62, the factory wanted to reduce:
A) Rotating masses,
B) Increase the total efficiency of the engine,
C) Make the engine more quiet and sophisticated,
D) Reduce manufacturing costs
Thus the reason, why the factory ended up upgrading flat tappets on M62 to smaller diameter of 33mm. From the perspective of performance tuning, some of M62 modifications are not welcomed in terms of top rpm reliability, like the infamous change from “stronger-than-a-tank” duplex timing chain to a fragile single version. OK, let’s get back to lifters.
According to bmwfans.info, M60 hydraulic valve lifters weigh 78 grams,
While M62 flat tappets weigh only 52 grams, according the same source.
Please note: that is over 26 grams weigh reduction per valve-spring package! When you multiply that by 32, you can see, how the factory managed to save 832 grams from the flat tappets only!
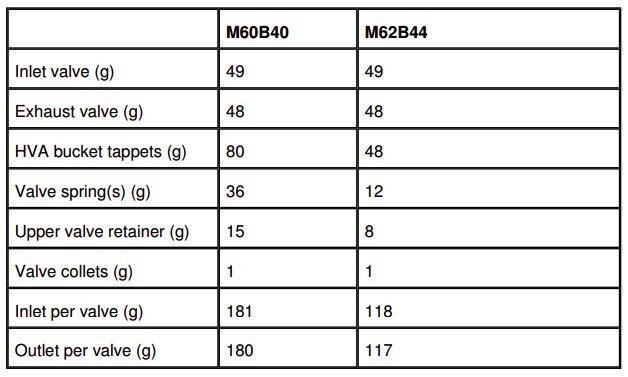
Comparison chart of M60 vs M62 valve trains. Notice the weight of factory M60 flat tappets.
Benefits of utilizing the lighter valve train on M60 engine
Because heavier M60 flat tappets require more stiffer valve springs, M60 engines have dual valve springs, while M62 has single ones. In terms of performance tuning, this can be either disadvantage, or advantage. The upside is: if you can find a way to reduce the overall weight of moving masses from M60 valve-spring package – without affecting the spring rates, you can get your valve train to sustain higher rpm range. And this is especially advantageous if you are after naturally aspirated performance tuning.
Our calculations show, that by reducing 20 grams from the valve-spring package – while utilizing both M60 stock valve springs – your M60 engine can sustain revs up to 8400 rpm. Ladies and gentlemen: it is on S65 territory! Please be advised: The maximum sustained rpm is mostly dependant on cam profile, namely aggressiveness of cam lobe (cam duration, lift), and to some degree on intake system efficiency.
Do I have to change my cylinder heads to M62?
No. You do not have to change your cylinder heads to M62, if you own M60 engine. Actually, the reality is the other way around: you may be interested in creating so called hybrid or frankenmotor with M62 bottom end matched to M60 cylinderheads – this will provide you prerequisites (Prerequisites only, thus most frankenmotor projects I have seen have failed to utilize this untapped potential) to build a high compression performance engine.
If you already have M62 engine, the advantage of hybrid motor is the upgrade to more robust duplex timing chain. The end result is pretty neat way to combine the best features from both engine families. Only downside is the heavier M60 valve lifters.
How to fix the issue of heavy flat tappets on M60 engine?
This modification is applicable if you are:
A) After performance upgrades,
B) Not worried about engine sophistication nor quietness,
C) Chasing for reliability on 7000rpm + category
You may have heard stories about fitting VW lifters to M42 318is engine, but you are lacking the proof of concept, right? Afterall, both M42 and M60 are using the same flat tappets.
Here is the proof of concept: I have successfully drove the M60 engine with VW tappets over 16 000 kilometers (Updated on 7/2024). Yes, they are not the most quiet, but they can take up the beating. My rev limiter was initially set to 7800 rpm. Afterwards, it was lowered to 7600 rpm. That is essentially the effective shift point.
VW hydraulic lifters to BMW M60 engine
The VW valve lifters in question are manufactured by Febi Bilsein. They can be any brand you prefer. I ordered mine from autodoc.de – not the best service, but affordable prices.
The part number is 07060,
outer diameter 35 mm
Height: 26mm.
Weight: 56 grams
Happy E30V8 revving!
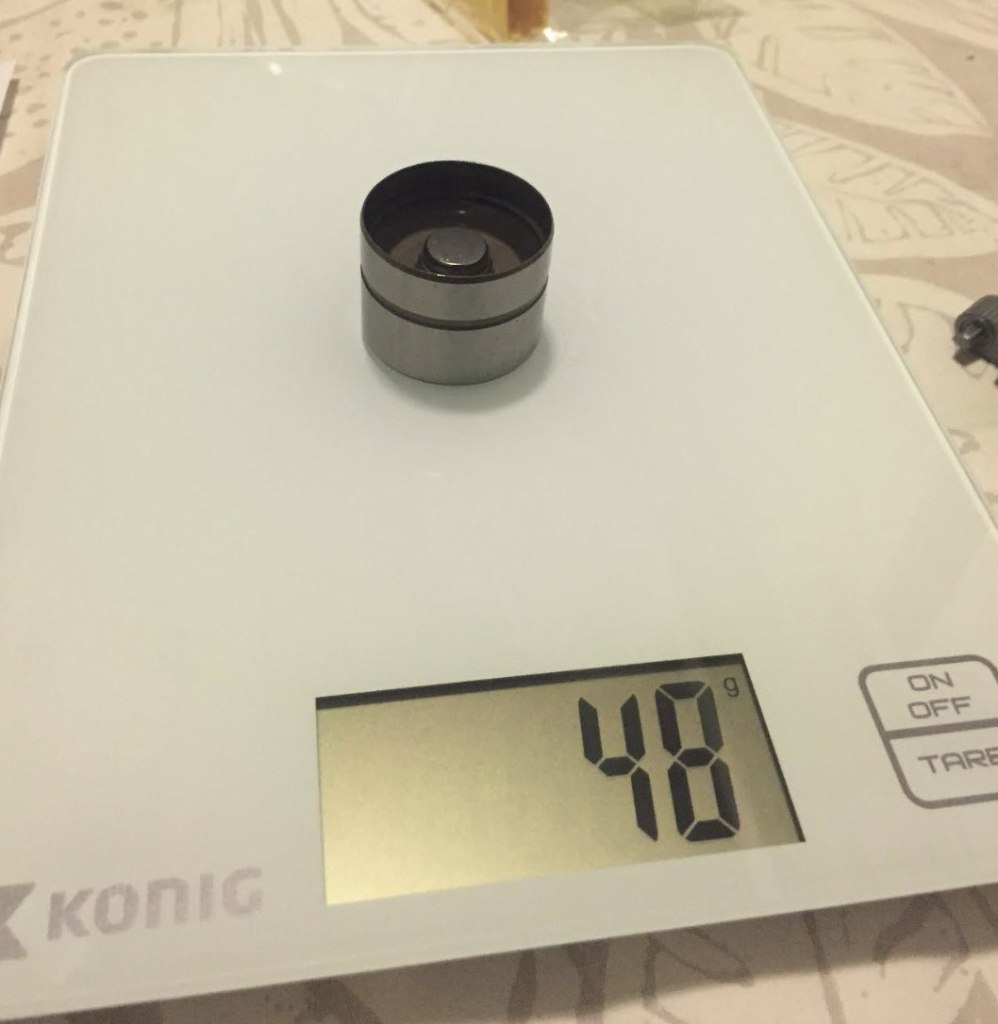
Some 35mm lifters can be as light as 48 grams, putting them on par with stock M62 33mm flat tappets.
There is more information about performance upgrades on my other articles:
A bit provocative question – and far too broad – in order to give you any simple answers. Basically, the most suitable ECU for your build is the one that suits the most for your preferences, which may vary a lot. Consider an ECU as an investment, where putting more money will get you both more features and quality in return. It is a return of investment. If you will break your engine due to lack of experience towards ECUs, their capability for warning limits and limp modes – it doesn’t matter – if you saved one or two thousand by selecting a cheap ECU in the first place.
The rule of thumb: If you are first timer, you will almost certainly buy a low quality ECU, regardless of all info provided on this blog article. If you are more experienced tuner, you most certainly recognize the importance of knock sensors, data logging, warning limits, extra connectivity and support, which more expensive ECUs will provide for you.
Let’s start with a common aftermarket ECU features. At first hand, these may seem minor issues on your list, but when time goes by, they will grow ever more important:
Checklist when buying an aftermarket ECU:
Configurability of basic parameters (e.g. injector data)
Ability to control IDLE QUALITY with hotter cams
Ease of use and connectivity (e.g. stability, speed, future support)
Longevity of both firmware and program support
Quality and number of support in your country
Number of extra inputs and outputs
Number of knock sensors
VE table configuration (a quite basic nowadays, thankfully)
CAN support
Full sequential support
Warning limits
High quality, wide band closed loop (For handling exceptions and monitoring)
Ability to control up to x number of variable cams for your build
Quality of data logging features: storing, reading and analyzing of data
One good example – actually a bad one – is Miller Warchip. They started with promising livechip feature for 1990’s bimmers, but when years passed on, company struggled to provide necessary support, leading to bad customer experience. If you still want to use Warchip, you are only good with legacy OS with legacy Java on Windows XP. ECU’s support for future upgrades is critical, thus you may have your build for decades. A financially stable company can provide you the best support for software upgrades in future.
How about tuning OEM ECUs? They can be divided into four main categories:
Reprogrammable ECUs
ECUs with add on ‘piggybacks’
ECUs with livechip
ECUs with switchable chip
The newer your OEM ECU, the easier it is to tune. What comes to M6x engines – they are type 2-4 ECUs. Most of us do prefer M60 OBD1 wiring harness and ECU, due to their simplicity for E30 swap. Thus ECU standards were under heavy development in 1990’s, you can face strange oddities in M6x ECU, like frequent EWS updates, or a sudden transition from OBD1 to OBD2. Generally speaking, ’99 model year is the milestone, when M6x engines were fully OBD2 compatible through KCAN interface. Luckily though, most M6x versions support live data logging through program called testo.exe, which I have explained here.
There is some evidence for BOSCH DME 3.3 ECUs having issues on both BMW M60 and Audi S6 engines on ’94 model year ECUs. Some of these, even with fully functioning live or custom chips can face strange oddities, if your build meets one or more criteria:
Your engine’s power range is extended to 7000-8000 and/or:
You are using bigger injectors, and/or:
Your stock MAF is not flowing enough, and/or:
You are using hotter cams -> a stock ECU cannot maintain idle -> an engine is stalling at traffic lights
Thus OEM M6x ECUs are somewhat limited for serious builds, it is advisable to turn your eyes on aftermarket ECUs. A bit surprisingly, OEM ECU can handle supercharging better, than building a hot street NA engine.
The problem most first timers lack to understand when selecting an ECU:
ECU’s ability to control idle quality with hotter cams
ECUS’s ability in normal driving conditions: cold start, cruise speed, stopping at traffic lights without stalling
ECU’s ability to prevent a total disaster of your build: Setting up warning limits and limp modes
A list of warning limits any engine builder shall employ in order to trigger a limp mode:
Continuous Oil pressure (OP) and temperature (OT) monitoring
Continuous Fuel pressure (FP) monitoring
Engine coolant temperature (CT) monitoring
In addition, following features must be monitored too:
Knock detection for ignition compensation
Warning limits for boost control (through MAC-valve)
Remember: the easiest part of your engine tune is to setup Wide Open Throttle (WOT) area of the map. It is the graph with nice looking power curve of your build. In reality, the most time consuming part is setting up an idle, cold start and driving quality for cruising conditions. And this is what you pay for.
Think about buying an ECU as an investment. By purchasing high quality parts, you can save big bucks in the long run, possibly avoiding a total disaster of your build.
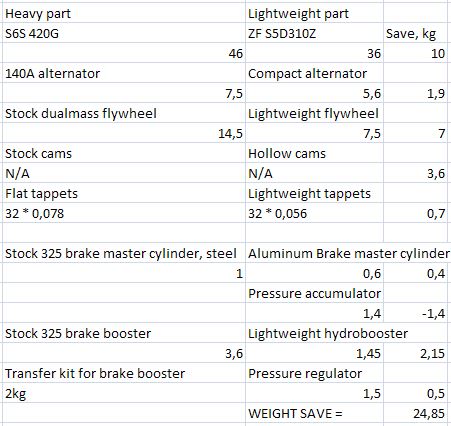
Did you know you can save up to 25 kilograms of an engine weight by selecting the lightweight components for your M60/62 build? This reduction can have a crucial effect for your E30 handling. Lighter, the better. Don’t be fooled by excessive weight of modern cars. They still follow the same laws of physics, no matter what marketing department puts us to think. Simply put, all modern BMW’s are too heavy for motorsport. They are not build for motorsport, as was E30 M3 in 1980s. And that is exactly the reason why we are tuning E30s. They are lightweight and offer you a unique driving experience – as if you are a part of a machine – a driving feel any reasonably priced modern car cannot offer for you. There is some lightweight hot hatches, but due to their FWD nature, they are excluded from the equation. Only on the day, when Formula One will switch to FWD, I can admit I was wrong with the amazing driveability, fun and excitiveness of FWDs…
So the weight is you worst enemy, thus your engine must be as light as possible, while providing an instant throttle response and a wide power range. Not so easy task, but doable for full aluminum V8 engine.
Please find below the table about the selection of the lightweight components, and their heavier counterparts:
Selection of lightweight components
Note 1: I excluded lightweight headers from the table, thus stock headers and lightweight custom headers are approx. the same weight, due to 4-1 nature of lightweight headers vs. stock headers with two primary pipes.
Note 2: Example above uses the lightweight hydrobooster from 7 and 8 series instead of a stock brake booster. This will have a double effect for your build:
No extra weight is moved forward
Hydrobooster is lighter than stock brake booster with a transfer kit
Note 3: Please note you can have further weight savings by:
Air condition delete
Catalytic converter delete (regulations will vary)
Keep windshield washer reservoir empty
Change bonnet to carbon fiber (-16kg)
With smart actions for weight saving, you can improve your V8 build’s handling substantially. Of course, there is more aggressive weight distribution tactics, like moving engine backwards, but I consider these too excessive for a street car. You can make your V8 behave like a dream by using the tips mentioned on this blog site. So how fast E30 V8 can be while cornering, if done right, you may ask? Probably faster, than your have the guts to put the pedal to the medal.
Lately, there has been a trend among experienced tuners to turn their eyes back to naturally aspirated engines, thanks to their ever challenging and unforgiving nature. Their is just something fascinating in a high revving naturally aspirated engine, especially in a V8.
Let’s admit: If you are interested in maximizing horsepower: buy a turbocharger. It is the easiest way to add power to your engine. But if you are like me, you are not interested in max hp. You may be allergic to turbolag, and interested in faster-than-light throttle response, in order to maximize the traction and driveability. Mate, this is the right blog for you. It is not about maximum hoos pauwo. It is about maximizing your fun, while you are driving along 101 on a west coast, or where ever you are enjoying your E30. In these situations, 300 to 400 engine horsepower and steady 400-500 nm of engine torque is much better than a galaxy exploding power curve. On rear wheels with 4th gear it means approx. 1500-1900nm of torque, if you are using a 5 speed ZF S5D310 and 3.15:1 ratio differential. You can consider 2000nm of rear wheel torque the upper safe limit for twisty (and both dry and clean) roads with 225 semi slicks. Just put the fourth gear on, and start enjoying.
The general idea is, that you may seek for more speed, but you may not be able to put any extra torque to rear wheels, or otherwise you may loose traction. This seems to be pretty tricky for folks to understand. It is the torque on rear tires that makes your driving either fun, or scary and difficult. And that’s why an electric car can be very fast on a track: they are providing steady torque, without any interruptions whatsoever. It means they are easy and logical to drive up to the limit. It is the same reason, why modern BMW diesels have even four turbochargers.
If you are living in the U.S, its pretty straightforward to install a LS engine into your E30, and start enjoying. While in Europe, M6x is popular swap due to a high number of potential engine donors available. And that makes it interesting tuning project for E30. With a basic M6x swap, you can get up to 286 hp for your E30. So your motives to build an engine swap may vary where you live at. M6x is very capable engine, and will response into a tune like any other engine.
Why not M5x then? the V8 has both more displacement and valve area than its little sister – making it the better choice for a NA build. There is no replacement for displacement – the V8 is basically a two four pot 16-valve 318is engines in the same. But if you are going to turbocharge your engine, the six pot can be better starting point, thus its much cheaper to rebuild with forced internals. Turbocharging M6x is more expensive, requires high demand from powertrain, and all these will add tens of kilograms of unnecessary weight on a front axle.
If you are about to keep your engine NA – go for V8 – and keep it as light as possible, thus it is one of the keys for good handling. Even among NA M6x builds, you can save up to 27 kilograms from a front axle, only by making smart decisions for your build. But V8 is still so heavy, you may say. Well, it can be either a true or false. A well built M6x swap is equal in weight to a stock E30 325i. I know this, because I’m a guy with two engineering degrees, and being taught to measure, before start making any hypothesis. In full driving condition, including all fluids and 3/4 of gasoline E30 weights 1180kg with M60 engine. It is in the par with the stock E30 325i. It is a bit of a surprise, but M6x cylinder block is lighter, weighing only 28 kilograms, than a good old four pot M10 block. The name of the game is aluminum.
A good reminder if you are first-timer in performance tuning, please repeat with me: A naturally aspirated engine is as strong as its weakest link. So tuning NA engine is like drinking a fine vine: there are no shortcuts in the making. Repeat with me: there is no single shortcut. Not only horsepower figures, but also the quality of your build through lightweight parts has to be taken into account. Many times the information from public bimmer forums is limited what comes to NA M6x performance tuning. You must face it: Tuning a naturally aspirated engine is an expensive task. If you have extra penny to spend for performance tuning, then go for it. If you don’t have, it may be advisable to stick with a stock engine.
INPA is a great tool for bimmer enthusiast for diagnosing E-series. Thus information is scattered around internet, it can be pretty difficult to understand which version and cable works in which series of a car. Let’s bust the myth, and explain this in layman’s terms.
EDIABAS: The server program needed to establish a connection in between your car and INPA. ISTA+ can utilize EDIABIAS too for E-series, namely E9x.
INPA: Factory level diagnosis tool developed by Bayerische Motoren Werke for E-series bimmers. INPA needs EDIABAS and appropriate cable to work.
ADS Cable: Early data transfer protocol for EDIABAS. Specific rounded ADS cable is needed for late 1980’s cars up to 1995, typically for cars with M50 or M60 engines. One example is a cable called TinyADS.
K-line or KCAN: Data transfer protocol for early OBD1 and OBD2 compliant cars, like late E36, E38 and E46. A modern K/DCAN cable is compatible with both data transfer protocols. Use rounded adapter to connect K/DCAN cable to OBD1 diagnostic plug, like found on E36. E38 model year 1999 has well-hidden OBD2 compliant port in a dash, in front of a gear lever.
DCAN: Faster data transfer protocol for late OBD2 compliant E-series cars, like E9x. Note: DCAN configured INPA (Remember, it is EDIABAS which creates the connection) cannot establish a connection to KCAN compatible car, like E38. The solution is described below.
Common problems and solutions:
You need more tricks than just tapping a switch in a cable in between K and DCAN. You must configure K or D can protocol accordingly for EDIABAS by using a program called D-CAN.exe
C:\Windows\Obd.ini: Com1 port must be set correctly.
C:\EDIABAS\EDIABAS.ini: Interface must be set either INTERFACE =ADS or INTERFACE =STD:OBD
Although Windows may find FTDI drivers for a K/DCAN cable, the version Windows is installing may not be compatible with EDIABAS. Install other FTDI drivers, e.g. these from ftdichip.com
INPA version may be faulty, try a different version.
You bought a faulty cable. E.g. I was wasting a week for configuring INPA for a faulty cable. Very frustrating.
If ADS is not working:
You do not have an ADS compliant cable. The most probable reason is that someone sold you a dummy cable without the circuit inside the rounded end, which is needed for establishing a connection.
ADSsetup must be run from EDIABAS/Hardware/ADS/ADS32 folder. If you do not have this folder, you may have the latest version of INPA/EDIABAS which is not compatible with ADS protocol. Install earlier version of INPA and EDIABAS, containing support for ADS data protocol in the corresponding folder.
IRQ address in COM1 port may be wrong on your laptop. Change IRQ address to 4.
Hardware address in COM1 port may be wrong on your laptop. Change HW address manually to 03F8.
If you cannot change the IRQ address, turn of all unnecessary devices on your laptop, and try again.
If you cannot change the HW address, use program called adsport.exe in order to manipulate EDIABAS configuration file called ads32.dll, and setup HW address according to your laptop.
Enjoy!
Diagnostics information from DME 3.3 module through ADS cable. Tank ventilation error is a typical for engine swaps, thus E30 does not have any sensors for it.
There are excellent articles out there about faulty Positive Crankcase Ventilation (PCV) systems, like the one on Timm’s BMW E38 Repairs and information page. PCV or Crankcase Ventilation System (CCV) is basically the same valve with a different name, only acronyms may vary.
This article is from the perspective of performance tuning. If you are about to install hotter cams, raise compression or rev limiter, it is important to understand the design flaw in a stock M60 PCV system. The described mods typically increase engine performance, but also put more stress – and blowby – through the engine. These blow-by gases are the reason, why there is a system called Positive Crankcase Ventilation in the first place. Thus, when you increase stress to your engine by increasing both compression and rpm, you will increase the amount of leaking gases to a crankcase. This will put increased demand to PCV system to do its job.
Unfortunately, the stock M60 CCV design is faulty from the factory. It does not matter if you replace the item with a new one – it is not up to its task, more less when you are doing any performance upgrades.
The main havoc for the stock PCV system is the design: all gases and residue will accumulate in the front of cylinder 8 runner. When there is enough sludge, and you accelerate hard at the same time, the cylinder in question will gulp all the residue into the combustion chamber. The result is pretty obvious: the Pope like white smoke is a testimony of compromised combustion chamber process, with excess oil.
M60 intake cover with Positive Crankcase Valve, PCV. Sludge will build up next to a cylinder 8 runner, and eventually find its way to the cylinder like a big gulp. Hence the occasional white smoke, when accelerating hard to a highway.
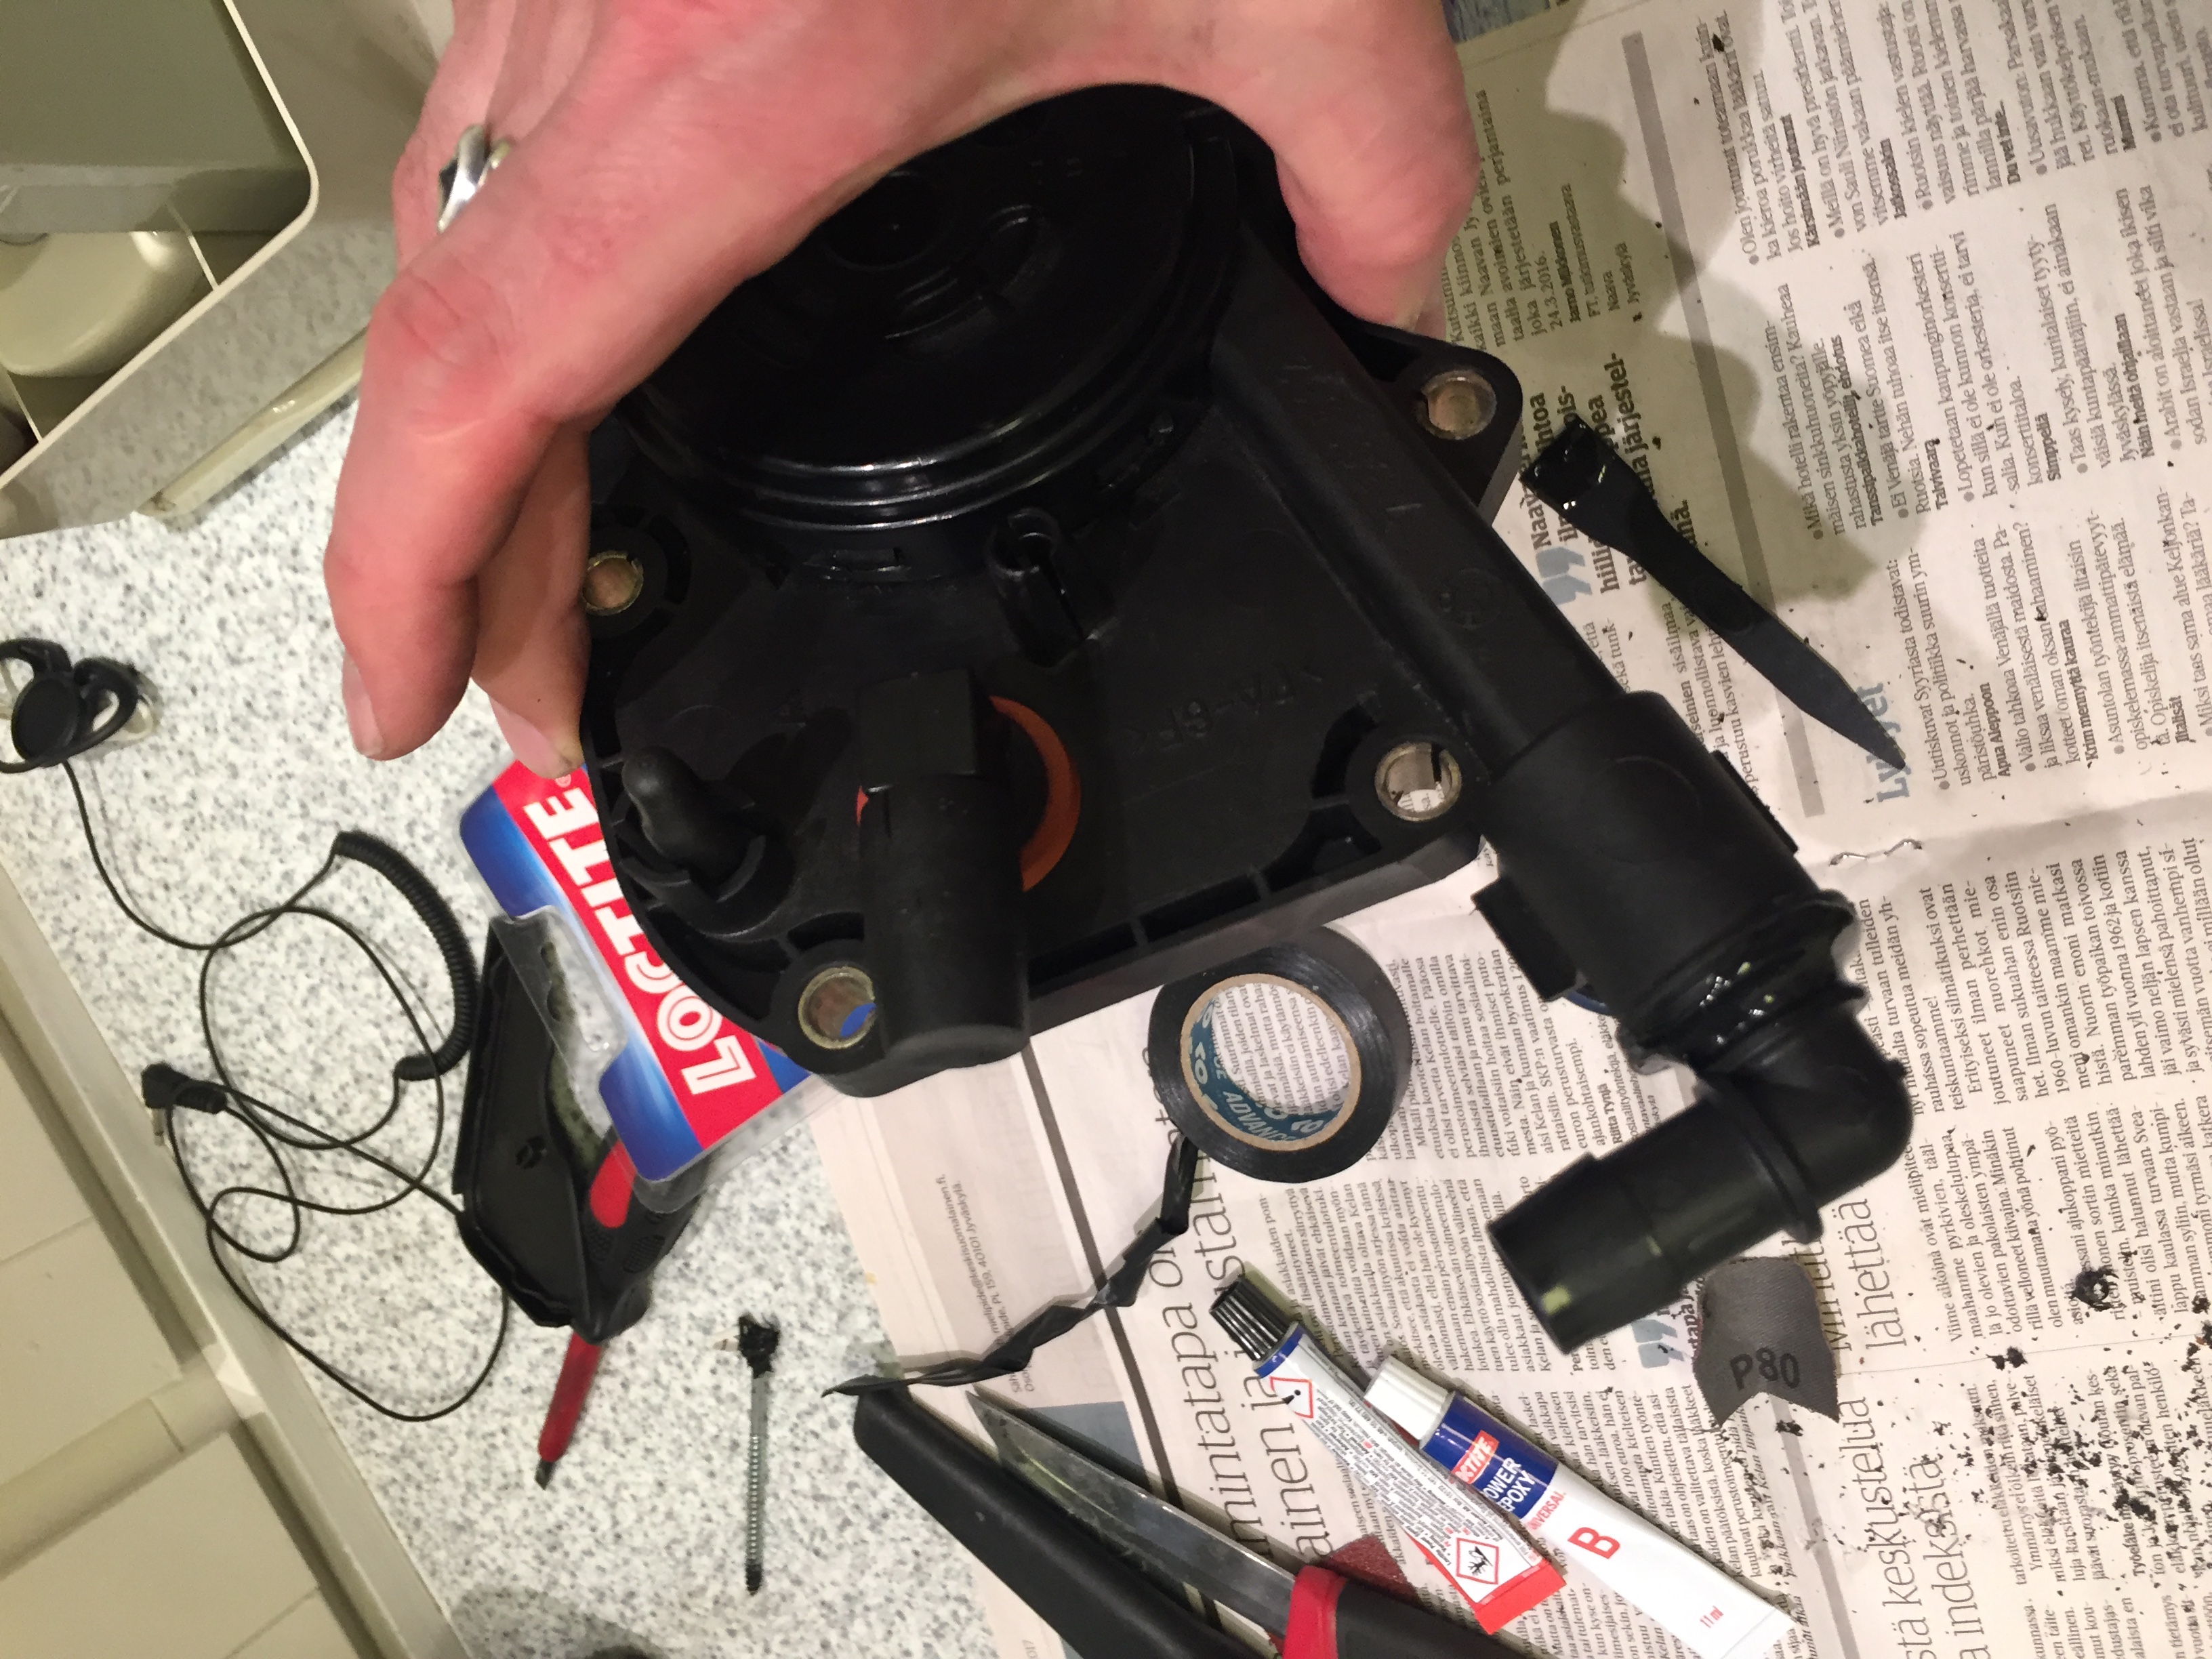
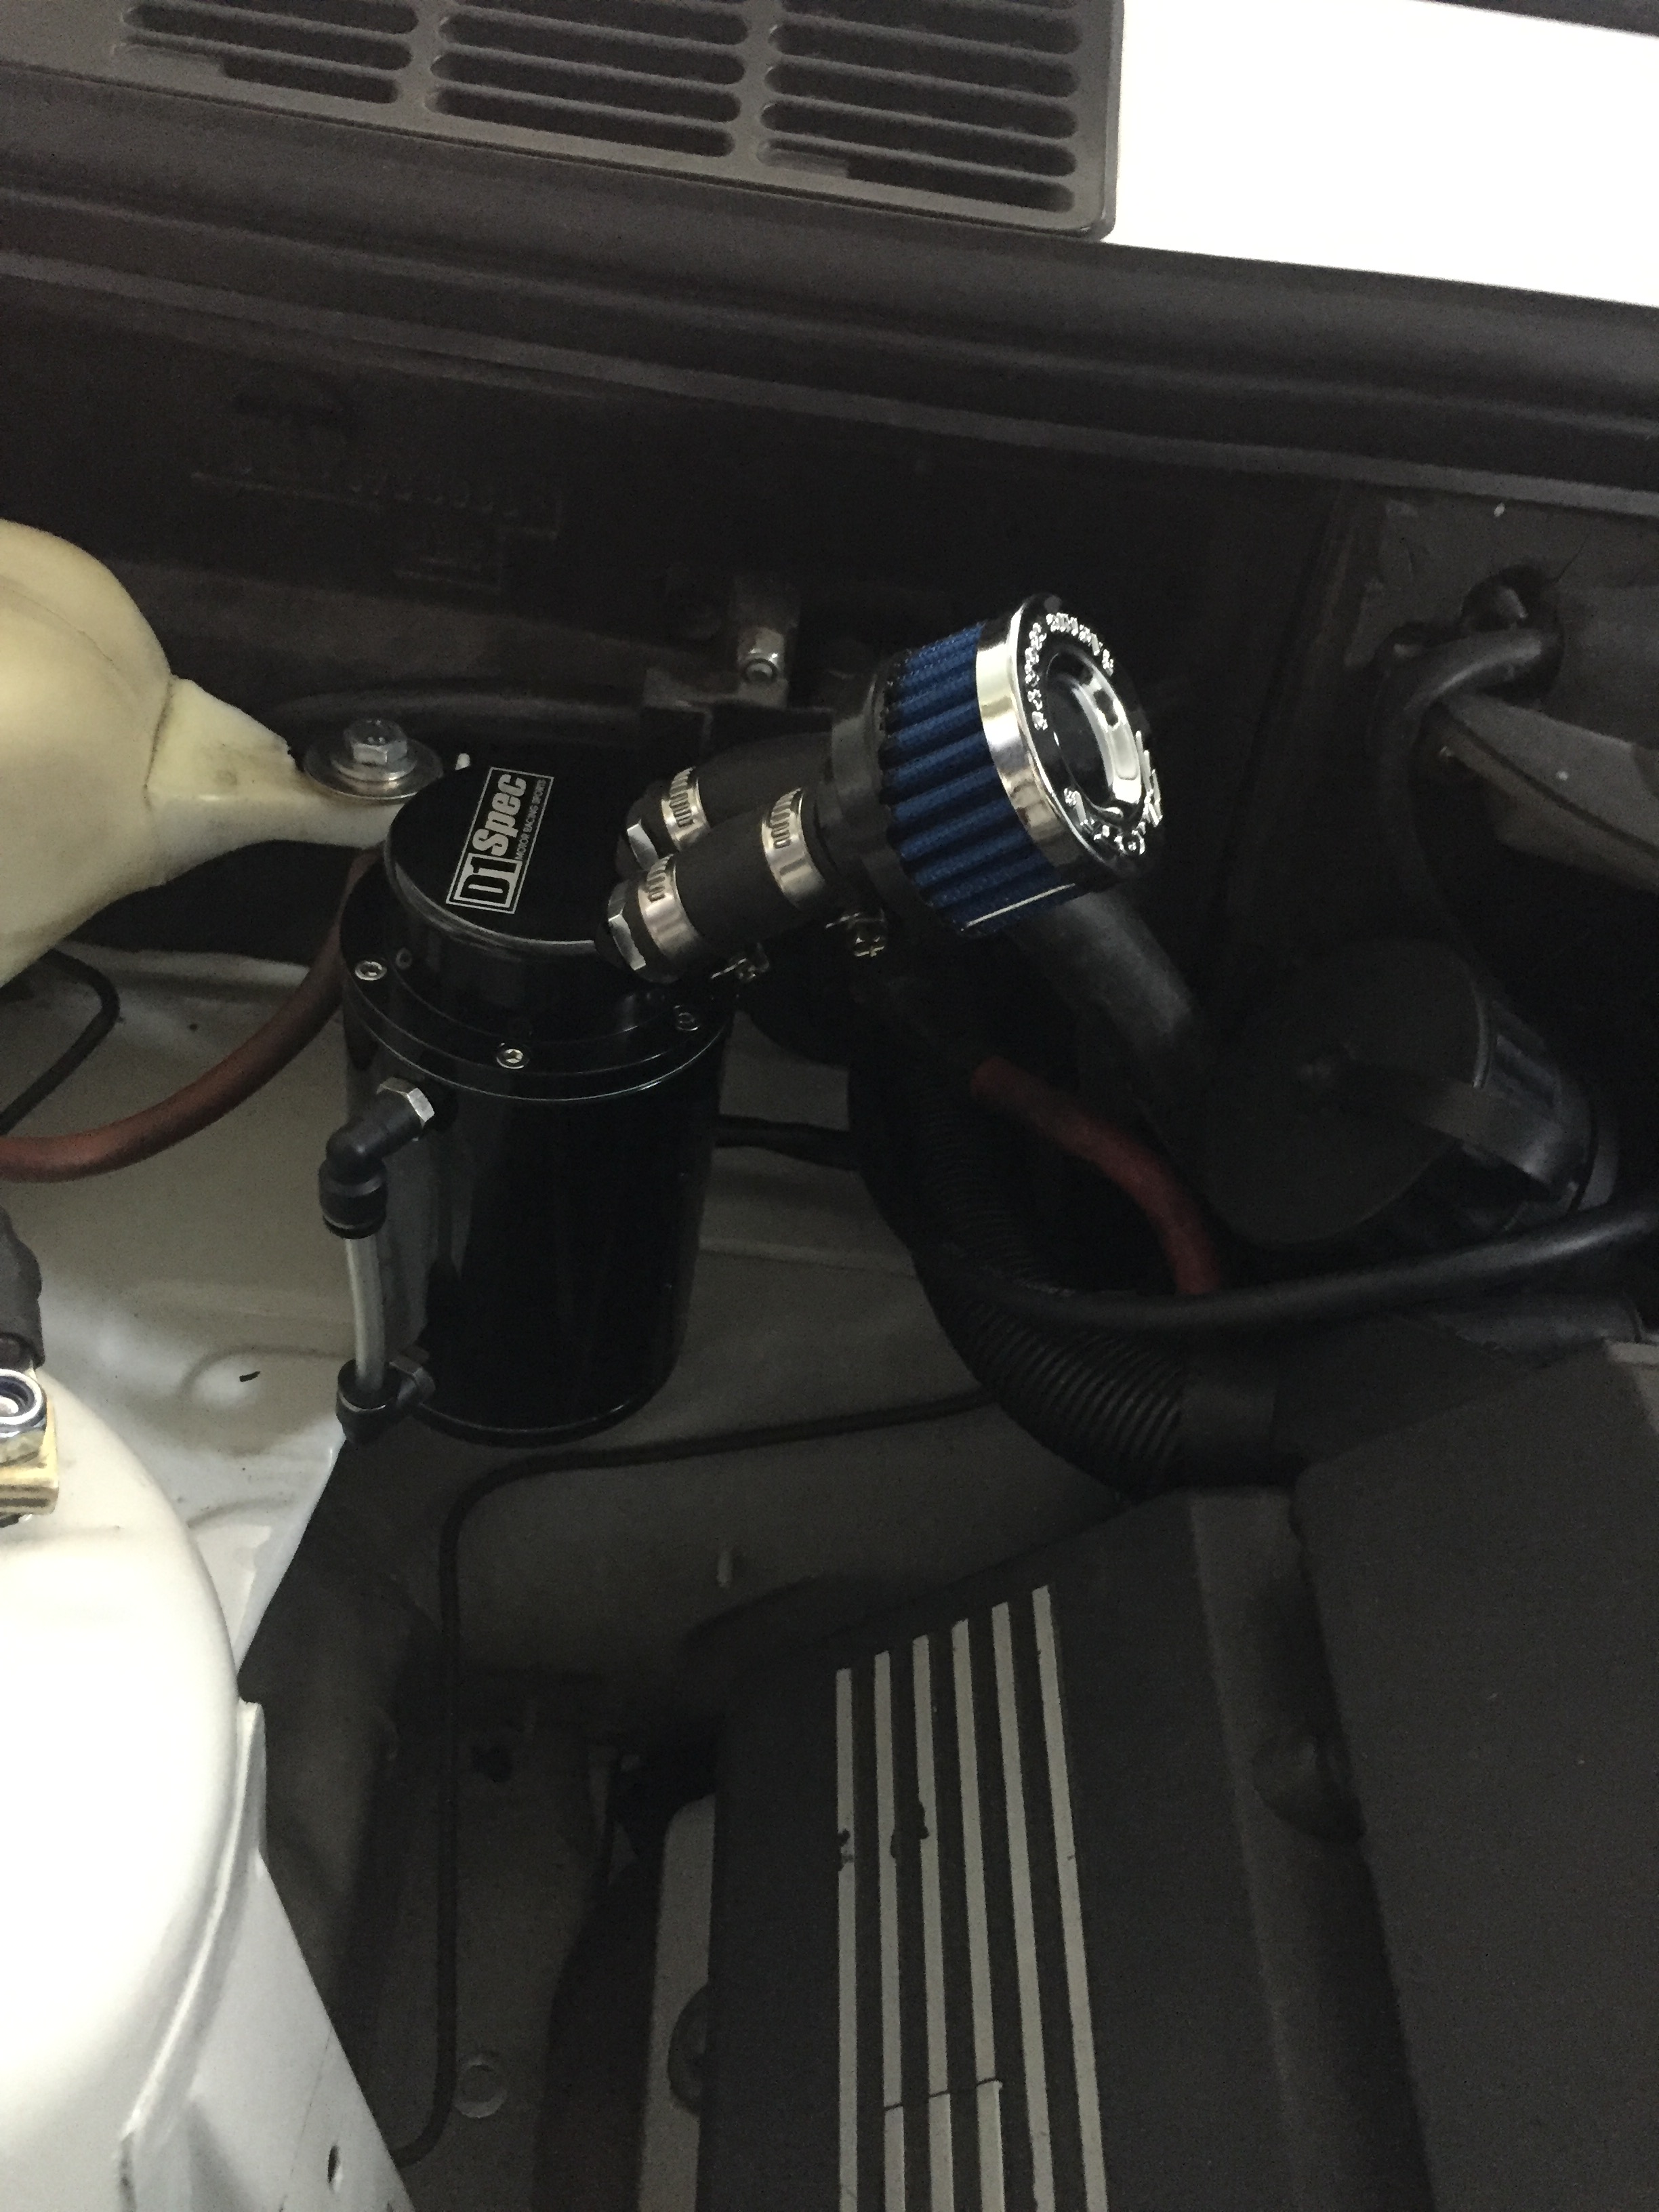
Installing an oil catch tank
One option is to bypass the stock PCV valve, and install an oil catch tank for residual gases. This can be done by modifying the stock PCV valve, and rerouting gasses to the tank. Other option is to purchase a new rear plate for intake manifold. The oil catch tank was acquired from BjörkMotorsport.
Rerouting a stock PCV valve for external oil catch tank.
The factory has provided four different intake manifolds for M60 and M62 engines. If you have studied about airflow, its obvious to select the manifold with the best possible velocity stacks for optimizing the engine performance. Velocity stacks – also called as trumpets, horns or bellmouths – can increase maximum airflow approx 2-4 %, but the benefit may be even higher in mid-range torque due to intake resonances. The science behind trumpets is their ability to smooth out incoming air, maximizing airflow to intake runners.
Source: Wikipedia, Velocity stack detail.gif, credit for user Motorhead. Picture published under GNU Free Documentation License. Delivery ratio of 387mm long runners with and without bellmouths. The difference is up to 4% gain.
Disclaimer: tuning a naturally aspirated engine is as strong as its weakest link. Cams, valves, cylinder head, headers, collector – and most definitely “the hot air intake system” may be hindering down the power and torque in your build. Thus, the benefit of changing the manifold depends on both level and quality of modifications you have made for your engine.
Different intake manifold versions
M60B30 and M62B35 – These are with smaller runners, so we will forget these,
M60B40 model year 1992 (MY1992) – The best version, large runners with full 360° trumpets,
M60B40 model year 1993 -> M62B44 non-Vanos (NV) – Large runners with partial bellmouths at the intake entry; the second-best option,
B62B44 Vanos – Version with small runners, so we will forget these too.
The Intake Battle: MY1992 vs. NV intake
Runners on the NV intake are 387mm long, meaning they are 20mm shorter to MY1992. This suggests that the NV design may perform better at high rpm. Let’s do some analysis, and break it down into numbers:
Delivery ratio comparison in cylinder 1. Red = MY1992 intake, Black = M62B44 NV intake.
The MY1992 intake vs the NV:
+Up to 20nm gains in the 1000-2800rpm range,
+Better mid range torque in the 3750-5000rpm range,
+ Up to 8hp higher power output in the 6900-7600rpm range.
The NV intake vs the MY1992:
+Up to 9hp benefit in the 6000-6800rpm range.
The verdict:
Overall, the MY1992 intake is the best choice for a Stage 3 hot street engine operating across a broad 1000–7600 rpm range. The MY1992 intake also shines with automatic transmissions. Intake pulse charging (delivery ratio) is higher on the MY1992 intake due to longer runners, and better velocity stacks (less flow friction). The NV intake has a better delivery ratio in the 6000-6800rpm range, though.
A) If you want the broad rev range (without variable intake) all the way to the 7600 rpm limiter, the MY1992 intake is your best choice.
B) If you have a stock engine with the stock rev limiter and want more top-end grunt, the NV intake is the right one for you.
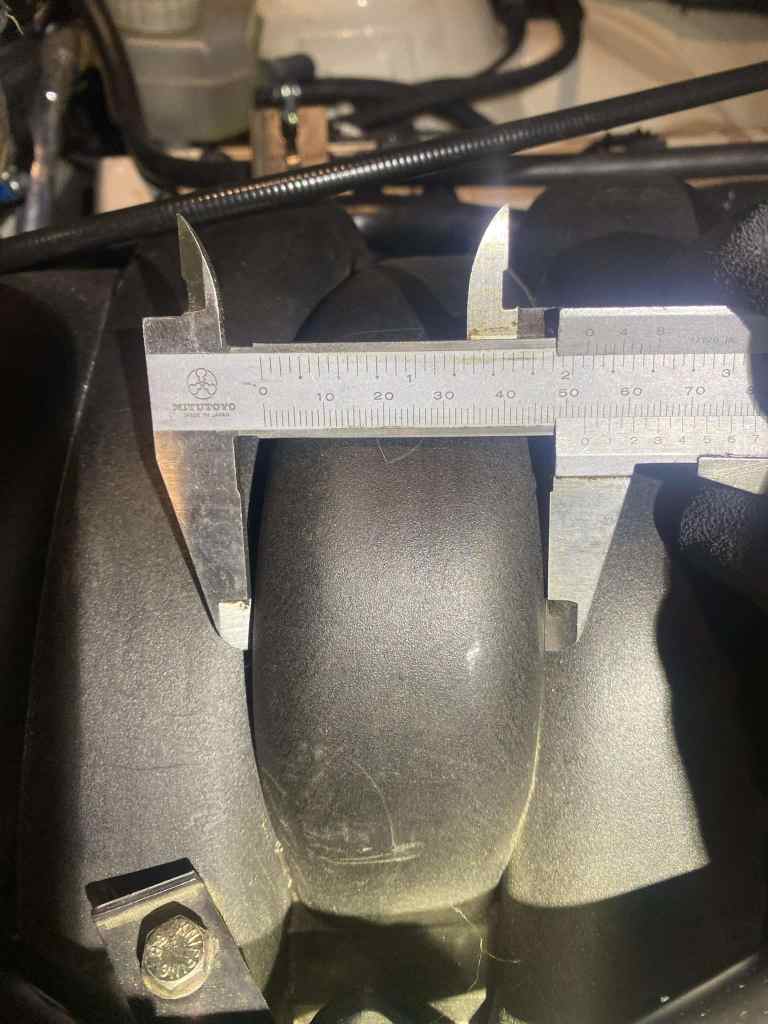
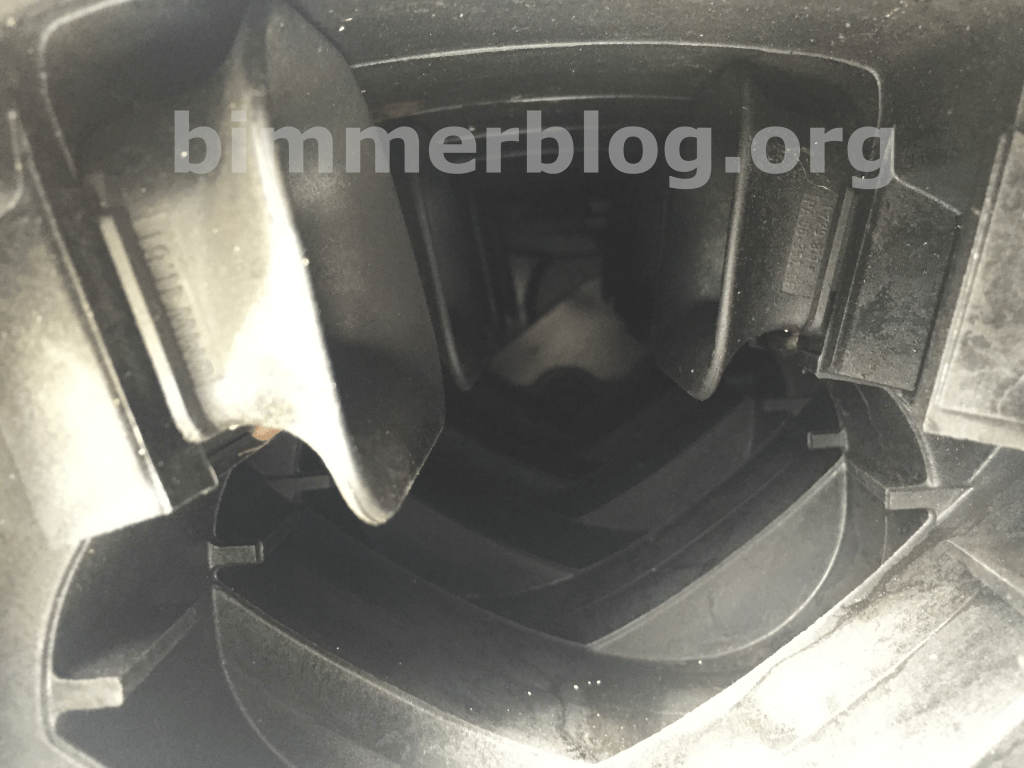
Visual identification
M60B40 intake manifold has bigger diameter runners. The outside diameter is 53mm.The best option: Ultra rare M60B40 model year 1992 manifold with proper velocity stacks for maximum air flow.The second best option: M62B44 Non-Vanos (NV) intake. Note the pipe in the middle for distributing blowby gasses more evenly to all cylinders. You can read more information about Crankcase ventilation design fault from the other blog article.
There are four hypothesis, why BMW quit developing 1992 version of the manifold so soon:
Factory may have wanted the best possible features and grunt for the press, when the new M60 V8 engine was introduced.
Guys at the department of finance wanted to cut some costs. We know how expensive these engines are to build. Take for example M60 timing gear with duplex chain. The level of design and robustness is closer to a tank.
Velocity stacks are prone to get loose. Simply put – why bother, if you can cope without them, and avoid any warranty issues.
Please take a note about sourcing the best throttle body for your M6x build. There is different TBs as well:
M60B30: 70mm with a wedge,
M60B40: 80mm with a wedge,
M62B44NV: 80mm without the wedge,
M62B44TU: 80mm without the wedge (EDK),
N62 throttle body: 84mm without the wedge (EDK).
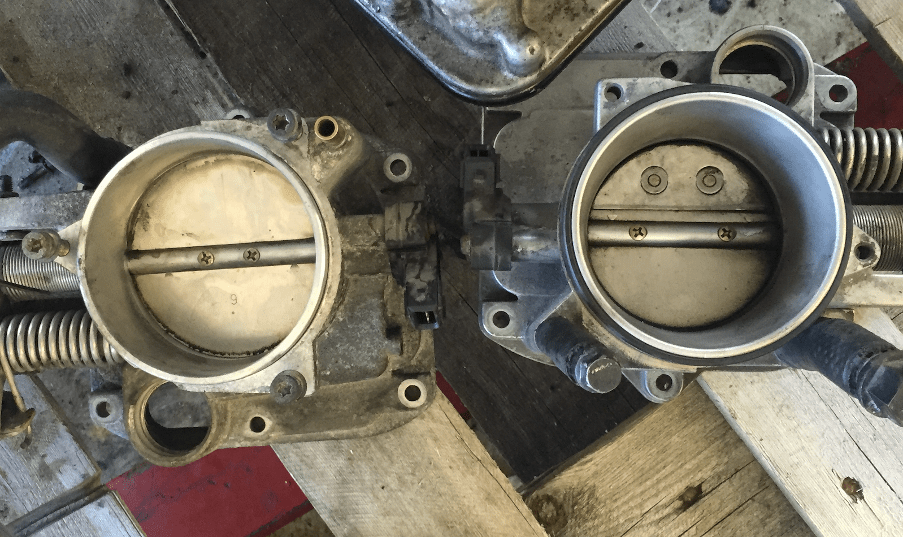
The first three aforementioned are cable controlled versions, and the latter are with electric throttle valve (EDK). The best cable driven 80mm throttle body is from M62B44 non-Vanos (NV) engine without the wedge. 80mm non-wedge versions will do just fine on a typical M60B44 build with no flow penalty. See the picture below to identify one:
Comparison of stock M6x throttle bodies. Left: The preferred, cable driven 80mm throttle body from M62B44 non-Vanos engine. Right: M6x throttle plate with the wedge (Flow restriction at WOT) can be identified from the rivets on a throttle plate.
Still here? There is more information about performance upgrades on my other articles:
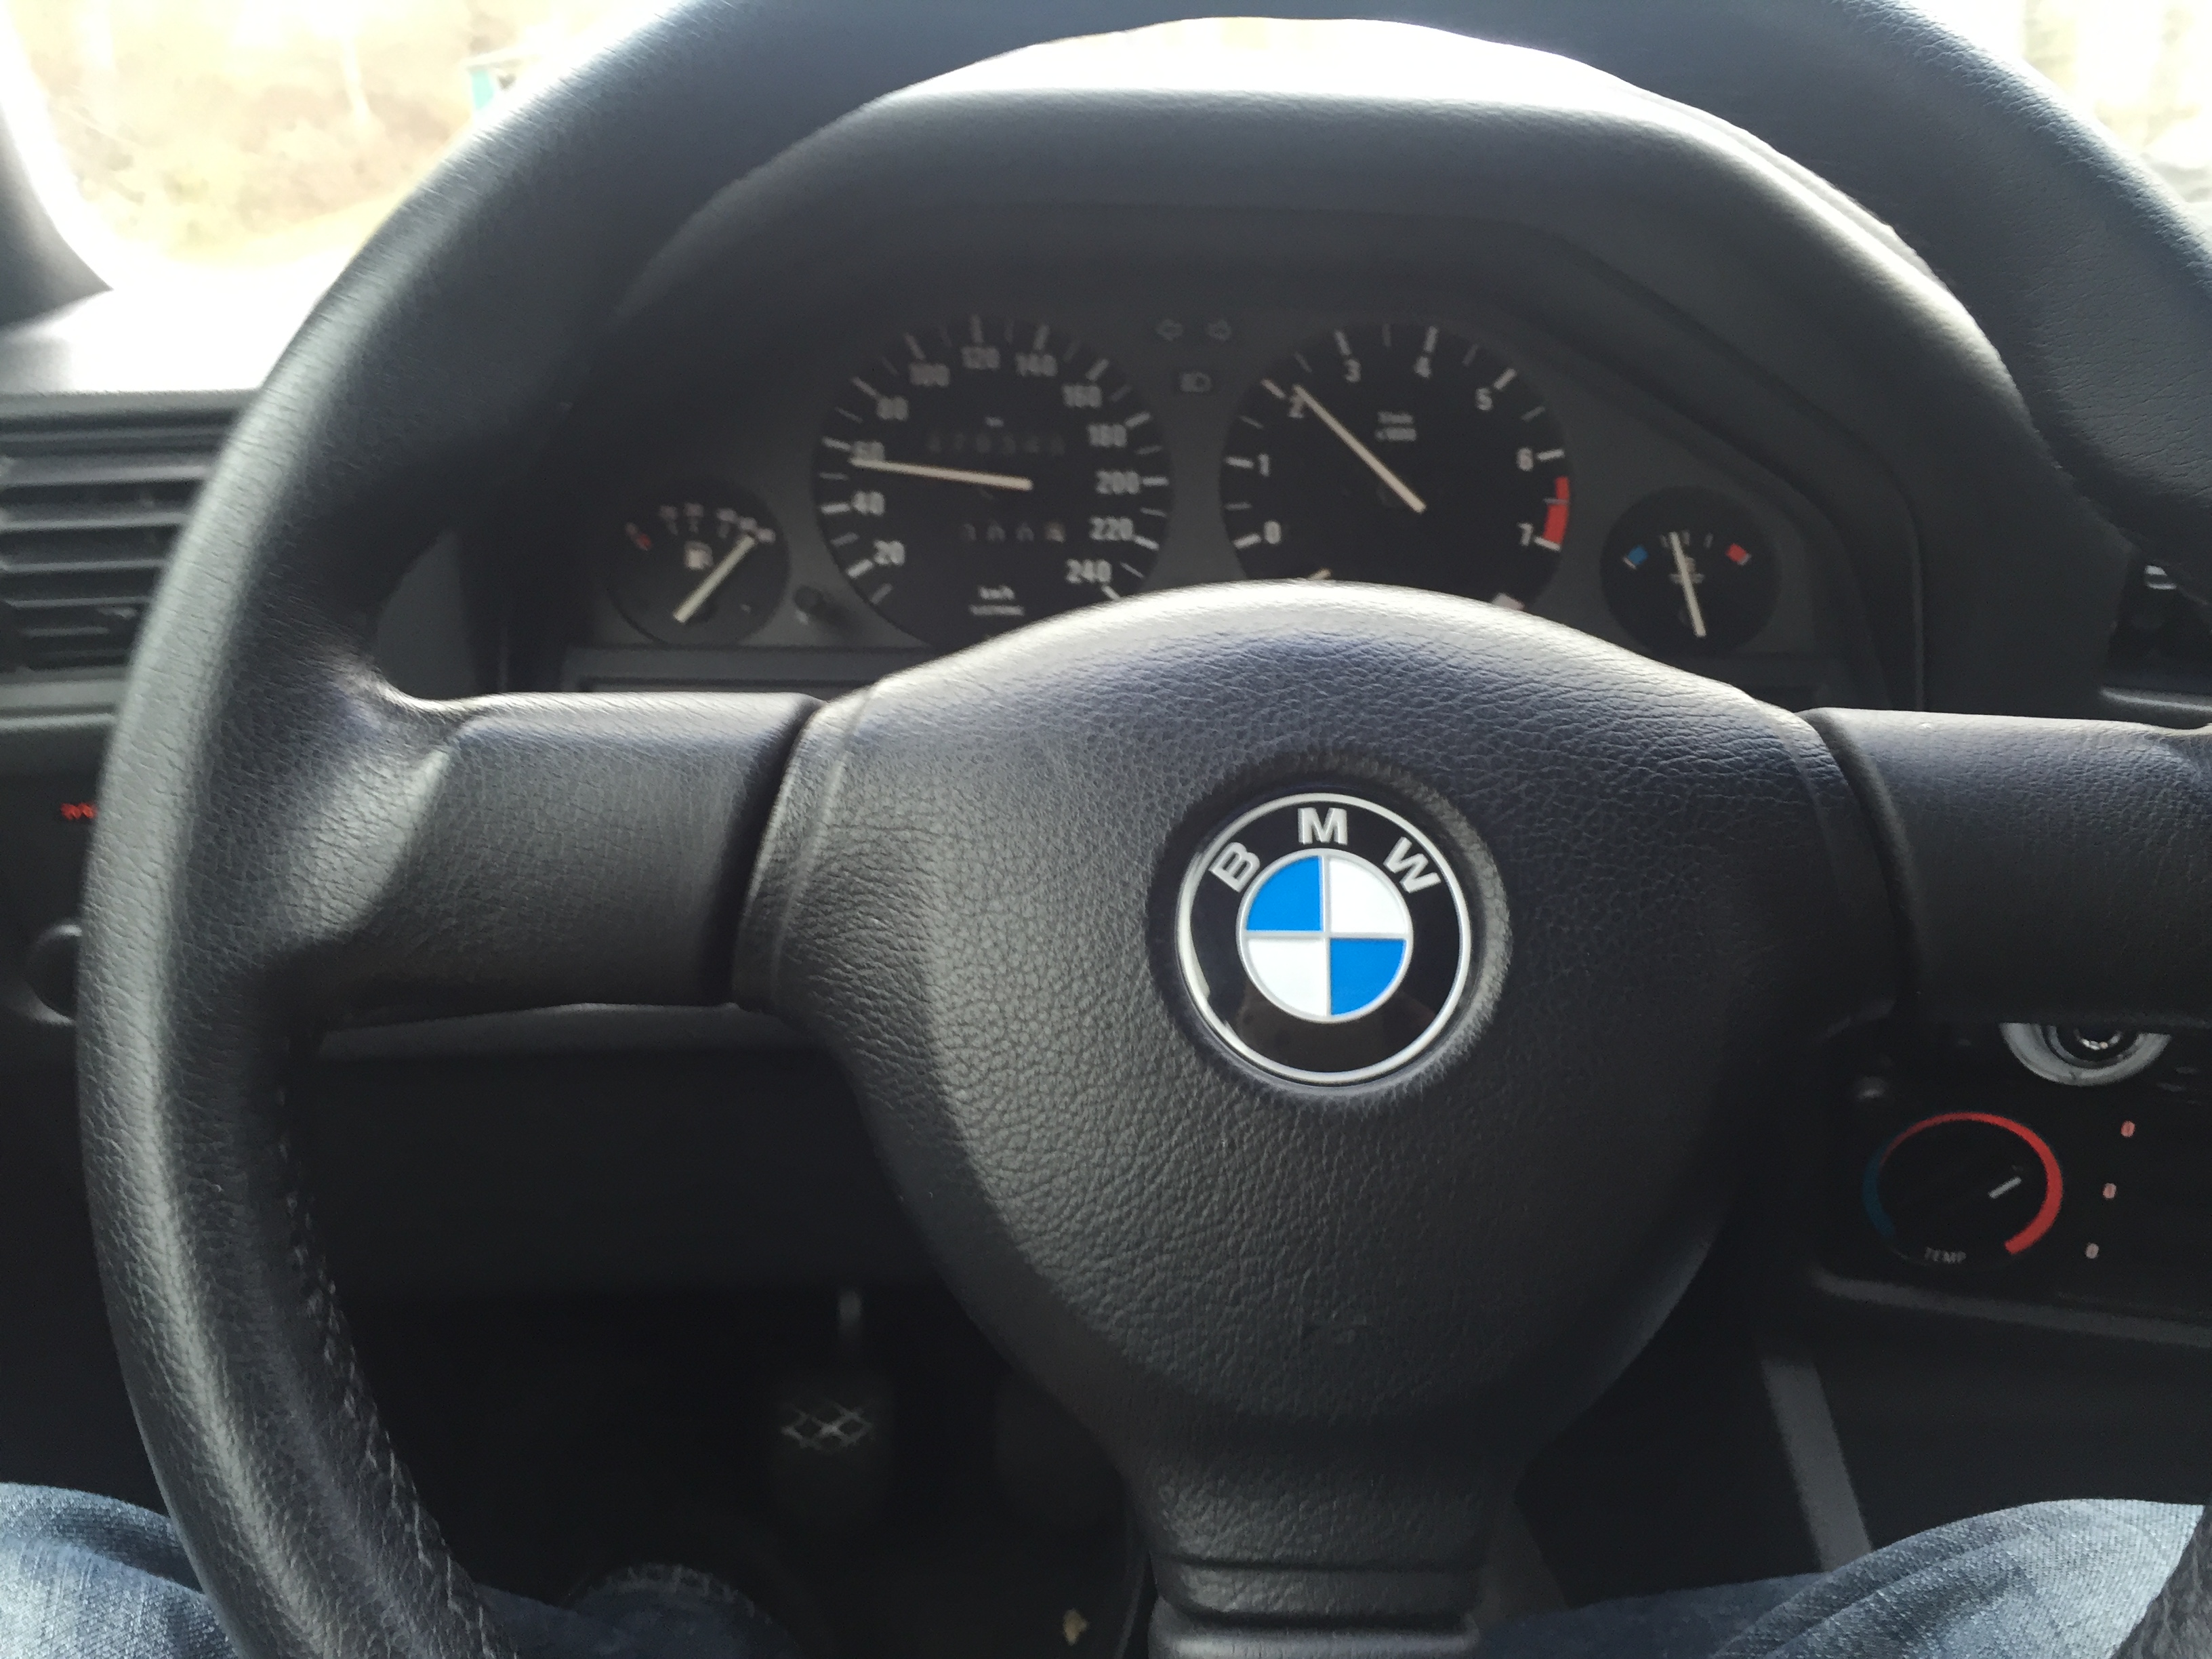
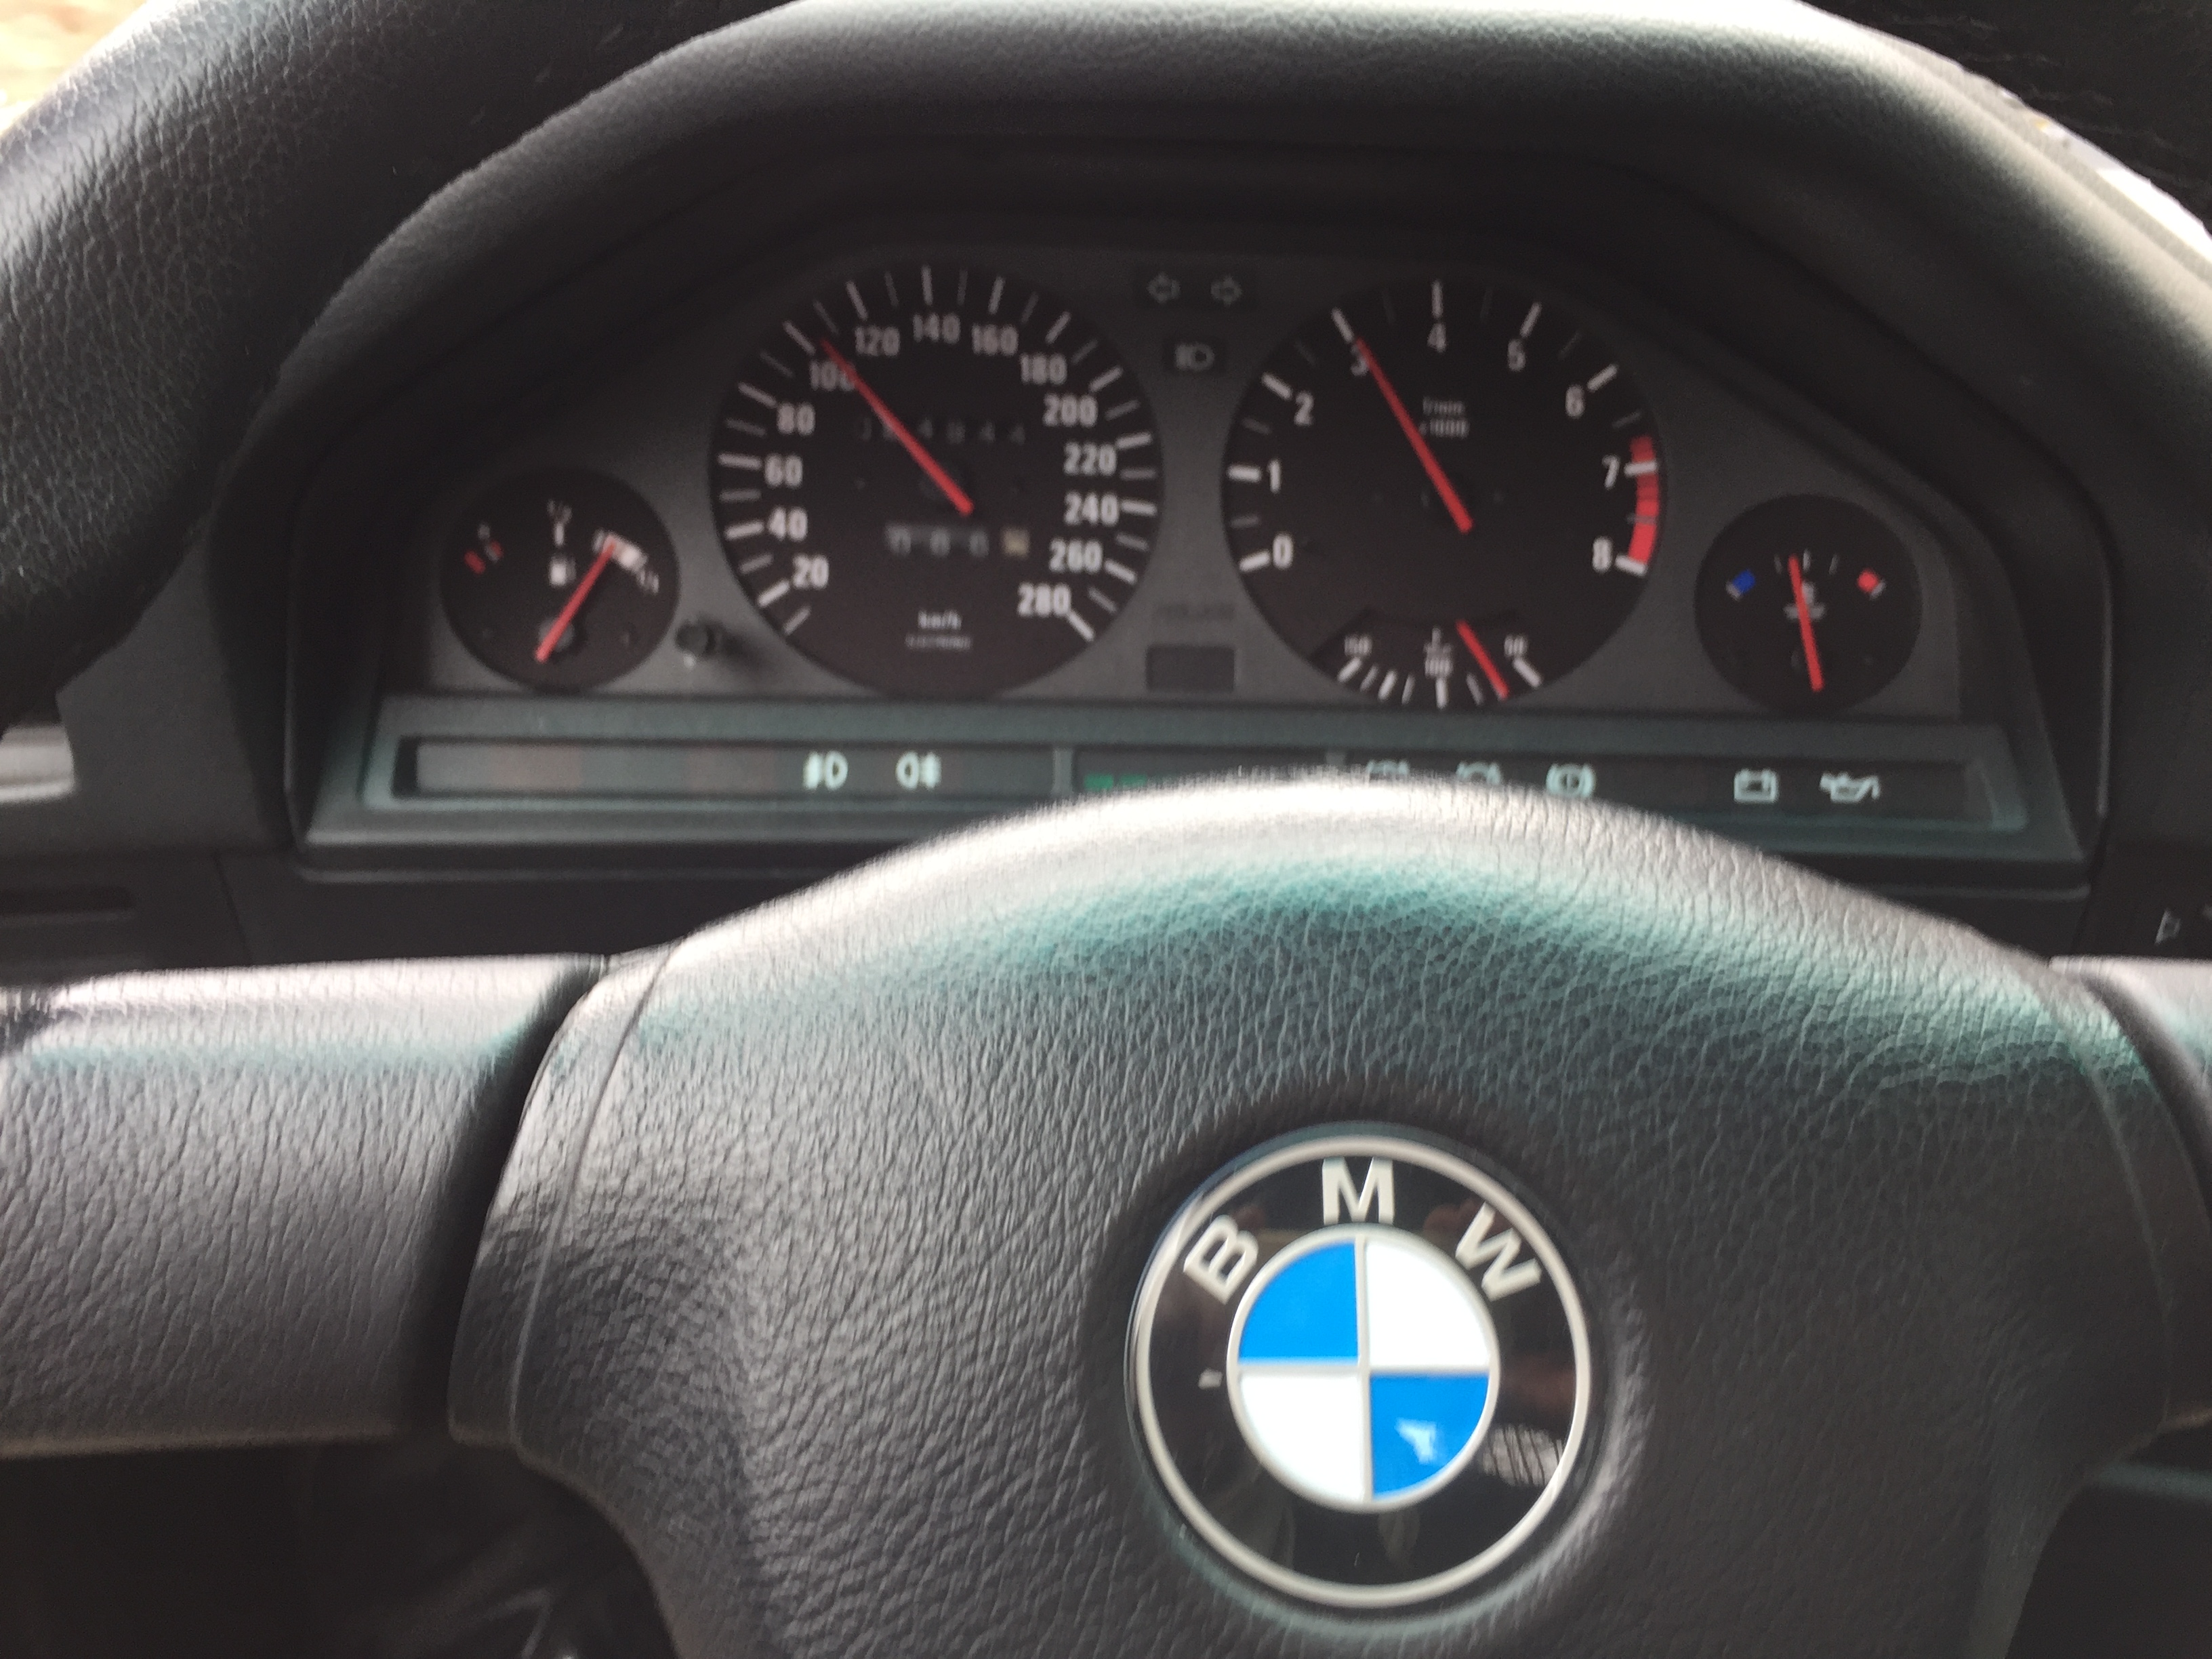
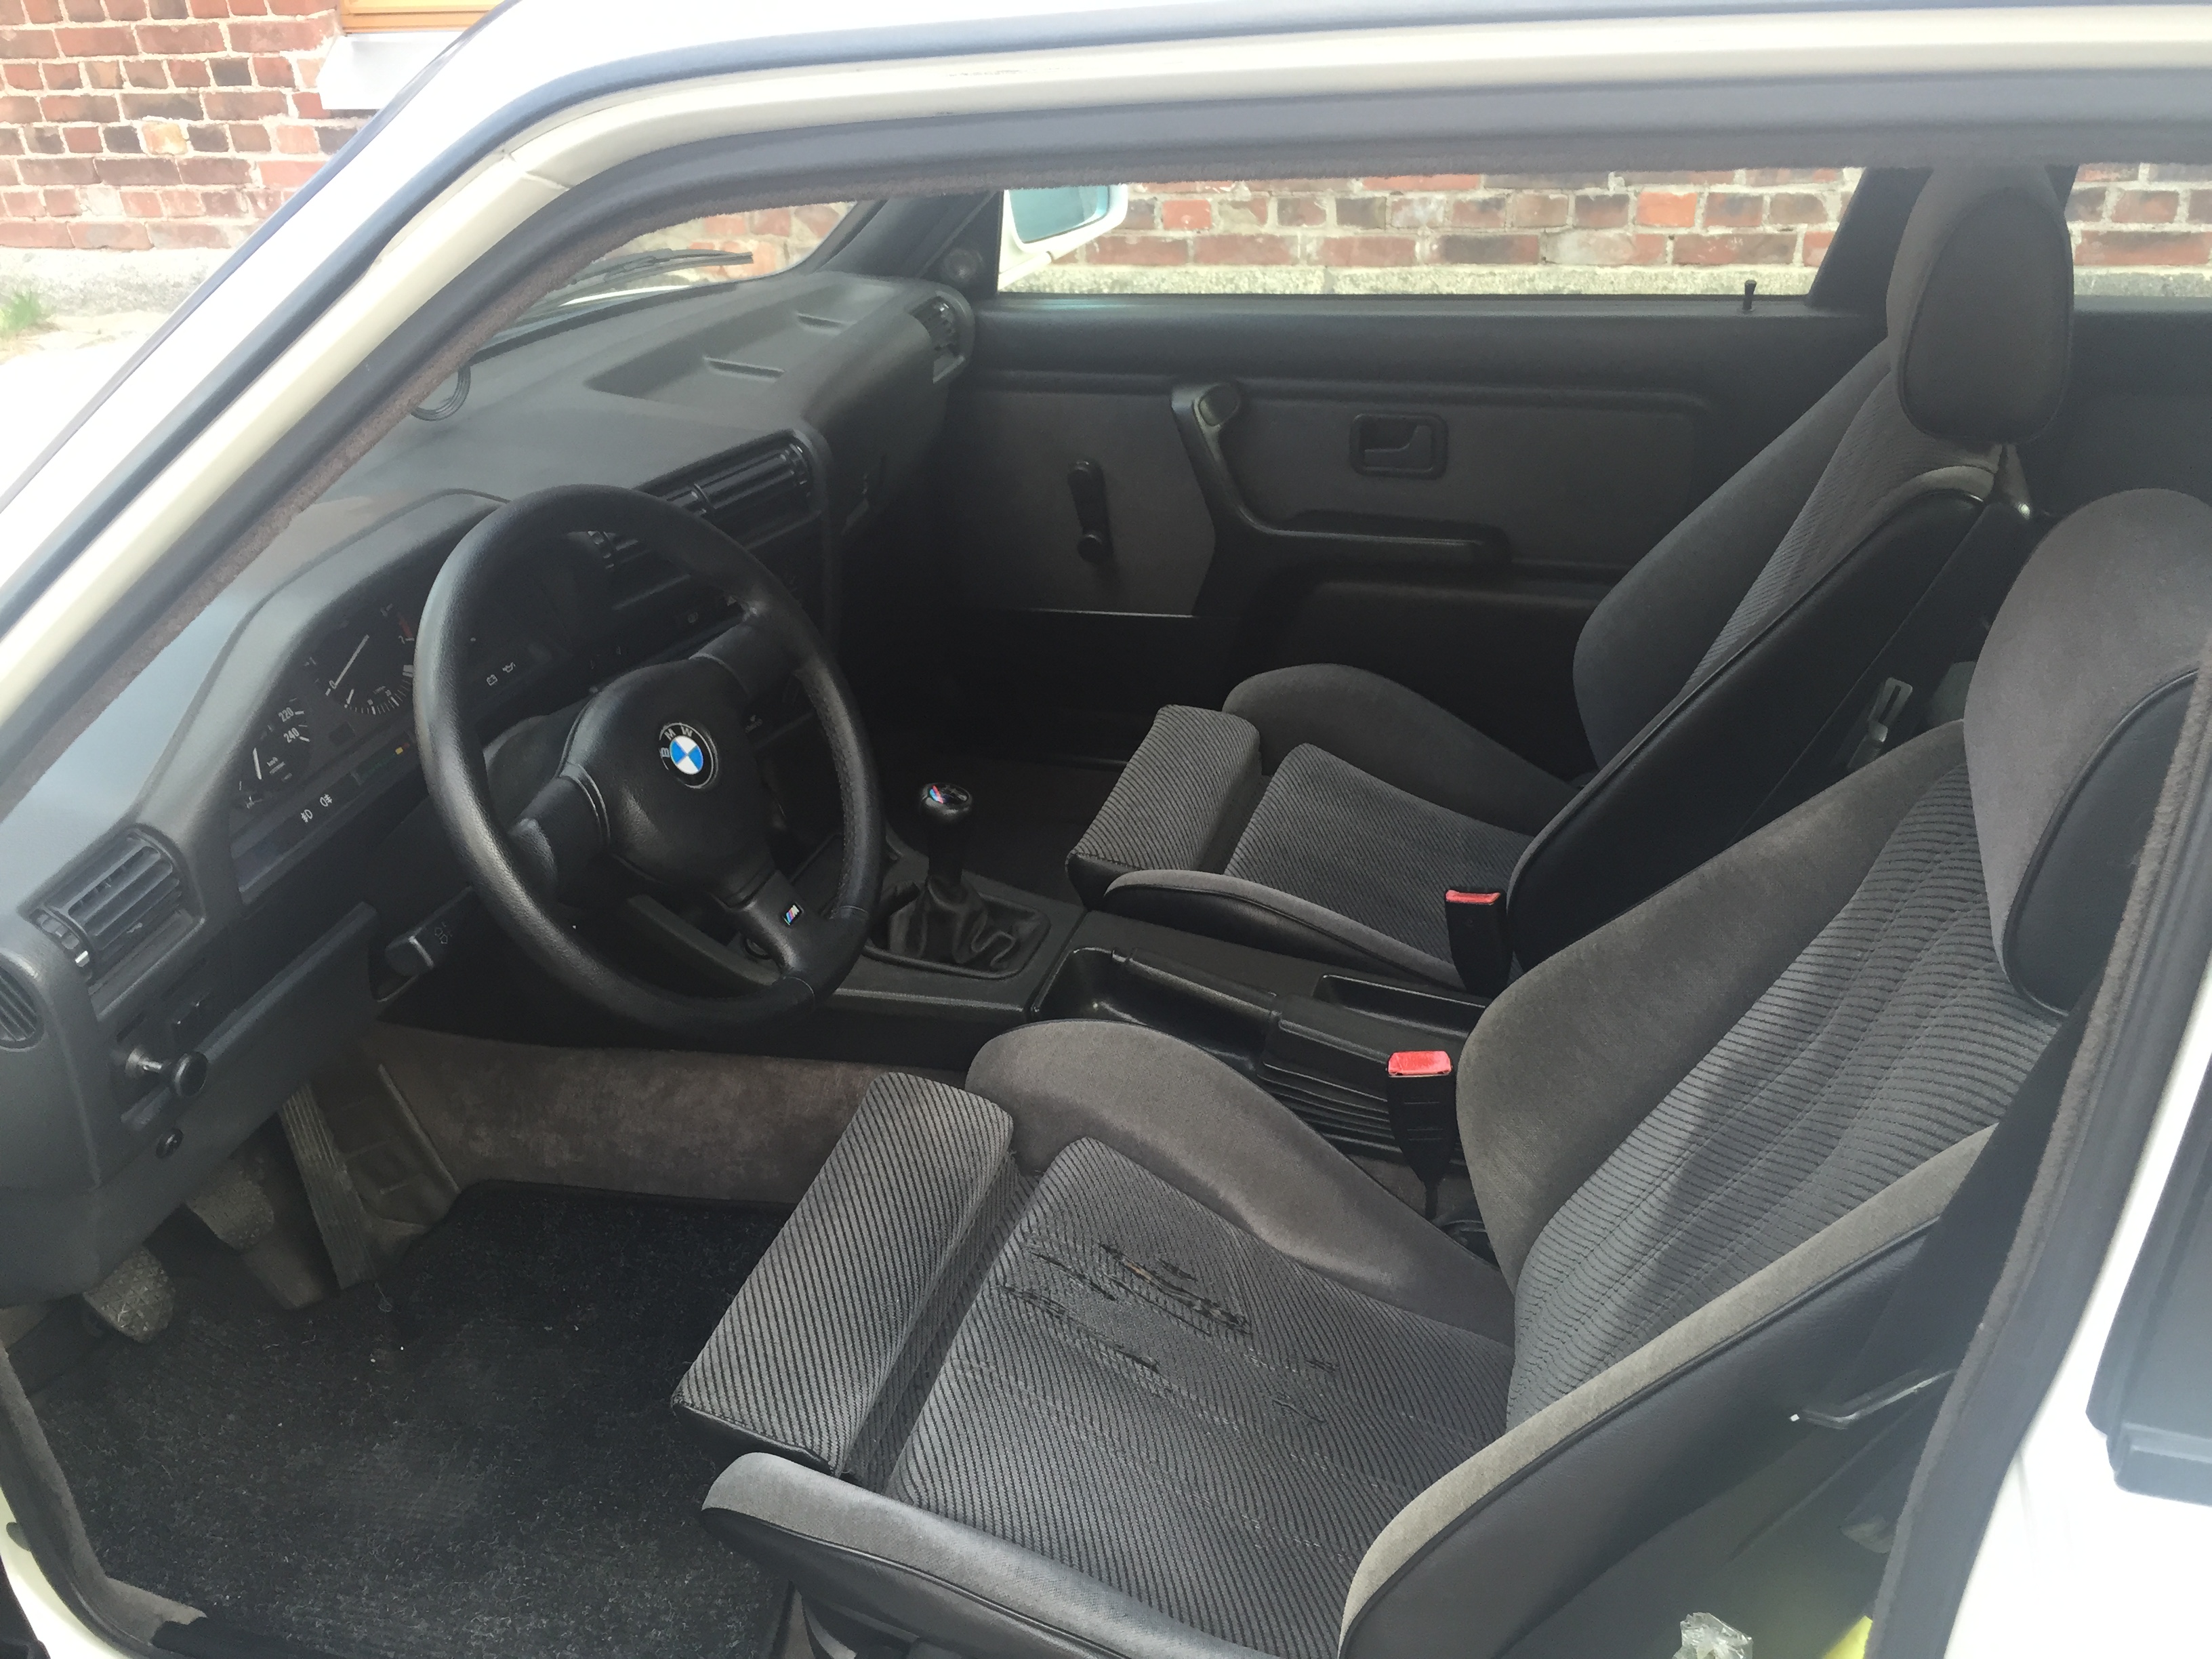
A great way to improve your car’s interior, while retaining a stock look is to make retrofittings and OEM style upgrades. These installations are the ones your friend will never know apart from the factory look. One of these upgrades is the instrument cluster. I wanted more sporty interior look, thus I started looking for M3 style instrument cluster, which would be compatible with V8 tacho. Also wanted to upgrade both speedometer and tacho readings up to 280km/h and 8000rpm, respectively.
German company called Maustech was selling a suitable instrument cluster for V8 swaps. It is imitating the stock M3 looks with customizable options to both dials. The cluster is displaying an oil temp instead of fuel consumption. The temperature sensor is included, and can be installed into the oil sump pan. Instrument cluster was a perfect fit, no hassle whatsoever.
Maustech instrument cluster for a V8 engine with 280km/h and 8000rpm readings.Stock E30 instrument cluster before modifications. Instrument cluster for E30 with 280km/h speedometer, 8000rpm tacho and oil temp.
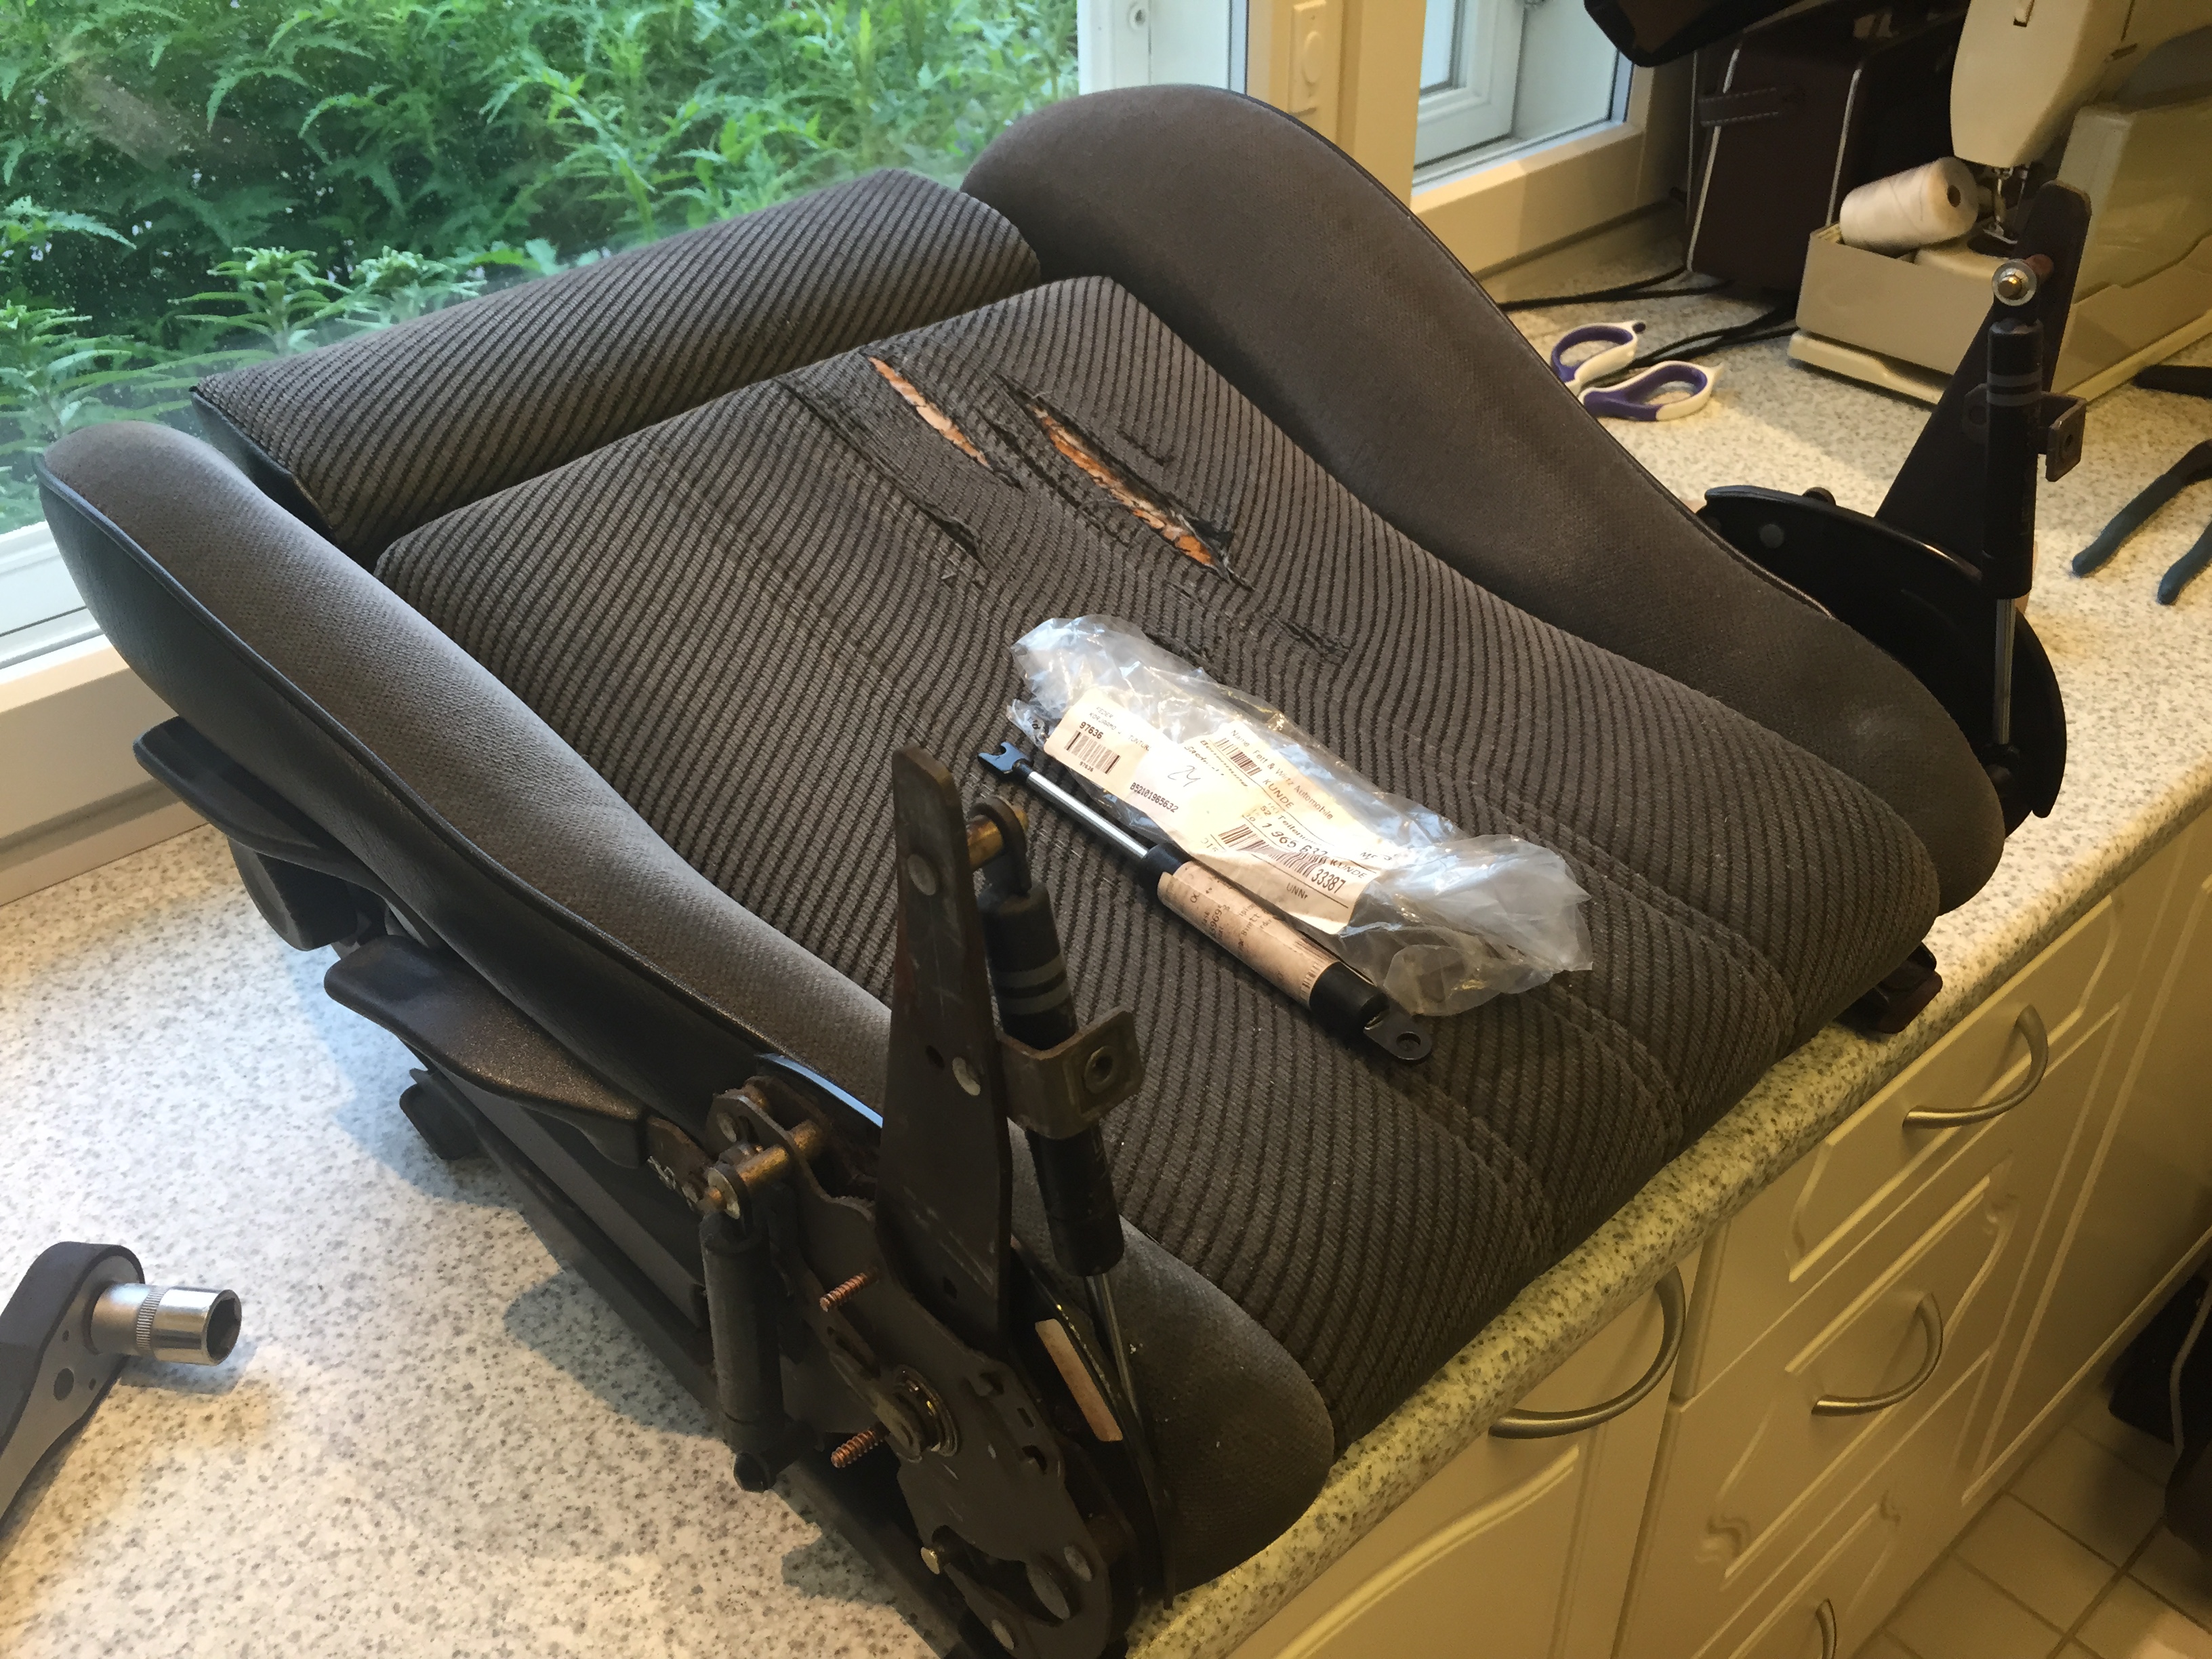
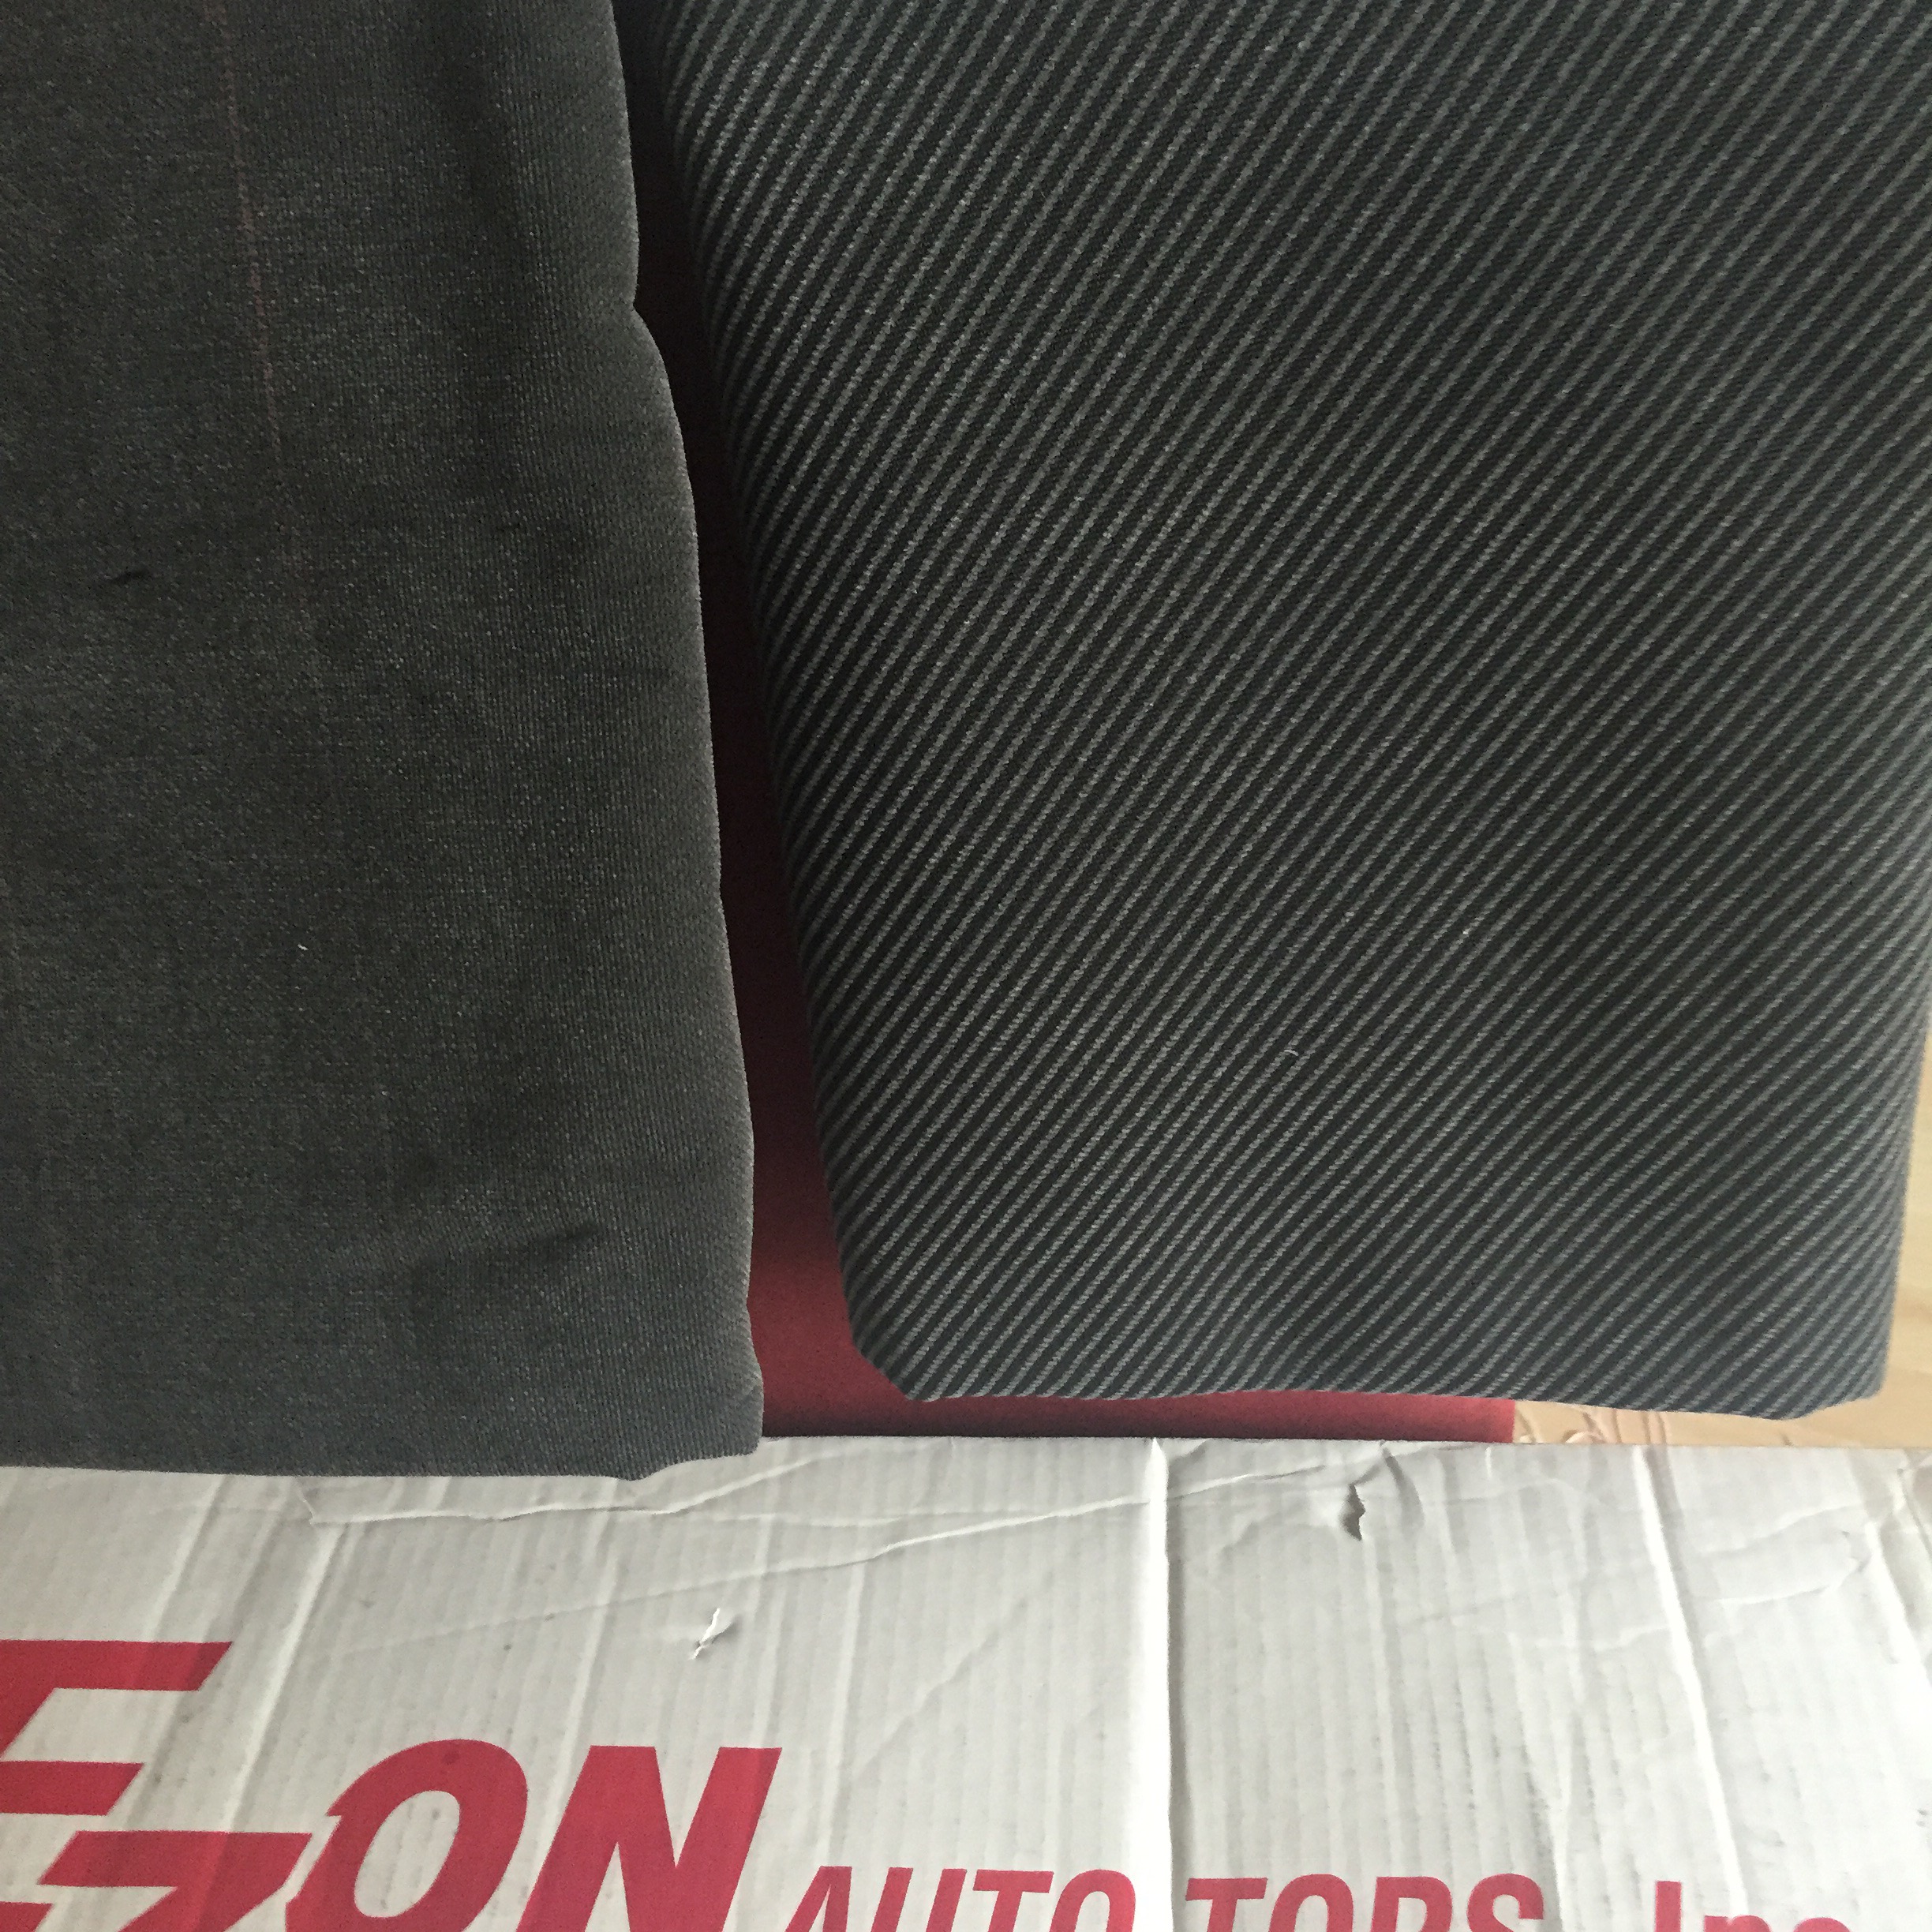
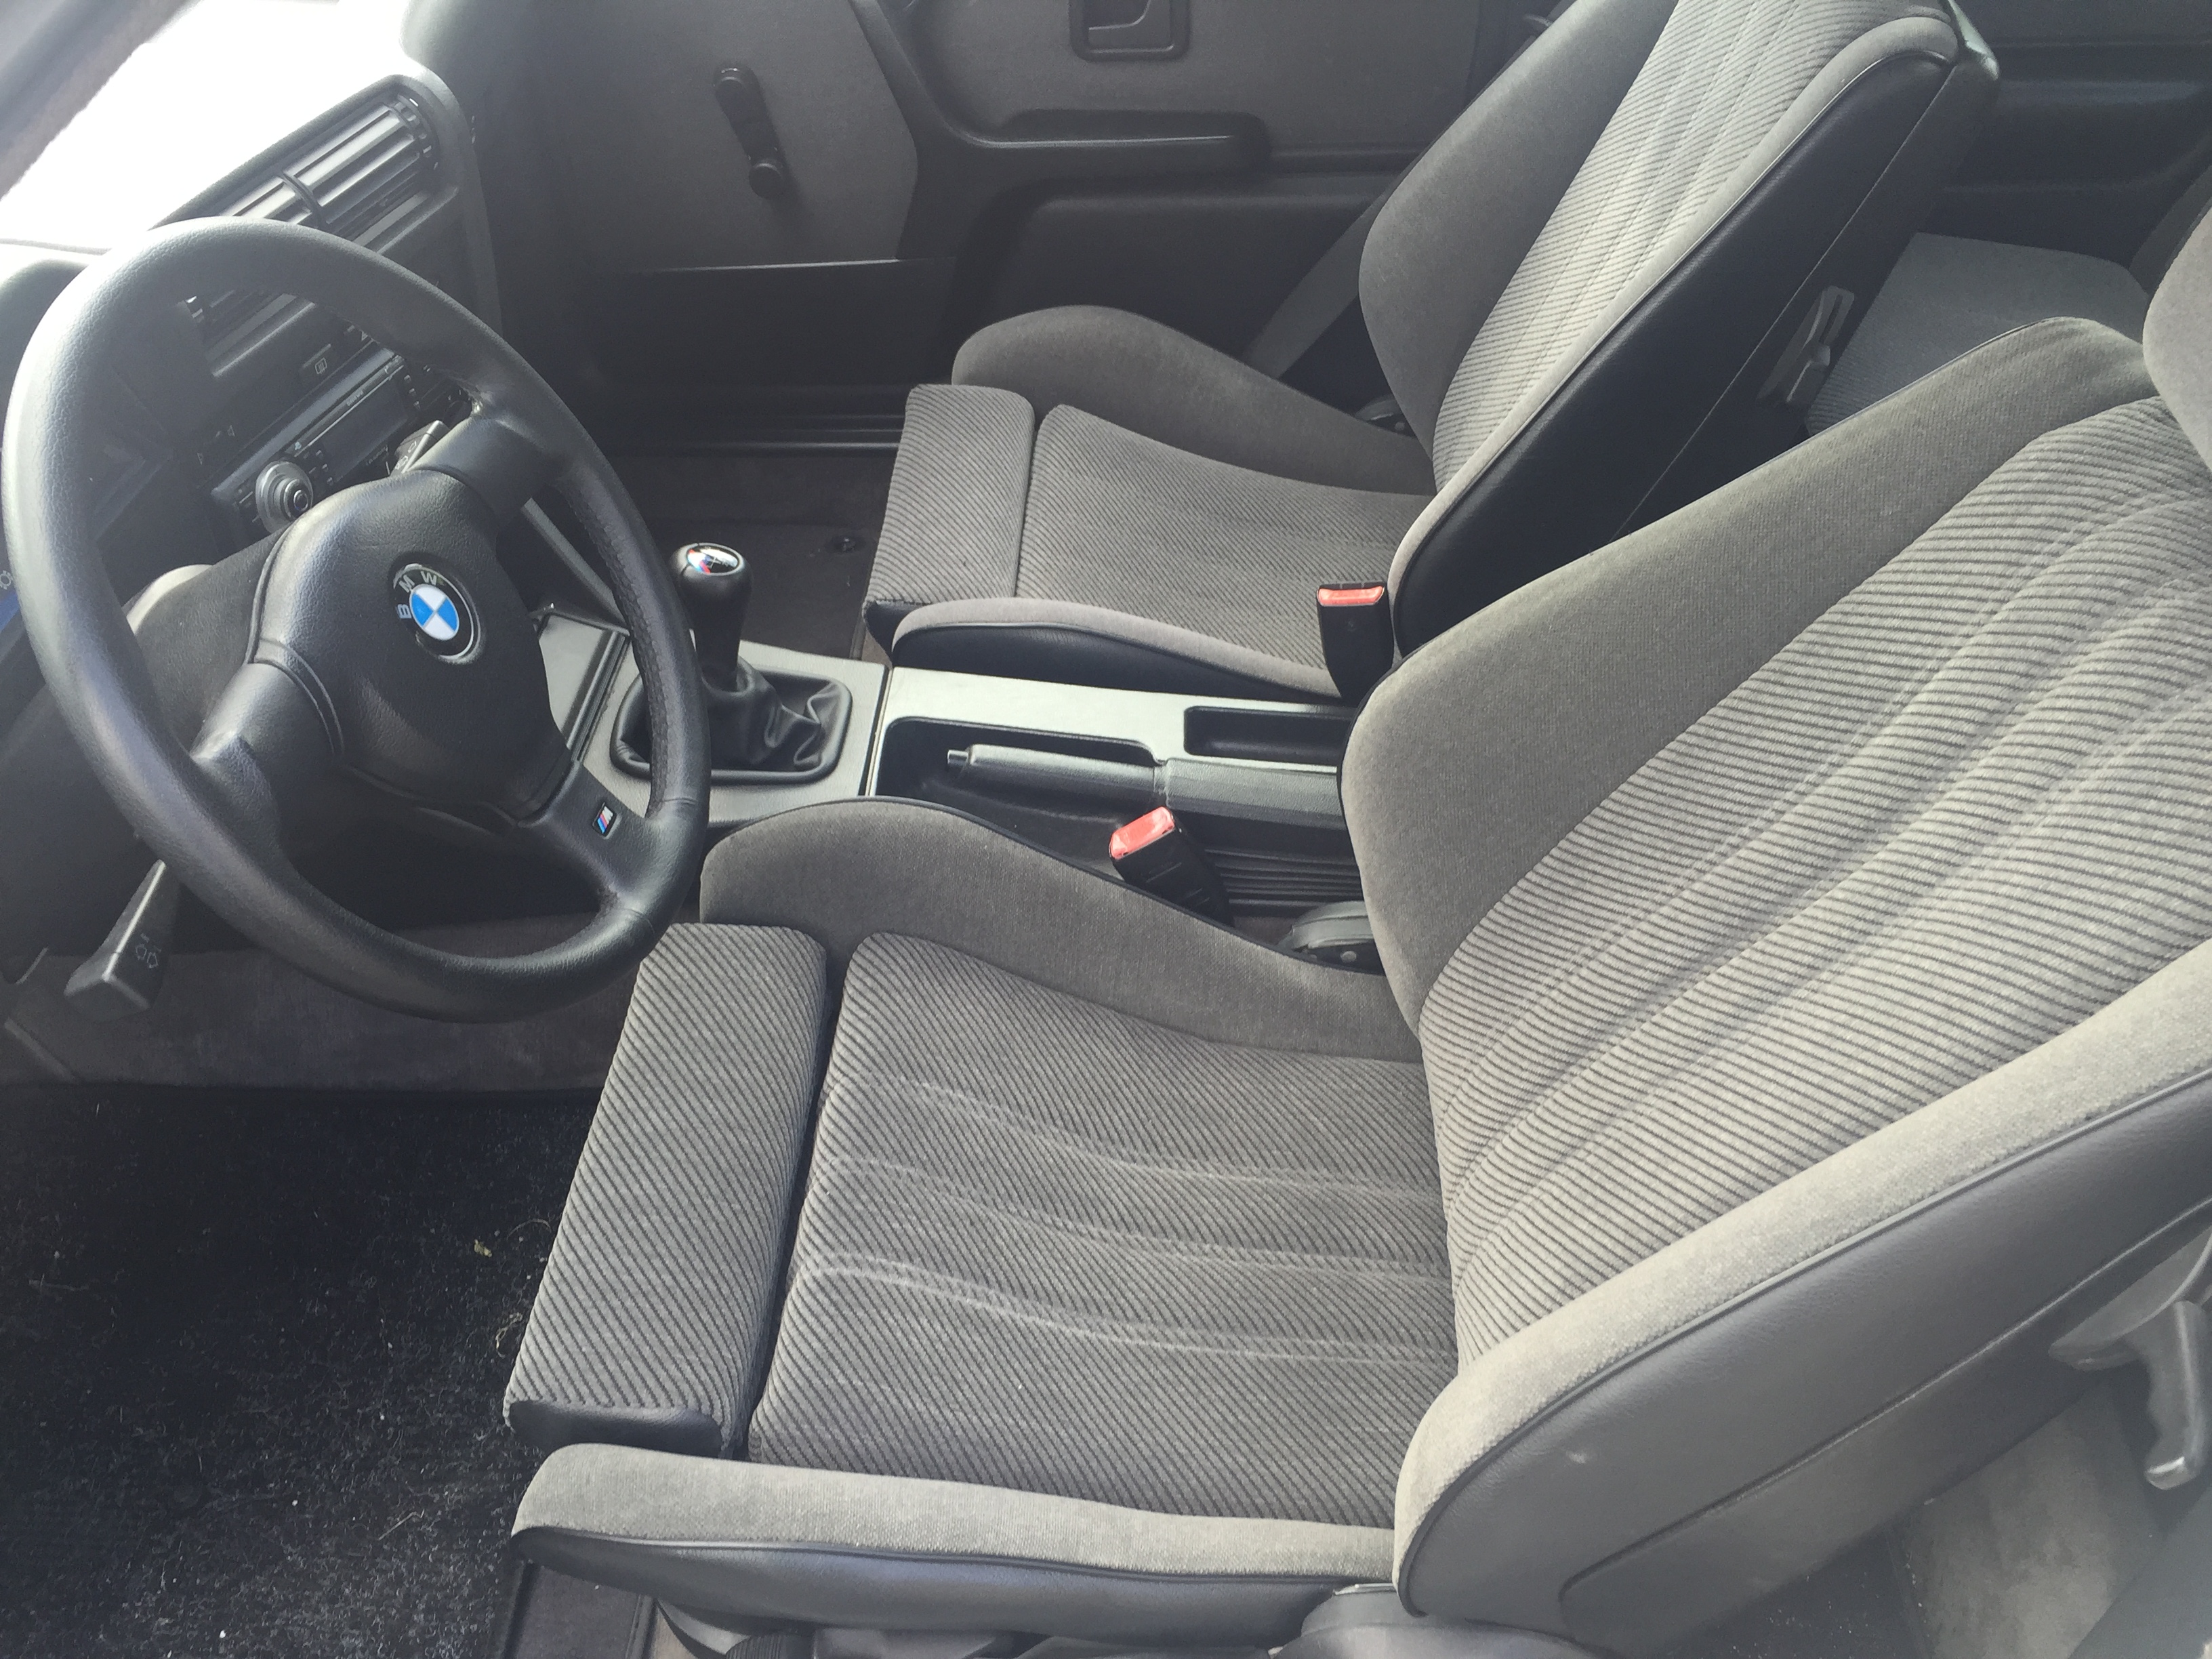
Ripped Driver’s seat is a typical view on E30 nowadays. Because I wanted to keep the factory look, my first task was to find some new fabric. Stock upholstery for M-technic interior is Anthrazit, code 0269. Orginal BMW number is 8106096. It is also advisable to change the pneumatic cylinders. The corresponding part numbers can be found on bmwfans.info. Availability may vary.
A typical, worn out E30 driver’s seat.
I just happened to remember an announcement a while back, where other bimmer enthusiast mentioned he had some extra fabric for the sport seats. Luckily I still had his phone number, and gave him a call. It came out he had bought the fabric from New Zealand. Can you believe it? First you manufacture some fabrics in Europe, carry them over to opposite part of the world, and then buy them back to Europe. If communism would have won, we’d just drive along with red colored Ladas, so its better to stick with capitalism, and buy the fabrics while there is some available – nevertheless the price.
The place I ordered the upholstery was Le Mans Autofabrics. They wanted a picture from the old seats, in order to make sure they will send me the right item. Kudos for Kosta at Le Mans Autofabrics for a good service.
M-technic 2 sport seats color code is Anthrazit, code 0269. The new fabric from Le Mans Autofabrics, NZ. A ripped seat with a sunburn.The updated interior looks as good as new.
My friend called me yesterday. His bimmer started displaying the infamous Check Engine Light. The car in question was an E38 with magnificent M62 engine. The program I found very useful for logging livedata is called testo.exe. This program lets you to both display and save livedata to your laptop. Very handy DIY diagnostics tool, indeed. In order to install, you shall have sufficient computer skills, this is not a standalone program! Testo.exe requires a server program called EDIABAS for establishing a connection in between your laptop and OBD port. You need also OBD I and II compliant K+DCAN cable for your bimmer. Download: http://phenoboy.kapsi.fi/testo
Note: if you have not read my previous posts, I suggest you to start with the Part 1.
When I bought the E30, it felt almost undrivable and plain dangerous in higher speeds. Thus, it was quite obvious I had to spent the first driving season to improve its handling. The list below is summing up the modifications I made for the E30 during summer 2015:
Correcting the suspension geometry and roll center by installing custom made raiser plates,
Raising the car approx. three times,
Decreasing negative camber on the front by installing eccentric upper strut mounts,
Increasing offset on the front by machining rims,
Zeroing toe on the front,
Increasing traction by changing tires to Toyo R888R Semi Slicks.
At times I was wondering if the V8 engine is too heavy, and despite of all the changes, non of the above tricks will work. But the engine was not the case. And M60 engine is all aluminum, and with small tricks here and there you can save tens of kilograms. But that’s the other story. So what was the end result? I use my daily commuter as the reference point. It is 2009 BMW 335d LCI with factory M-sports aerodynamic kit, M-sport suspension and OEM 18″ alloy wheels. So the reference car is representing a pretty darn good car design from 21st century.
So how does the E30 compare to the 335? Well, I can honestly say – because I own both cars – that the E30 will beat mighty 335 in EVERY aspect of driving. The E30 is more agile, has better feel for road and – what’s most important – is more fun to drive. I cannot say that the 335 is a bad car to drive. No way. I was driving through Norway with the 335 in summer 2018, and it was a great pleasure to drive with a ton of torque in twisty serpentine roads. Of course, there is some features the 335 is missing like limited slip differential, which actually makes a huge favor for the E30. I know, it is a bit unfair comparison, due to the E30 has a custom built race differential in it.
The reference car was 335d with OEM 18″ rims and ContiSportContact 5 tyres, 225/255 in size.
So the E30 is more fun to drive on twisty roads. OK, we can accept that, because it is around 400 kilograms lighter than the 335. But how about high speed stability after the mods? I got an opportunity to test both cars on a airstrip, and oh boy, that was a great fun! It was a windy day, and I was a bit frightened to try the E30, because I had no idea if it will either start flying off from the airstrip, or keep going like it should be. The result was, that in 250km/h speed I did not notice any wind or unbalance when I was driving the E30. Actually I was watching the speedometer and using only one hand on a steering wheel. While on the 335 I noticed the wind, and had to put both hands on a steering wheel. Do you believe it? A 30 years old Bayerische Motoren Werke is beating 20 years and three generations newer 335 in high speed stability too. The handling in my E30 seems to be working. Amen.
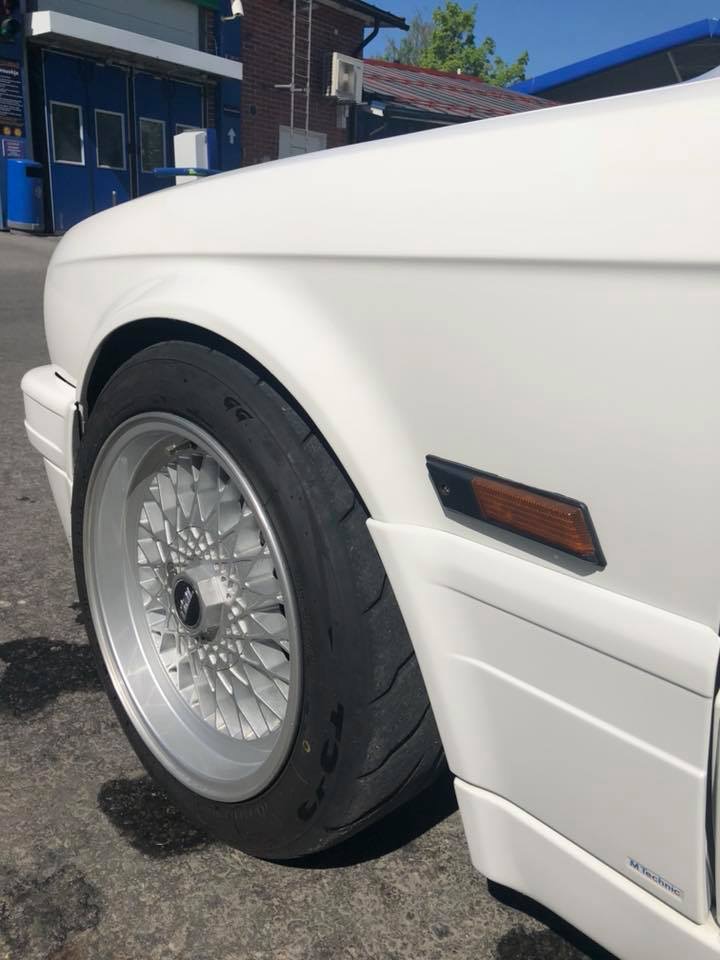
This picture is a good example of well designed front spoiler, preventing the air to go underside of the car. The end result is increased downforce and high speed stability.
Note: if you have not read my previous posts, I suggest you to start with the Part 1.
On the first and the second part of “Fixing the driveability issues” I was concentrating my efforts to correct erroneous suspension geometry. Now, when the suspension geometry was set up correctly, I shifted my focus to both tires and rim offset.
Part one and two were just the basic stuff. Most of us do understand the importance of fixing camber and toe. But for some reason, most of use are neglecting the importance of tires and rim offset.
If you think about what single component is responsible in between your car and road, it should be quite obvious that optimizing the tire quality will give you the best bang for the buck. I mean seriously. The best possible performance upgrade for your car is not 20 000 euros suspension kit. It is tires. Period. The quality of rubber compound makes the most difference. It does not matter how wide your rear tires are either, if their compound is not up to the task. Good semi slicks in 225 size will beat any budget tires in 275 size. Anytime. The difference of tire compound quality is huge. You just don’t believe it – until you will try it out.
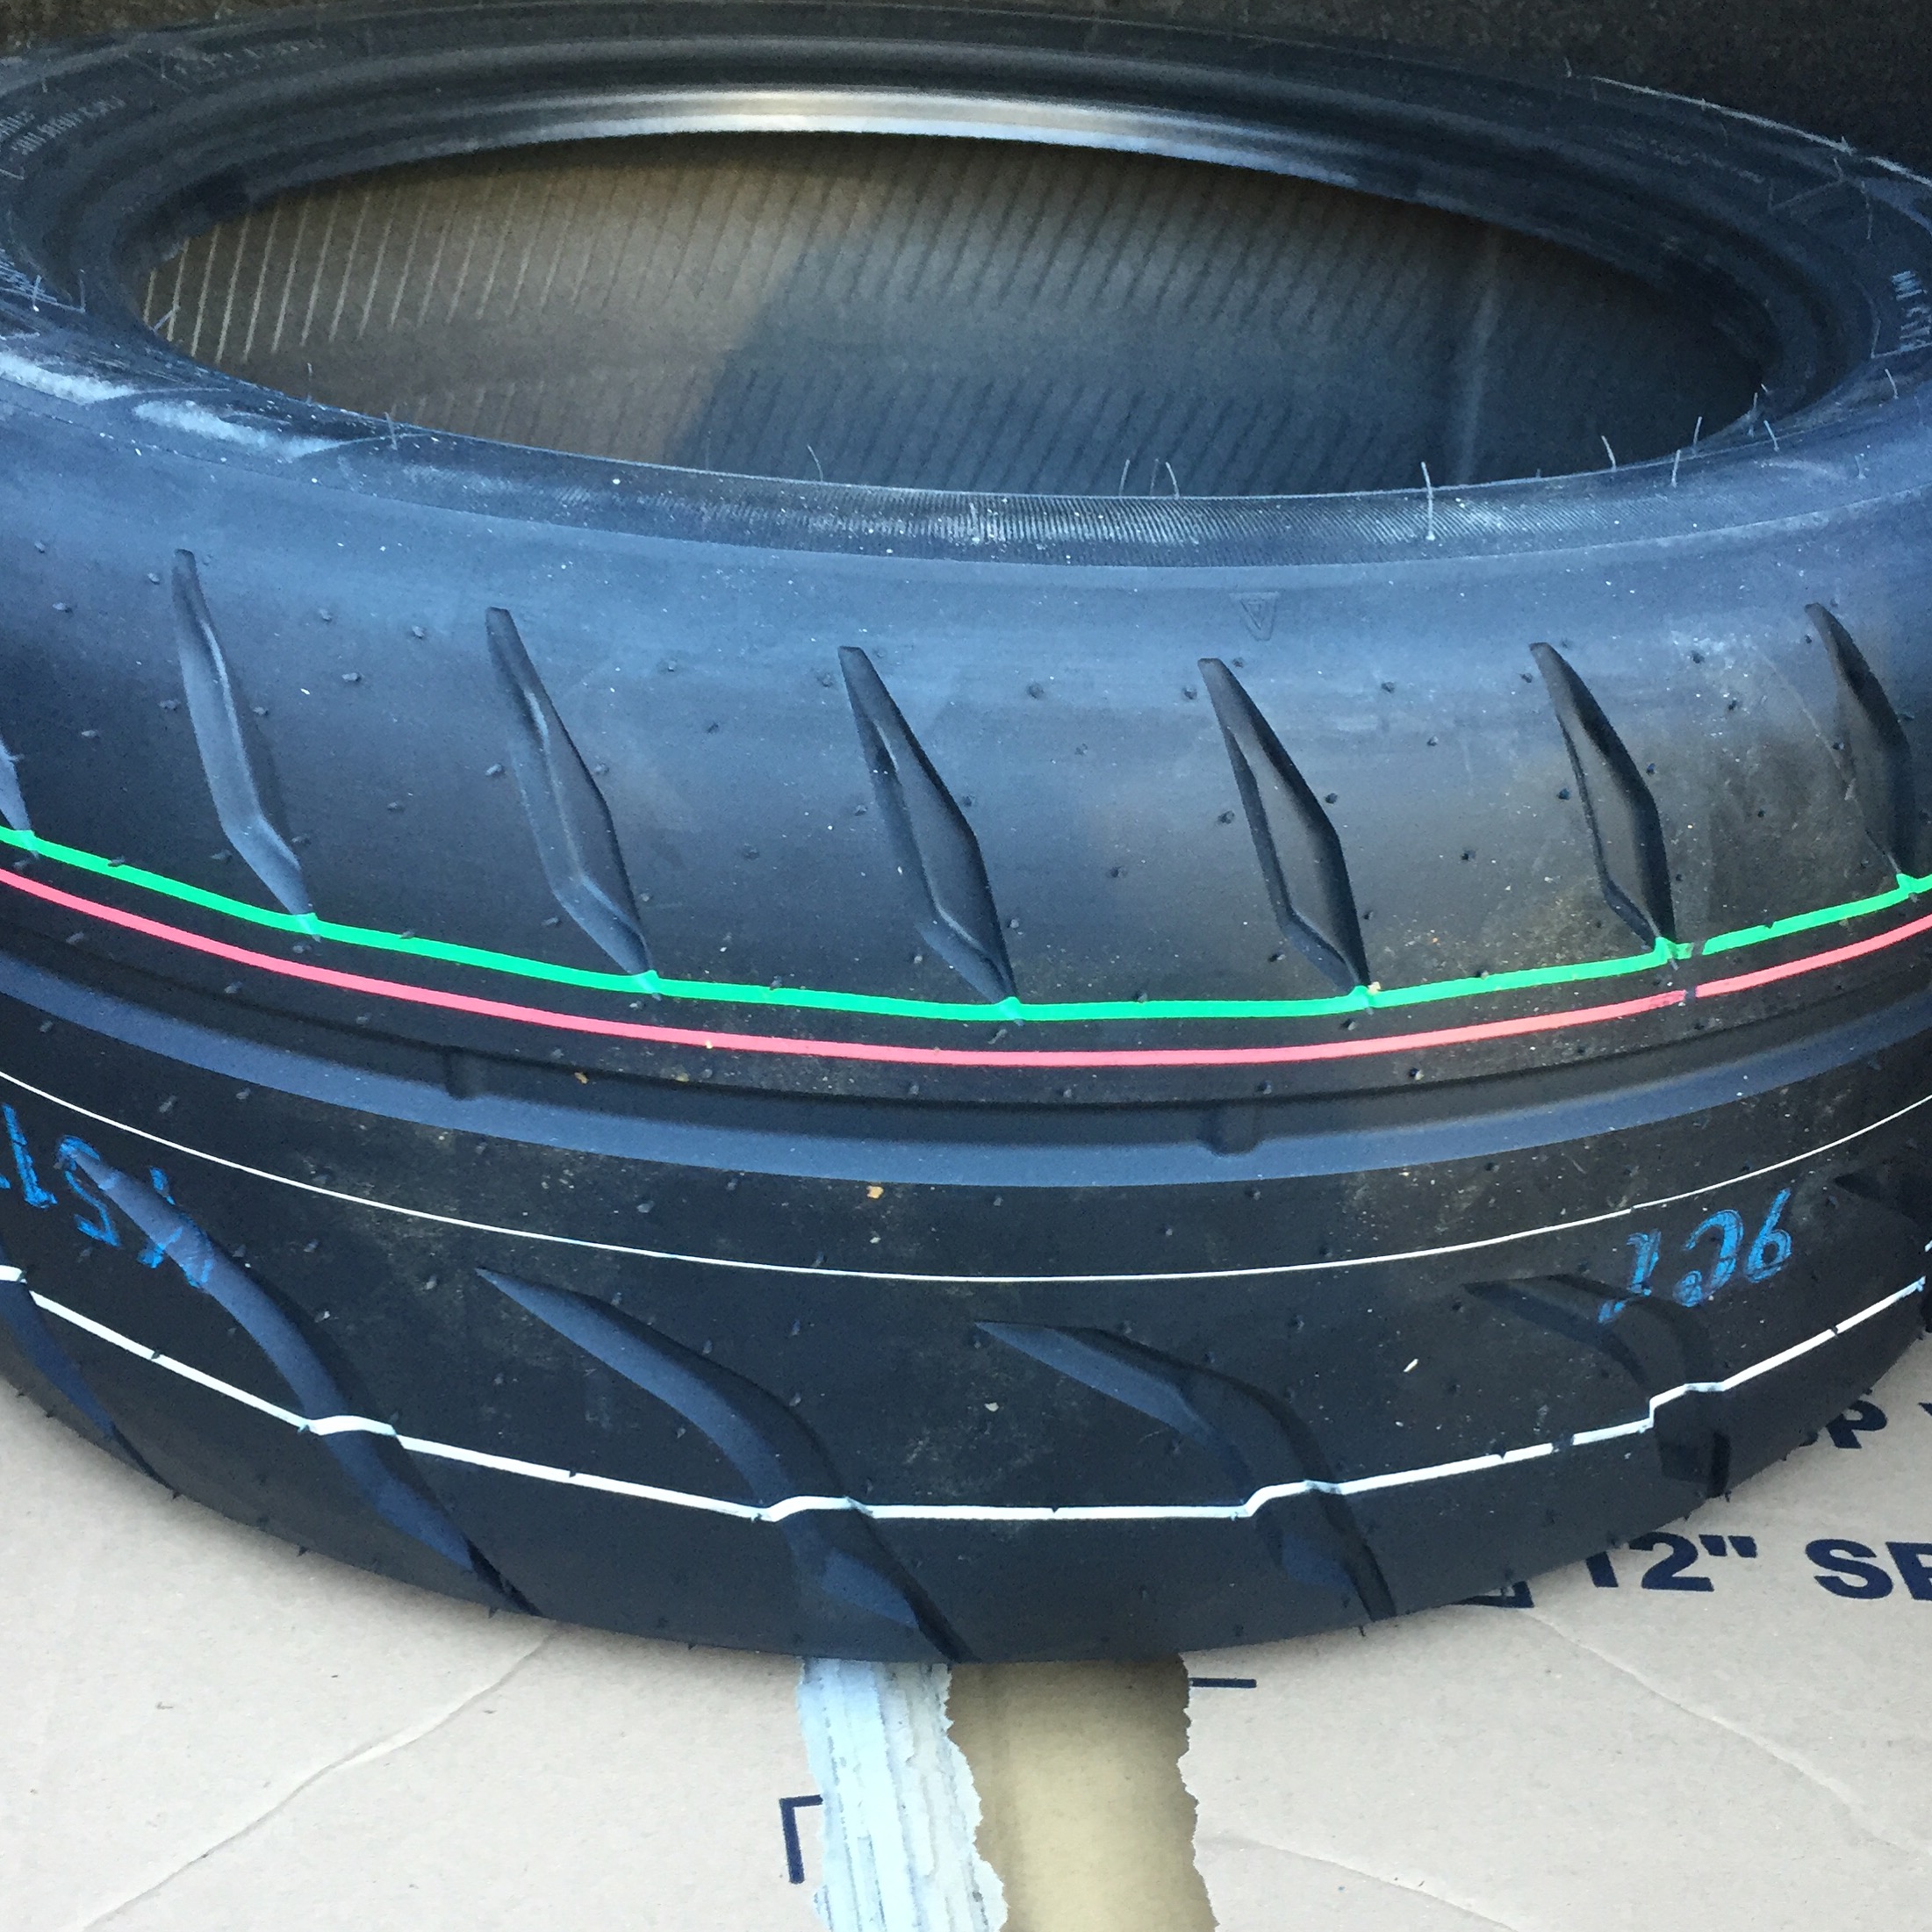
Toyo R888R Semi slick tires in 225/45/16 size.
In order to improve handling characteristics even more, I decided to change the rim offset a bit. The rims are very rare and good looking RIAL mesh style in 8×16″ size for front and 9×16″ for rear. The front ET was 13, and it made the steering a bit nervous, thus I ended up machining 2 millimeters from the rim center. So the front ET was increased to approx. 15. Believe me or not, it made the difference. The rear ET was also increased to 15, due to a clearance issue with Toyo Semis. This issues was present with rolled fenders. Rears in 225/45/16 size with 9″ rims and ET15 are pretty tight fit for stock E30.
Toyo R888R 195/50/16 tires on 8″ Rial Mesh rims, ET15, made in West Germany.
Note: if you have not read my previous post, I suggest you start with the Part 1.
Because This was my third E30, I already knew how challenging this small boxy bimmer can be with both suspension and tire setups. On part one, I was able to correct some of the suspension geometry challenges by installing custom made raiser plates.
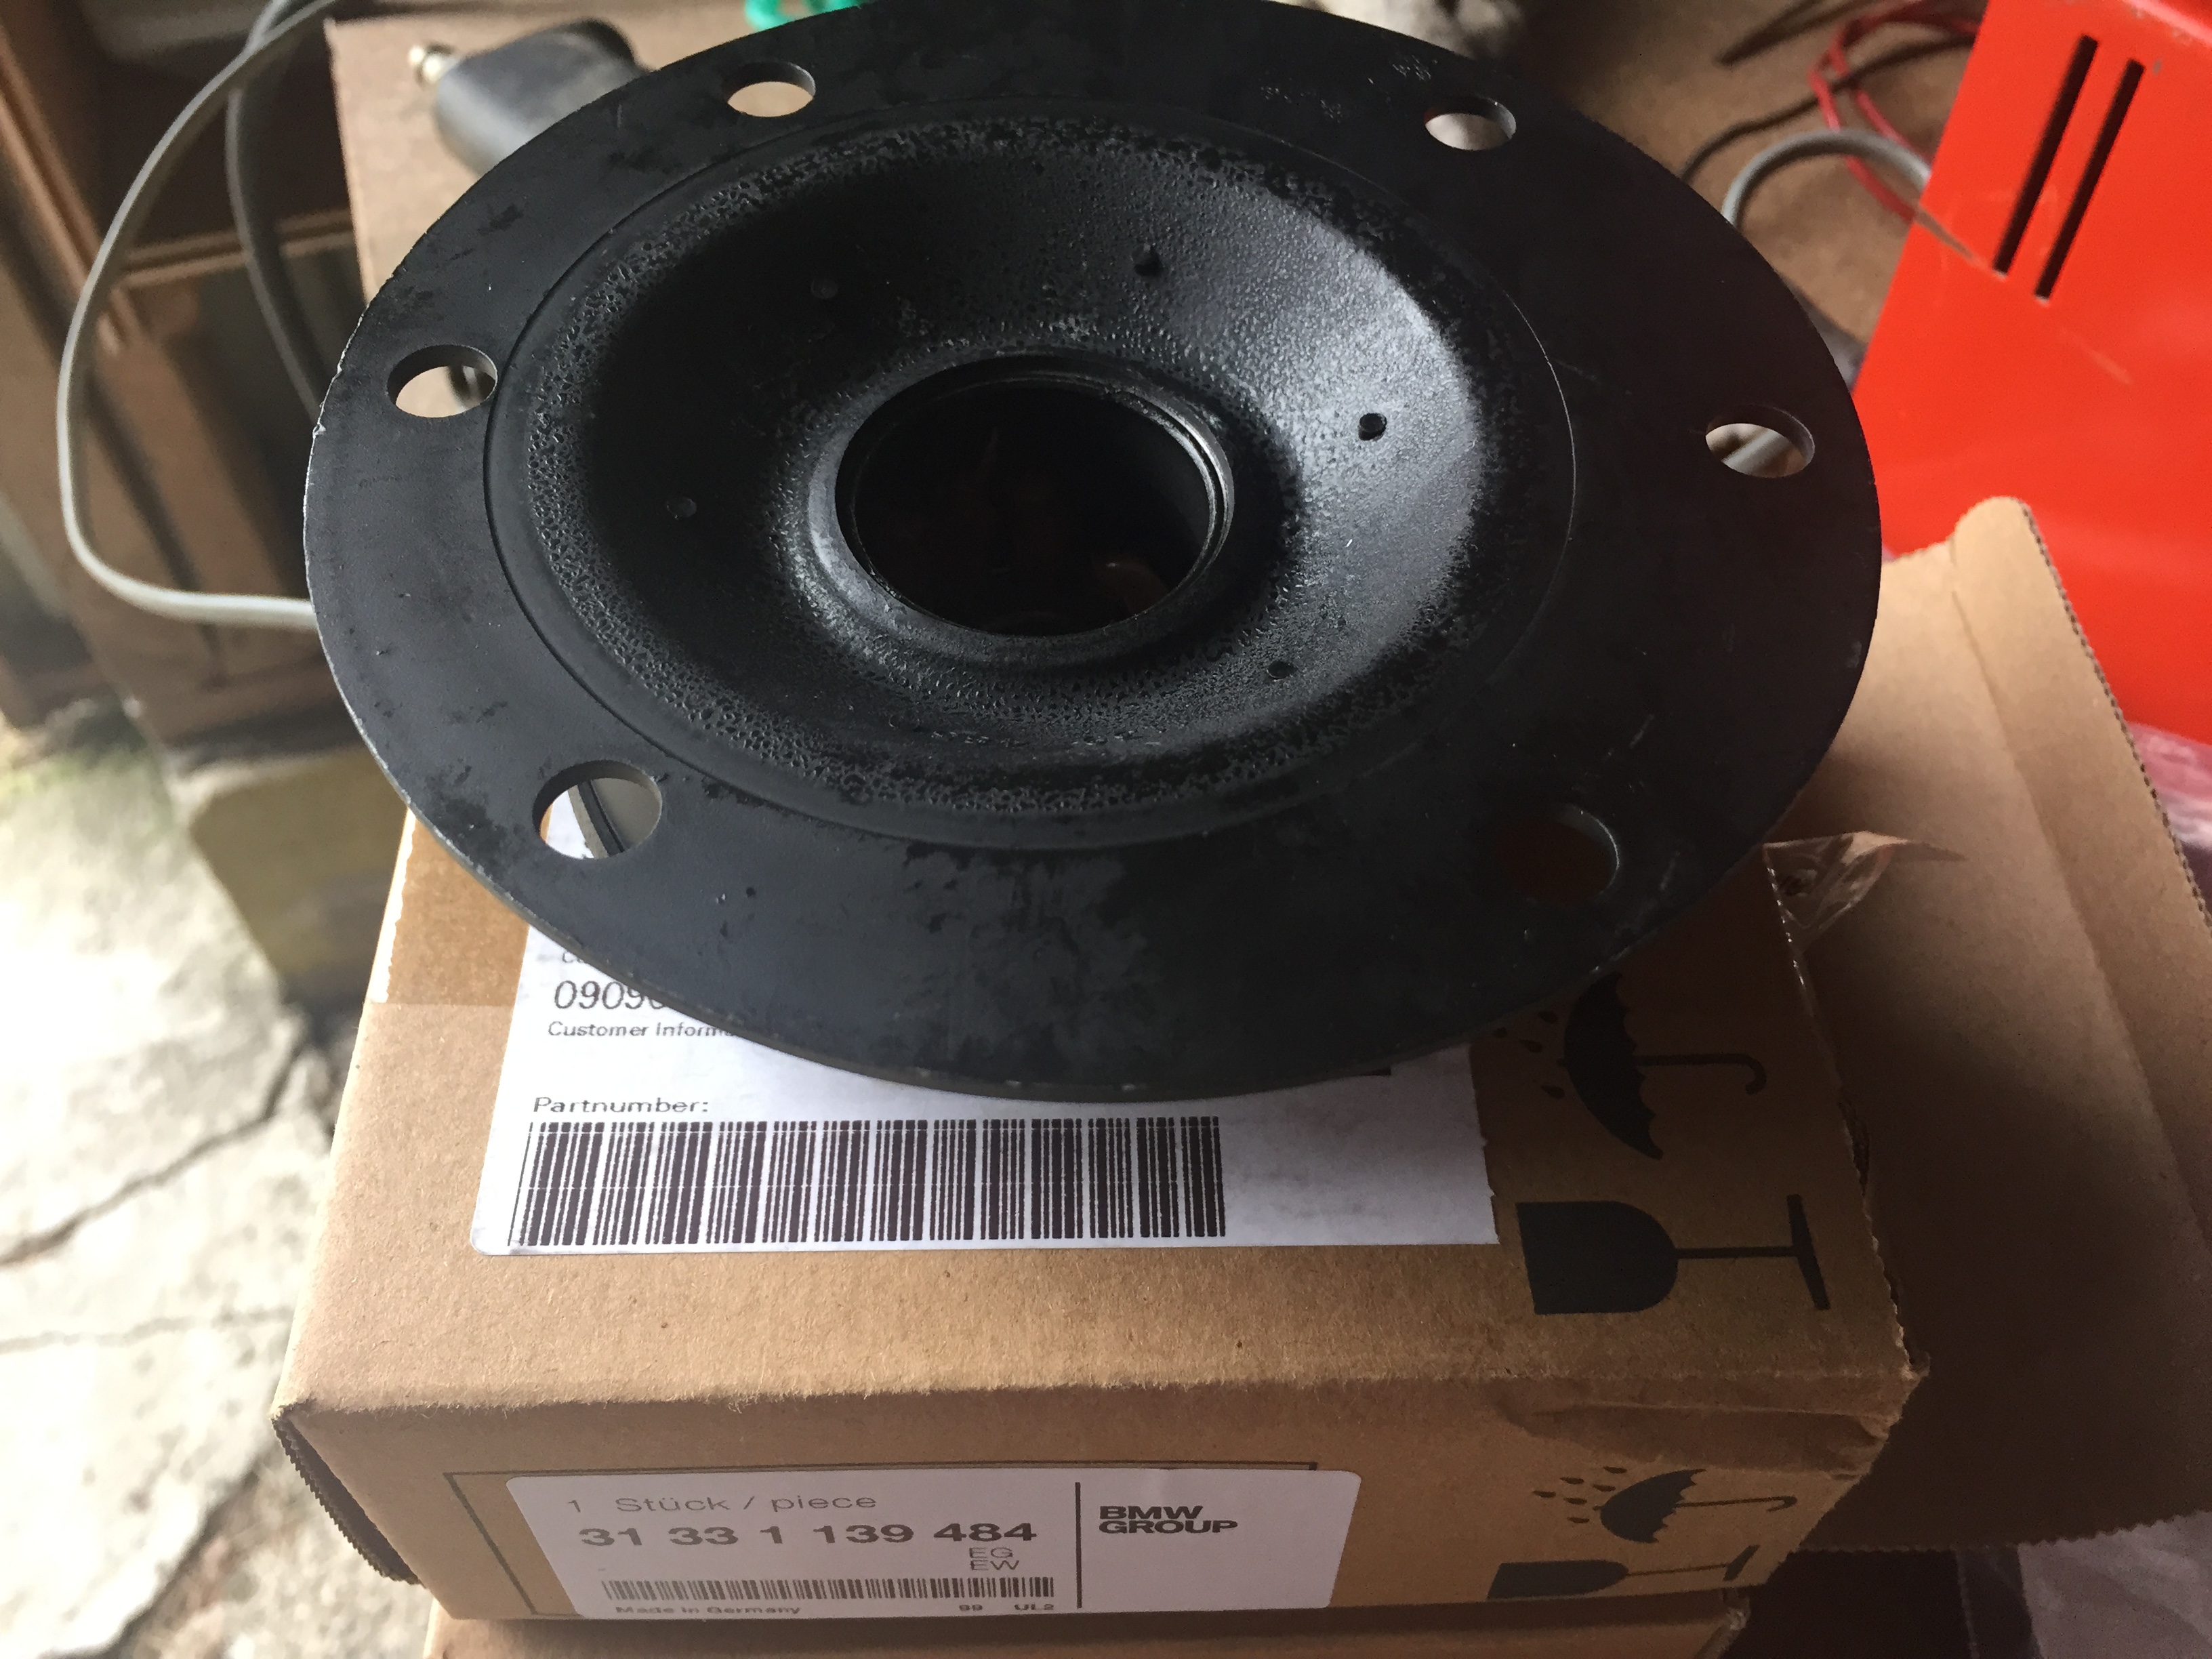
There was still too much negative camber on front tires, though raising fixed the issue on rear axle. The solution for front tires was to move upper strut outwards. Typically you have two options: either install an adjustable uniball strut mounts or select a fixed one. The advantage of uniball mounts is adjustability, but on the downside it will transfer more load and road irregularities to chassis. Uniball is great for a track use, but not so great idea for bumpy countryside roads. So I wanted rubber strut mounts that were able to adjust camber. The Solution was OEM BMW upper strut mounts with +/- 0,5 degrees of Camber Correction. These are more sturdy than OEM mounts, and raises your car a bit too. That was only welcomed feature for my E30, described on previous blog post. OEM part number for the rubber mounts is 31 33 1 139 484. Note: These OEM rubber mounts are actually more expensive than Uniball strut mounts.
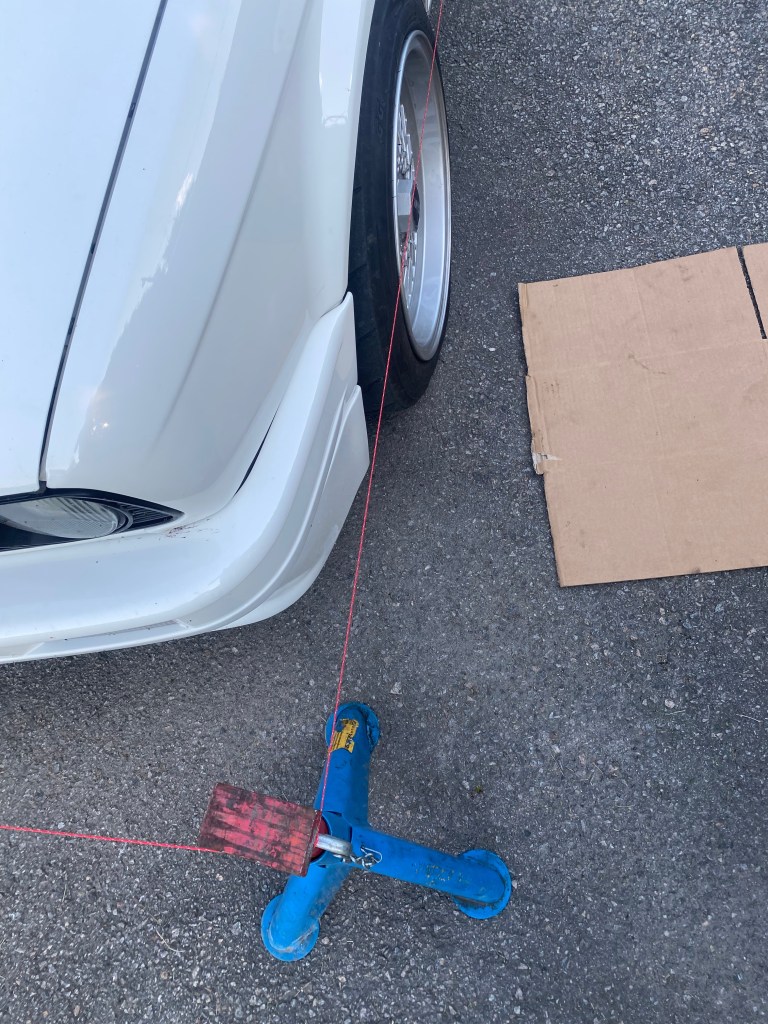
Actually, I never took my car into any car service for toe adjustment. Instead, I adjusted the toe manually. I set up a string in between pair of Jacks, and aligned them as close as possible to both rear and front wheels. Then measuring the toe was easy task by using a vernier caliper. I put toe to zero. It is a good compromise in between cornering and high speed stability. Using a string is quite simple method, and surprisingly accurate. Don’t laugh. They use this same trick for WRC cars too.
Take home points:
Looking cool is not equal to going faster.
Do not add too much negative camber for street use, it will only make your car unpredictable and dangerous.
Adjusting toe is surprisingly easy at home garage with pair of jacks, a string and a vernier caliper.
Choose upper strut mounts based on the usage. Rubber mounts can be better for street use, uniballs for track. Choose wisely.